Step 4 - Manage open Opportunity
Step 4 - Manage open opportunity
Notes
- Are suppliers supposed to receive a notification when a closing/termination date gets extended? Not automatically. You must create an Addendum using the Discussion Forum
Instructions
Follow the instructions in the sections below.
Inviting Suppliers to an Open Opportunity
Click to enlarge image
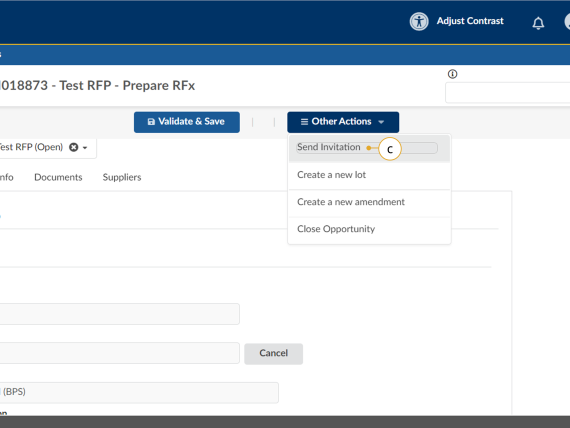
1. Optional: To add a Supplier to an open opportunity:
a. Add the new Supplier in the Add Suppliers menu.
b. In the left-hand menu, click Prepare RFx.
c. From the Other Actions drop down list, select Send Invitation.
Click to enlarge image
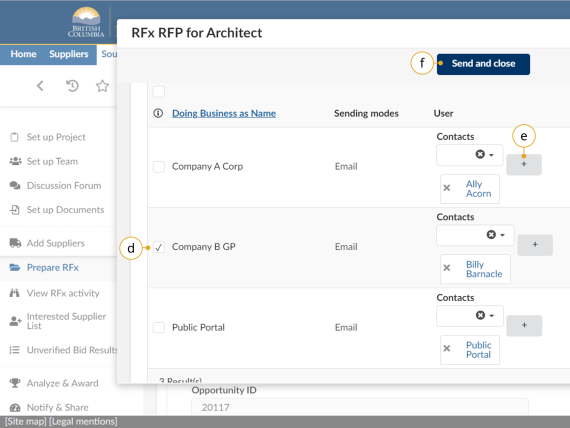
d. In the dialog box, select the new Supplier.
e. Optional: Click the + button to add a contact to the Supplier profile.
f. Click Send and close.
NOTE: Shell Suppliers will be marked with [SHELL (Unregistered) Supplier] to the right of the supplier name. Please do not invite a [SHELL (Unregistered) Supplier] to an invite-only sourcing project as these accounts cannot be used to log in and view the details of the opportunity. If you wish to invite a supplier to an invite-only opportunity they are required to register for their own account prior to being invited.
Creating an Addendum
An Addendum is created in the Discussion Forum to make minor changes or clarifications to an opportunity. Items that are changed via addendum could be: clarification on a requirement, responding to a Supplier question, and providing additional information with an additional document. Creating an addendum will not require suppliers to submit a new Submission. For more information, please see this comparison of Addenda versus Amendments.
Click to enlarge image
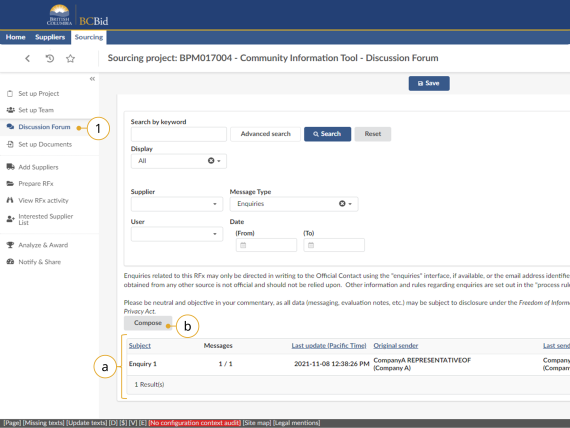
1. In the left-hand menu, click Discussion Forum.
a. To review an Enquiry, select the message in the messages table.
b. Click Compose to begin the Addendum.
Note: Keep "Public Portal" selected in the list of recipients to publish on the Addenda tab. Please refer to your Training Guide for more information.
Click to enlarge image
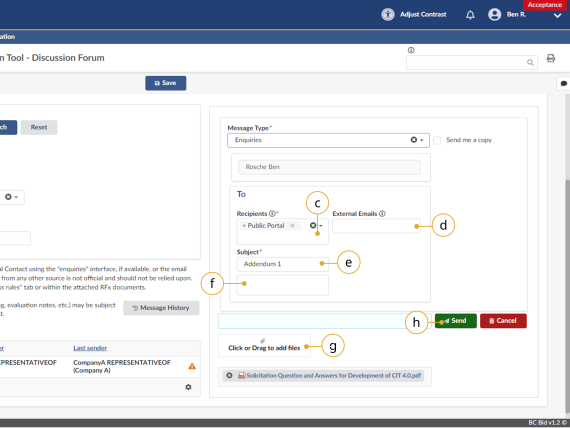
c. In the Recipients drop-down list, select Public Portal for publicly posted opportunities, or All Invited Suppliers for opportunities that are limited to specific suppliers. For the addenda to be visible to all team members, also add All Internal Team Members.
d. Optional: In the External Emails textbox insert an external email, if applicable.
e. In the Subject textbox, enter the subject of the addendum. This is visible on the Public Portal and Supplier Dashboard
f. In the second textbox below Subject, enter the description / content of the addendum.
g. Optional: Upload documentation related to the addendum. See the Discussion Forum section of Step 1 – Create Sourcing Project.
h. Click Send to complete the addendum.
Note: Suppliers will receive notification on an addendum if they have selected the Start Submission button and the message is sent to All Invited Suppliers. When issuing Addendums All Invited Suppliers includes any supplier who has hit start submission or has been added to any amendment/lot on your Opportunity. If it’s for an invite only downstream version of your Opportunity, choose each supplier individually.
Changes to Closing Date
Changes to the Closing Date must have an Addendum processed at the same time as a method to notify suppliers of the change. They do not require an Amendment. For more information, please see this comparison of Addenda versus Amendments.
Click to enlarge image
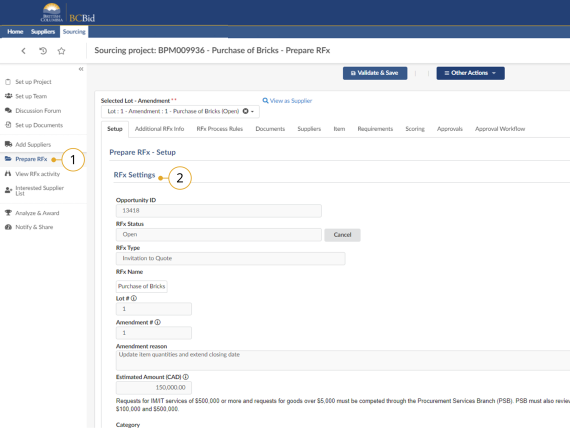
1. On the left-hand menu, click Prepare RFx.
2. Click the Setup tab.
Click to enlarge image
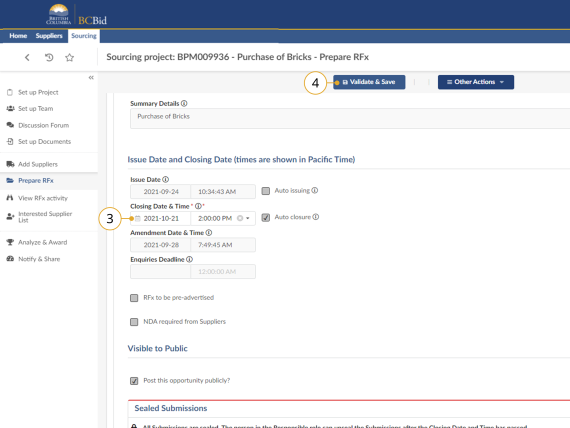
3. Update the Closing Date & Time.
Optional: At this time enquiries deadline can also be changed without creating a new amendment.
4. Click Validate & Save.
Click to enlarge image
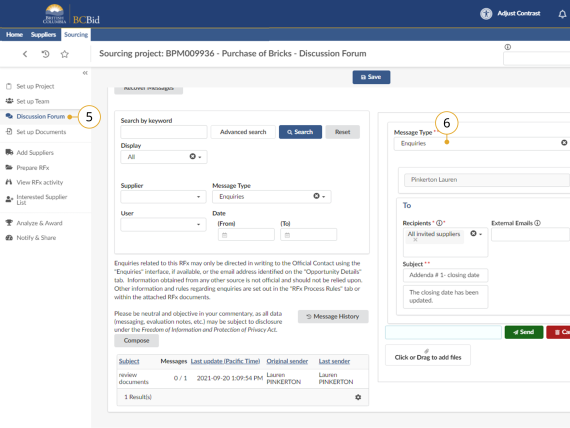
5. On the left-hand menu, click Discussion Forum.
6. Proceed with creating an addendum to notify suppliers of the change in closing date. See the steps for Creating an Addendum for more information.
![]()
Changes to Main Commodity or Other Commodities will require the posting of an Addendum as well.
Creating and Posting an Amendment
An Amendment is created to make changes to an opportunity that cannot be done through an addendum. Changes to the information in a document attached to an Opportunity is an example of an Amendment. Amendments will require Suppliers to submit new Submissions to the Opportunity. For more information, please see this comparison of Addenda versus Amendments.
Creating an Amendment
Click to enlarge image
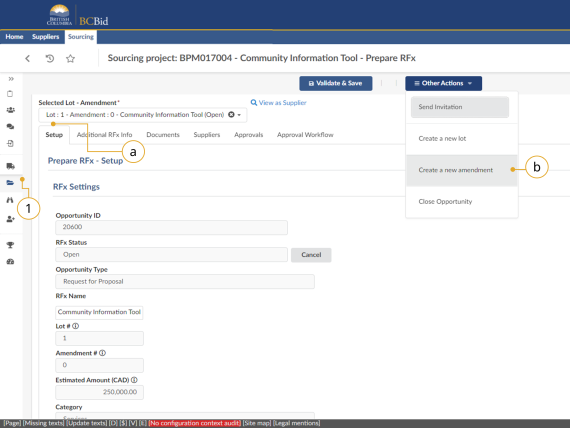
1. In the left-hand menu, click Prepare RFx.
a. Navigate to the Setup tab.
b. From the Other Actions drop-down list select Create a new amendment.
Click to enlarge image
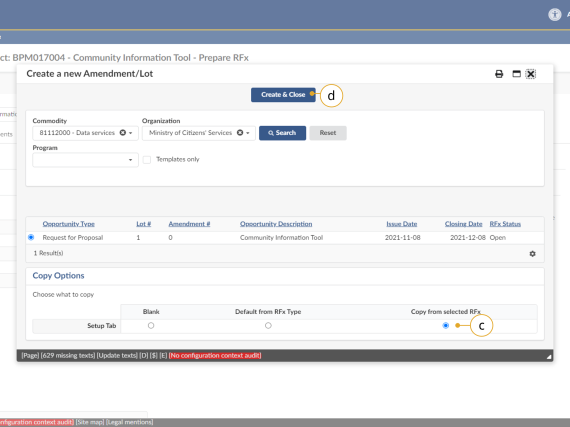
c. In the Create a new Amendment/Lot window, select Copy from selected RFx.
d. Click Create & Close.
![]()
Only select Copy from selected RFx. Do not select Blank or Default from RFx Type.
Click to enlarge image
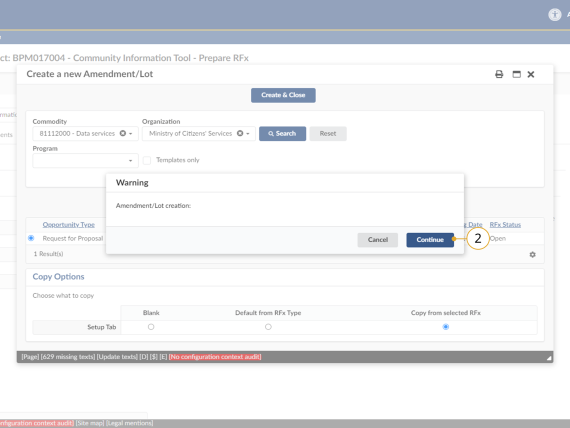
2. Click Continue.
![]()
Creating an amendment will cause any Submissions already received to be rejected, requiring vendors to resubmit their response. Submission submitted on previous amendment versions will not be able to be evaluated.
Click to enlarge image
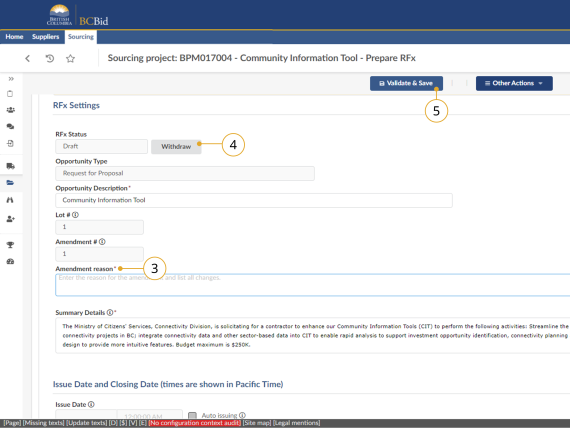
3. After amending the Opportunity, navigate to the Setup tab and enter the reason for the amendment in the Amendment reason textbox.
4. Optional: If the Amendment is no longer needed, click Withdraw to withdraw the draft Amendment. See Toggle Amendment or Lot steps below, if using.
5. Click Validate & Save.
![]()
Do not change the Opportunity ID with an Amendment.
Posting an Amendment
Click to enlarge image
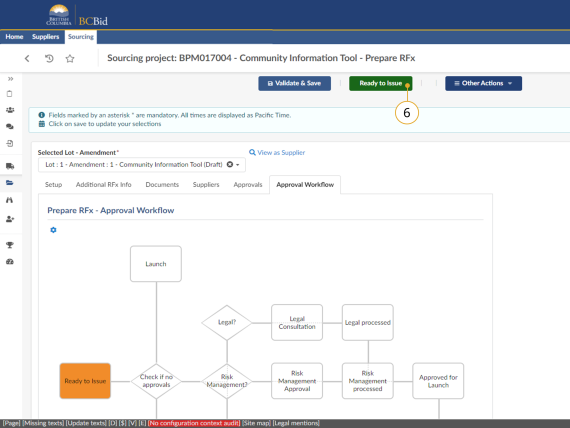
6. Click Ready to Issue.
![]()
If the Buyer wants to delete the Lot or Amendment they can do so prior to issuing using the Other Actions dropdown button.
Click to enlarge image
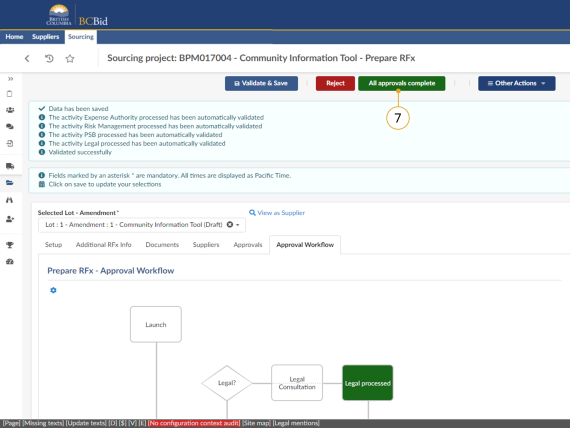
7. Select All approvals complete.
Click to enlarge image
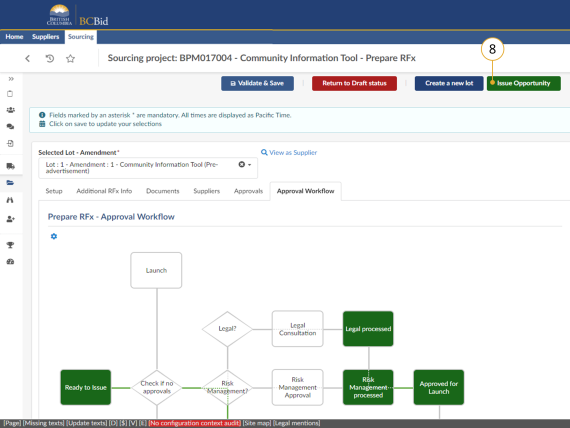
8. Click Issue Opportunity.
Click to enlarge image
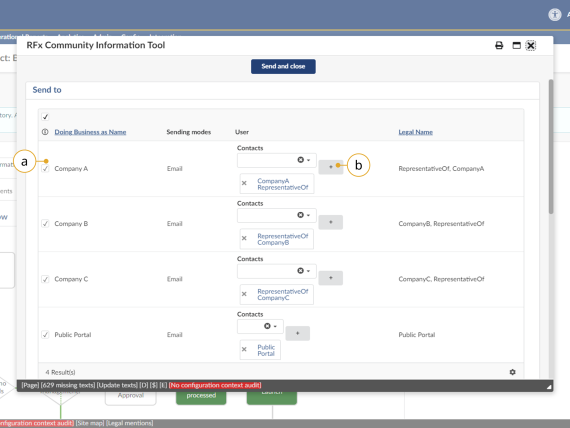
a. Optional: In the pop-up window, review the invited Suppliers and select or unselect the checkbox to ensure an invitation is sent.
b. Optional: In the User column, select the + icon if a contact is needed.
Click to enlarge image
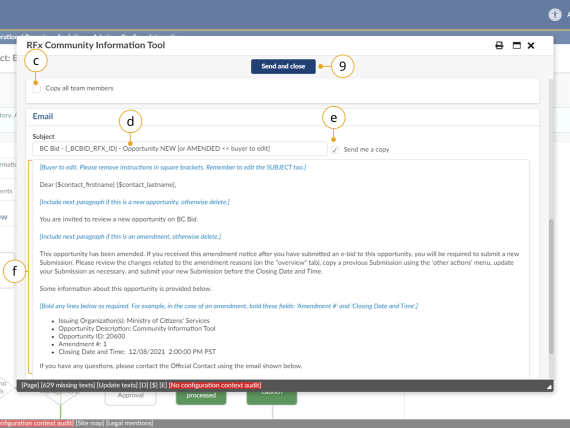
c. Optional: Click the Copy all team members checkbox to send the invitation to all team members.
d. Optional: In the Subject textbox, review the subject name.
e. Optional: Click the Send me a copy checkbox to receive a copy of the invitation.
f. Review the email and make edits according to the Blue text.
9. Select Send and close.
Click to enlarge image
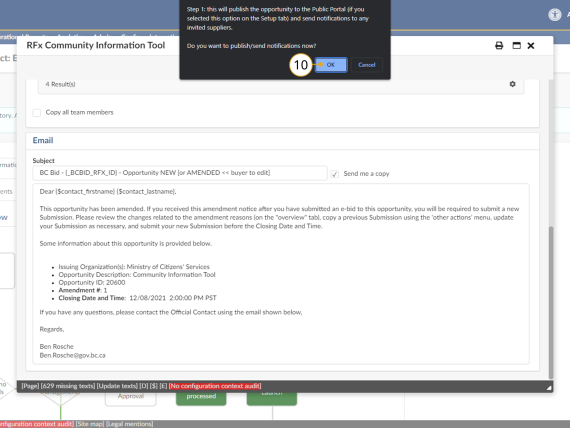
10. Click OK.
Click to enlarge image
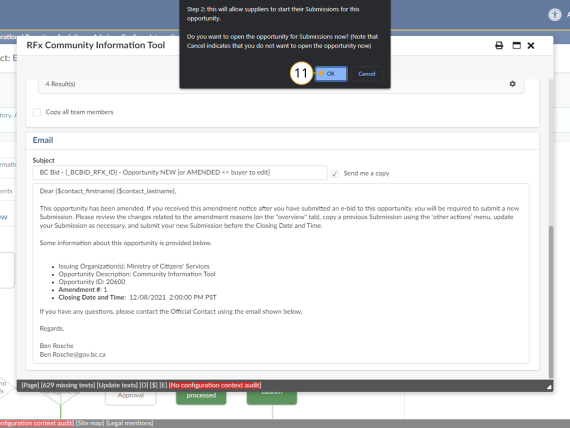
11. Click OK.
Toggle Amendment or Lot
Click to enlarge image
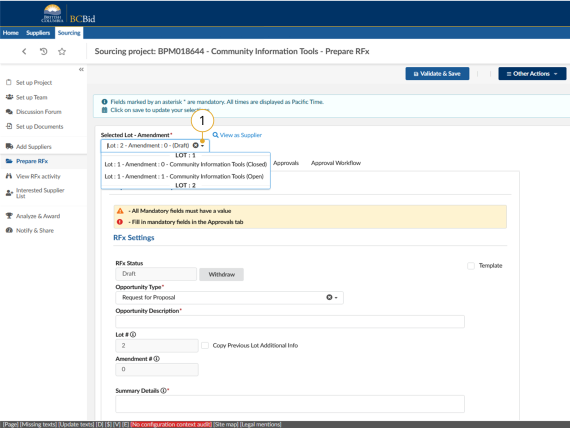
1. To toggle between amendments or lots choose the amendment or lot using the Selected Lot – Amendment dropdown.
![]()
See the Create New Lot section of Step 8 – Downstream activities for guidance on creating a new lot.
Amending a Qualified Supplier List Generating Opportunity
Buyers and Suppliers should be aware that when a multiuse list opportunity is amended the old version is closed and the Suppliers will see the amended version in their manage submissions queue. It will not impact their shortlisted status if a Supplier has already qualified, but because 'closed' versions of any opportunity are filtered out they'll see the amended version of the opportunity and it will look like they have not submitted anything. Suppliers can change the filters to see the old version of the opportunity.
To reassure the Suppliers, Buyers should contact the qualified suppliers to tell them that they are still shortlisted even though there was an amendment and it looks like they have not submitted/qualified.
Additionally, Buyers should add the Suppliers they want to the new version of the opportunity using the offline submission route. This will ensure the Supplier browse screen shows the suppliers did have submissions to that opportunity and are still shortlisted. This also ensures the Buyer has a view showing all shortlisted suppliers in the same list rather than spread across multiple versions of the opportunity. Anyone using the list in a downstream opportunity will see the full list imported into their opportunity, so this doesn't impact them.
Interested Supplier List
Click to enlarge image
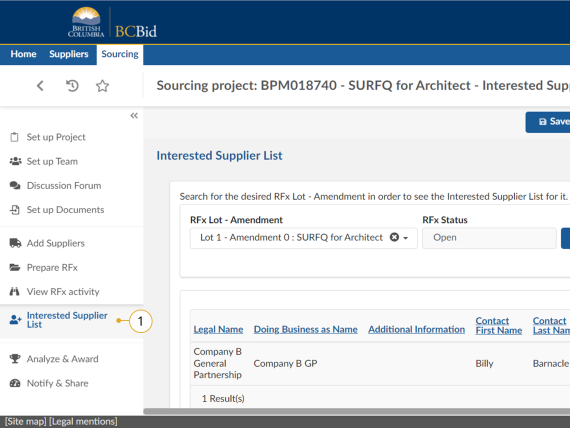
1. Optional: In the left-hand menu, click Interested Supplier List to review the list of suppliers who have joined the list of interested suppliers for this opportunity.
Note: This step is applicable only if the publicly available Interested Supplier List used for this RFx checkbox was checked in the Setup tab.
Review NDA
Click to enlarge image
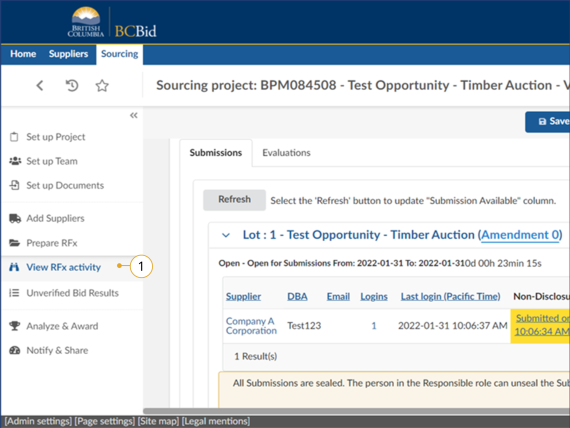
1. In the left-hand menu, click View RFx activity.
Note: This step is applicable only if the NDA required from Supplier’s checkbox was selected in Prepare RFx – Setup tab.
Click to enlarge image
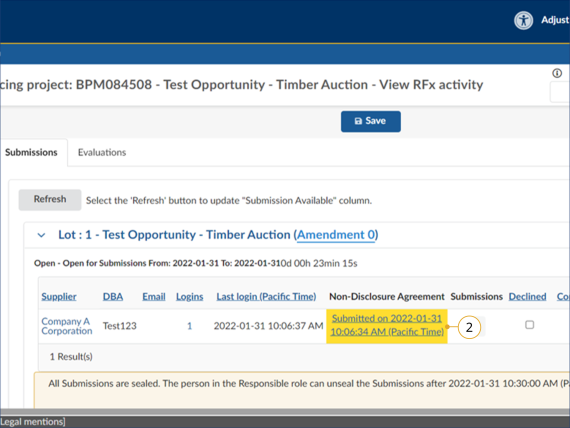
2. Click the NDA submission under the Non-Disclosure Agreement column.
![]()
If the Non-Disclosure Agreement column is not visible, select the Cog icon in the lower right corner of the table. Once selected, the user can change which columns are visible.
Click to enlarge image
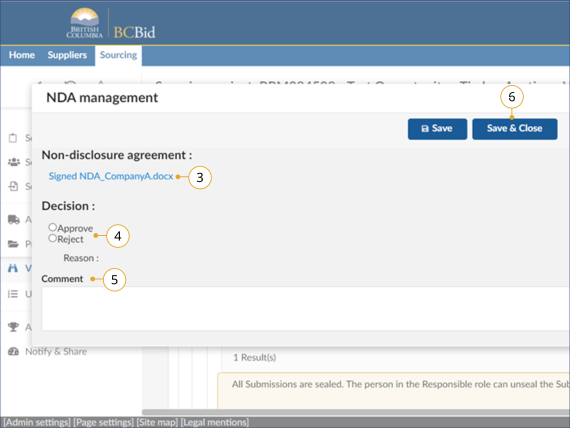
3. Download the Non-disclosure agreement.
4. Select Approve or Reject.
5. Enter a Comment if NDA submission is rejected.
6. Click Save & Close.
Upload Submissions to Open Opportunities
To upload a Submission received by hard-copy or email for open opportunities, such as the Request for Information, or Multi-Use List, follow the steps identified in Adding Suppliers Not on a Qualified List under the Add Suppliers section of Step 1 – Create Sourcing Project prior to the steps in this section. This section is not for contract-resulting Opportunities.
Click to enlarge image
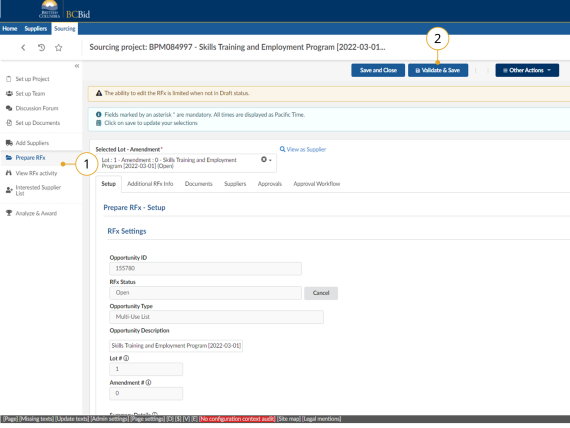
1. After adding the Supplier on the add Supplier tab, navigate to the Prepare RFx – Setup tab.
2. Click the Validate & Save button.
3. Complete the steps identified in the Upload Submissions section of Step 5 – Opportunity close.
Note: If the Validate & Save button is not selected “NA” will appear on the View RFx activity.

