Step 2 - Prepare RFx
Step 2 - Prepare RFx - How to Prepare RFx, MULRFQ Setup, Additional RFX Information, Documents, Approvals,
Instructions
Follow the instructions in the sections below.
Setup
This section is where all public or supplier facing information on the opportunity is inputted or uploaded. You will be working your way left to right through the tabs (e.g. Setup, Additional RFx; Documents; Suppliers; and Approvals and Approvals Workflow if needed).
Click to enlarge image
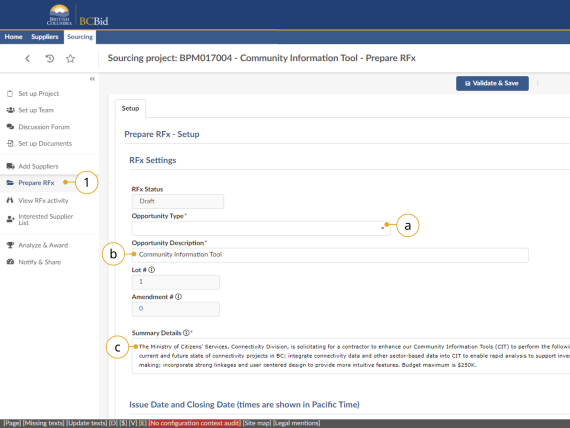
1. In the left-hand menu, click Prepare RFx.
a. In the Opportunity Type drop-down list, select the applicable Opportunity Type.
b. In the Opportunity Description text box, confirm the description of the opportunity.
c. In the Summary Details text box, enter a summary of the Opportunity.
Note: Once the Opportunity Type is selected and Validate & Save is clicked, the Opportunity Type cannot be changed.
Click to enlarge image
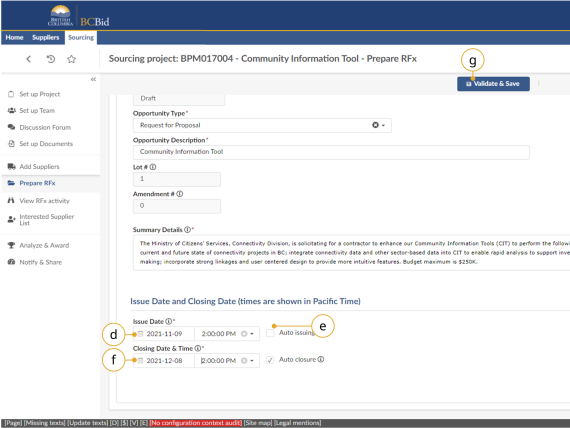
d. Select an Issue Date.
e. Optional: Click Auto issuing. If Auto issuing is selected, there will be no Ready to Issue button in Step 3 – Issue an Opportunity.
f. Select a Closing Date & Time.
g. Click Validate & Save.
Note: Auto issuing will automatically issue the opportunity to BC Bid at the selected Issue date & time, once all approvals are completed. For Multi-use List (MUL), see MUL Setup (next Section). If not, continue to the next page.
![]()
After your first Validate and Save, you may see alert/error messages related to incomplete mandatory fields in this and other tabs. Review other tabs and fill in fields. Validate and Save often. Mandatory error guidance will be visible on the Setup tab.
Continuing in the Setup tab.
Click to enlarge image
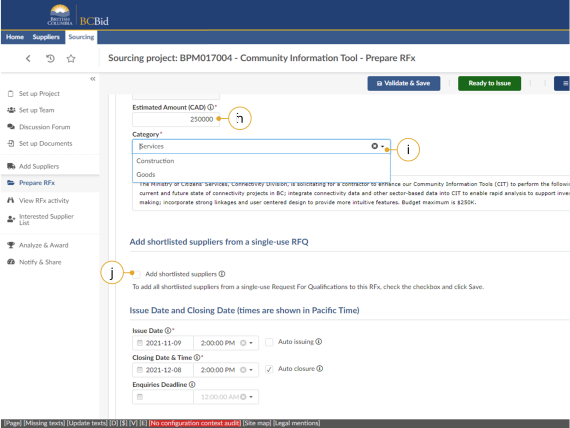
h. In the Estimated Amount (CAD) field, insert the estimated value of the end contract.
i. In the Category drop-down list, select a category.
j. Optional: Select the Add shortlisted suppliers checkbox, if the Opportunity is the Lot after a Single-use Request for Qualifications. See Create New Lot.
Depending on the Opportunity Type, a Buyer may not see all fields.
Click to enlarge image
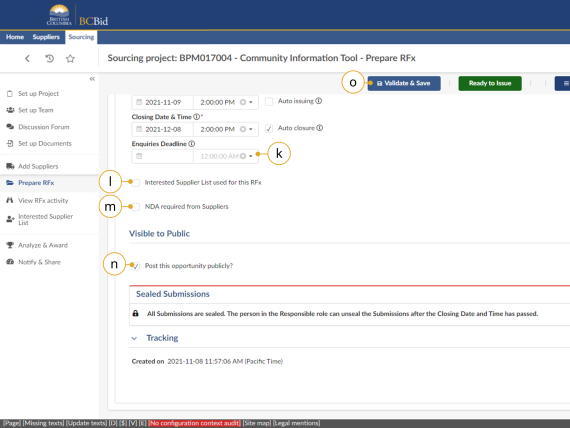
k. Optional: In the Enquiries Deadline field, select the deadline for submitting enquiries.
Note: if at a later time the closing date is extended, the enquiries deadline can be extended without an amendment.
l. Optional: If applicable to the Opportunity Type, select the Interested Supplier List used for this RFx checkbox to create a public facing interested suppliers list.
m. Optional: If an NDA is required, select the NDA required from Suppliers checkbox to add the NDA workflow to the Opportunity.
n. Optional: In the Visible to Public section, deselect the Post this opportunity publicly? checkbox. This step is for invite-only.
o. Click Validate & Save.
![]()
At this stage you will be prompted to complete all mandatory fields that can be found on the Additional RFx tab and the Approvals tab. For procurement processes that are not MUL, skip MUL Setup and see Additional RFx.
Multi-use List Setup
Click to enlarge image
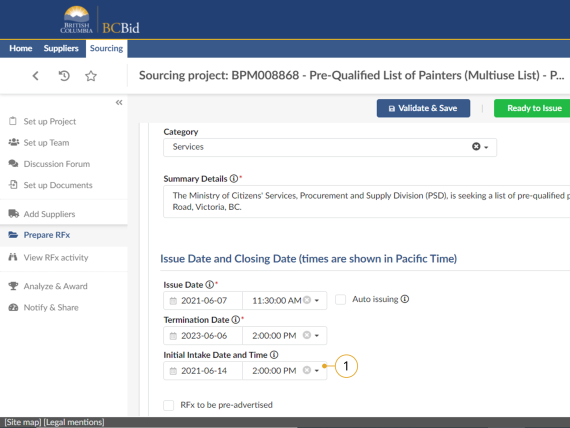
1. Optional: Select an Initial Intake Date and Time for the initial batch of submissions for evaluation.
Note: This date is visible to Suppliers.
Click to enlarge image
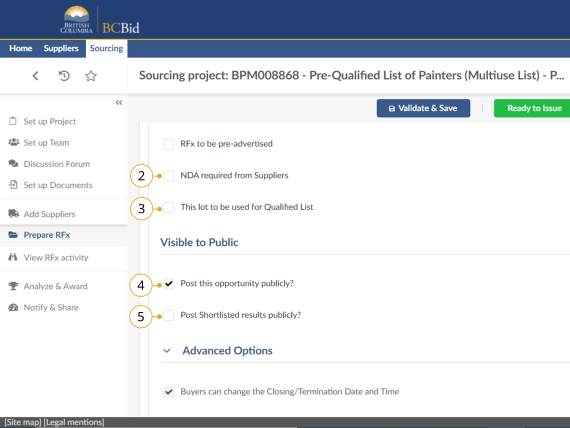
2. Optional: If a Non-Disclosure Agreement (NDA) is required for the Opportunity, select the NDA required from Suppliers.
3. Optional: Select This lot to be used for Qualified List checkbox if the MUL will have multiple lots or stages of evaluations
4. Optional: Select or unselect the Post this opportunity publicly? checkbox as appropriate.
5. Optional: Select the Post Shortlisted results publicly? if the results of the MUL are to be posted publicly.
![]()
RFx to be pre-advertised checkbox and the checkboxes under Advanced Options section are not to be used for MULs. To save all progress, Buyers must select Save before navigating to a different tab or menu. If the lot is to be used for Qualified List checkbox is selected, Buyer needs to state which ‘Lot’ will be the one where the final shortlisting will happen.
Additional RFx Info
Click to enlarge image
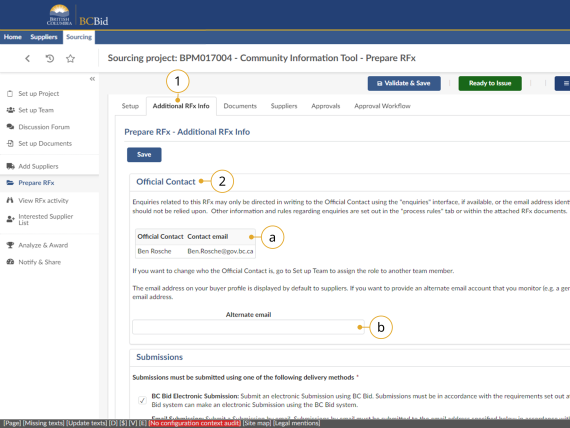
1. Click the Additional RFx Info tab.
2. Review the Official Contact.
a. To edit the Official Contact, click Set up Team and change the Official Contact.
b. Optional: Enter an alternate email, this will replace the default email address of the Official Contact.
![]()
The Save button is different than Validate & Save. Save will save the sourcing project without checking the template for errors. Validate & Save will only save if all mandatory fields are filled out correctly.
Click to enlarge image
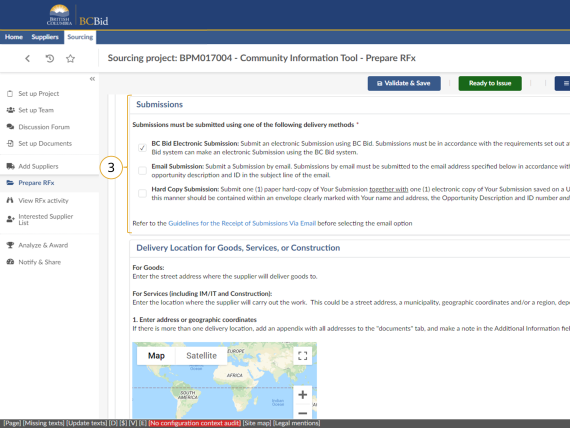
3. Within the Submissions section, select the delivery methods using the appropriate checkboxes. If Hard Copy Submission is selected, enter Physical Address for delivery. If Email Submission is selected, enter the email address for delivery.
Click to enlarge image
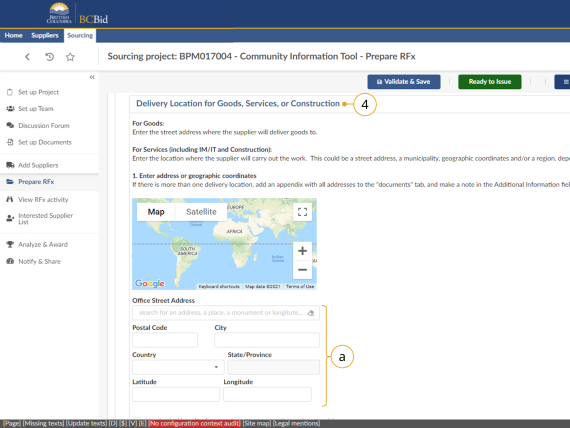
4. On the same page in the Delivery Location for Goods, Service or Construction section.
a. Enter a location.
Click to enlarge image
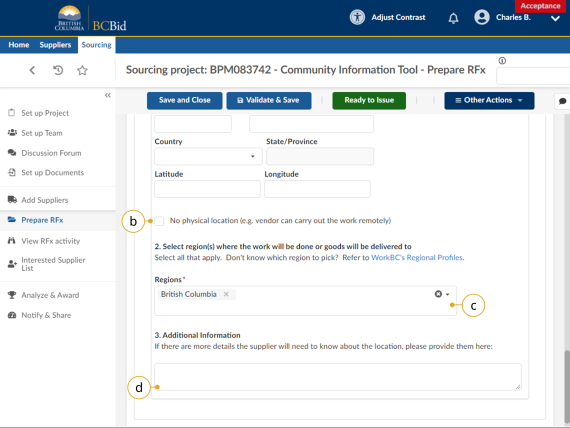
b. Select the No physical location checkbox if the work can be done remotely.
c. Select the Regions where the goods or services will be delivered from the drop-down list.
d. Enter any Additional Information as required.
Documents
Click to enlarge image
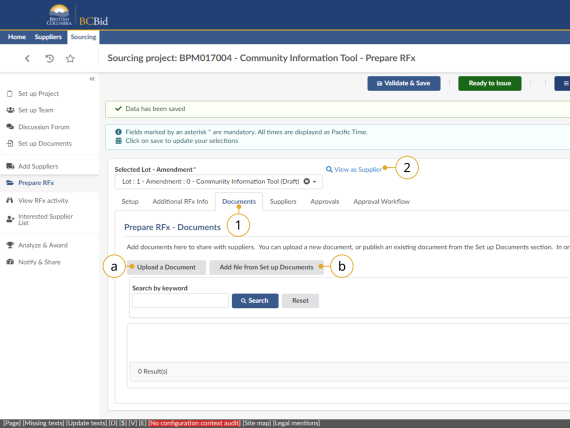
1. Click the Documents tab.
a. If adding a new document, click Upload a Document. Once selected, see Uploading Documents.
b. If adding an existing document, from the Set up Documents tab, select Add file from Set up Documents.
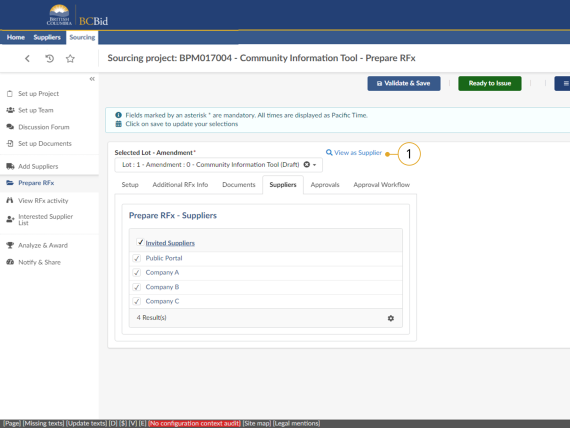
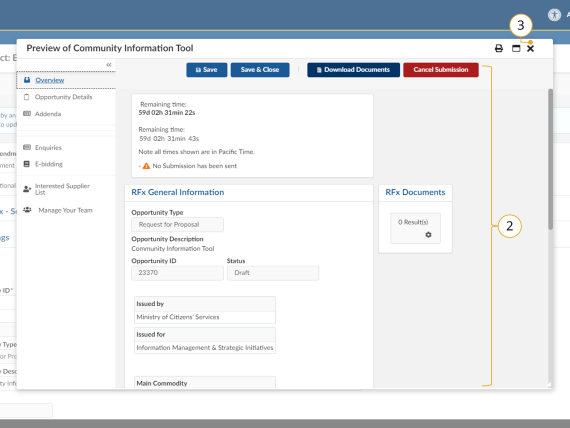
2. Optional: Click View as Supplier to review the Opportunity from the Supplier perspective.
![]()
Documents to be uploaded on the Documents tab must be in Approved status to be posted publicly. Documents uploaded on the Documents tab will also be visible in Set up Documents.
Uploading Existing Documents
Click to enlarge image
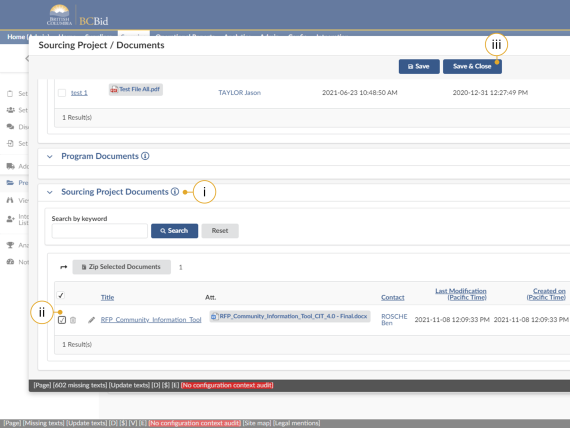
i. Navigate to the document(s) location.
ii. Select the checkbox next to the document(s) to be added from any of the lists on the Set up Documents tab.
iii. Click Save & Close.
Click to enlarge image
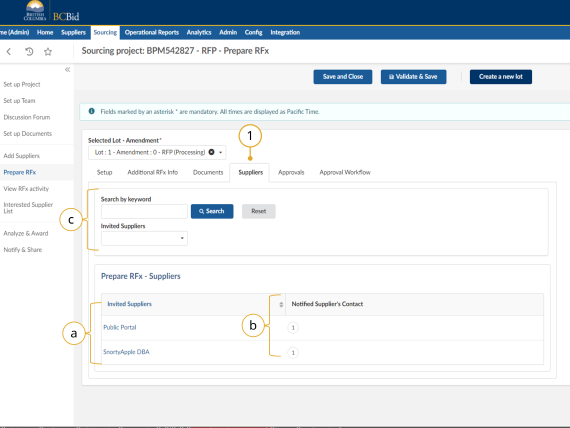
1. Optional: Click the Suppliers tab.
a. Review list of invited suppliers. Even if the opportunity isn’t posted publicly (from the Prepare RFx Setup tab) the Public Portal needs to be present to allow addenda to be visible to invited suppliers.
b. Notified Supplier’s Contact is an area of the Suppliers subtab that indicates if the supplier has been notified or not. A number 1+ in a circle being displayed indicates they’ve been notified, a 0 indicates they have not been notified and this will reset for each amendment. You can toggle between multiple amendments with the Selected Lot – Amendment dropdown.
c. You can search the list of invited suppliers based on keywords or invited suppliers.
Even if the opportunity isn’t posted publicly (from the Prepare RFx Setup tab) the Public Portal needs to be selected to allow addenda to be visible to invited suppliers.
![]()
This tab is a due diligence tab. On this tab the Responsible will ensure that the correct Suppliers are invited to the Opportunity.
Click to enlarge image
2. Optional: To add additional Suppliers, return to the Add Suppliers tab. See Step 1, Add Suppliers.
NOTE: When adding suppliers, Shell Suppliers will be marked with [SHELL (Unregistered) Supplier] to the right of the supplier name. Please do not invite a [SHELL (Unregistered) Supplier] to an invite-only sourcing project as these accounts cannot be used to log in and view the details of the opportunity. If you wish to invite a supplier to an invite-only opportunity they are required to register for their own account prior to being invited.
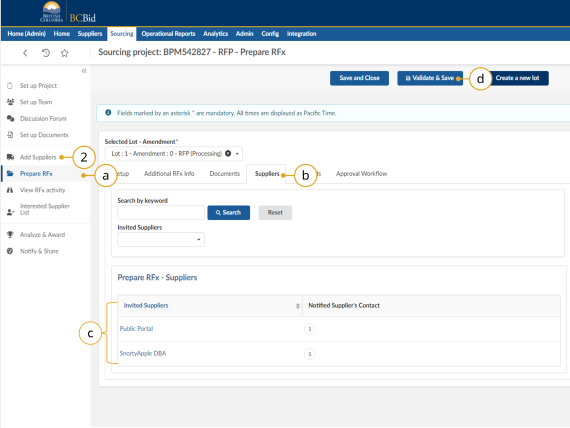
3. If additional supplier(s) were added on the Add Suppliers tab:
a. Click on Prepare RFx.
b. Click on Suppliers.
c. Confirm that the added supplier(s) is listed.
d. Click Validate & Save.
Note: If you hover over the number under the Notified suppliers column a small window will pop up showing the supplier contacts who have been notified.
![]()
If you do not complete the Validate & Save step, additional Suppliers will not be notified of the Opportunity.
Review what Invited Suppliers and/or Public will see
Approvals
Click to enlarge image
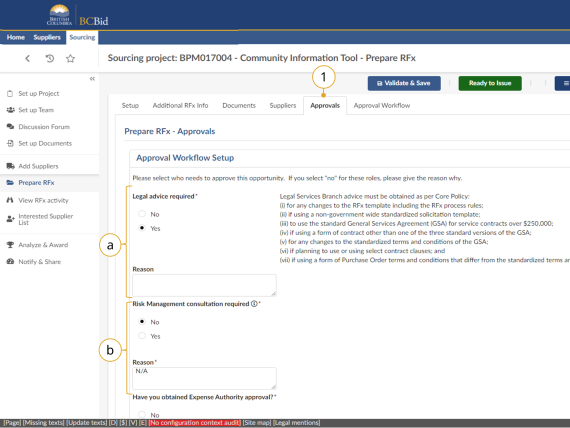
1. Click the Approvals tab.
a. Select No or Yes for Legal Consultation required.
If No, provide a Reason in the text box.
b. Select No or Yes for Risk Management approval required.
If No, provide a Reason in the text box.
If Yes, enter the name of the approver.
![]() Buyers may see different approval needs depending on the Opportunity Type. Additionally, Buyers may not see the Approvals or Approval Workflow tab for their Opportunity Type, if so, progress to Step 3 – Issue an Opportunity.
Buyers may see different approval needs depending on the Opportunity Type. Additionally, Buyers may not see the Approvals or Approval Workflow tab for their Opportunity Type, if so, progress to Step 3 – Issue an Opportunity.
Click to enlarge image
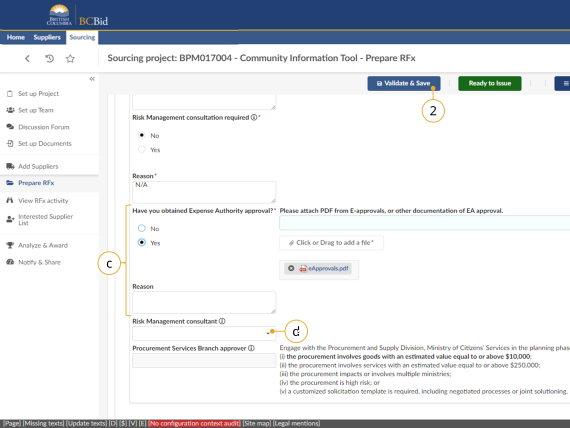
c. Select No or Yes for Expense Authority approval required.
If No, provide a Reason in the text box.
If Yes, attach PDF from E-approvals or other documentation of EA approval using the Click or Drag to add a file button.
d. If required, indicate the Risk Management consultant by selecting the name from the drop-down list.
2. Click Validate & Save.
Subscribe
Enter your email address to subscribe to updates of this page.

