Managing asset metadata and tags in CMS Lite
Adding metadata and tags to assets in CMS Lite makes digital files (like PDFs, Word documents, and images) easier to find, organize, and manage.
This page explains what metadata and tags are, how to use them, and how to tag assets as forms.
On this page
- What asset metadata and tags are
- Where to edit asset metadata and tags
- Add metadata to an asset
- Descriptions of metadata fields
- Using the Tags tab and tag collections
- Tag forms for the Forms search tool
What asset metadata and tags are
Metadata and tags are labels that give extra information about an asset, such as:
- What the file is
- It's purpose
- Who it's for
- Who created it
Adding metadata for assets is optional, but highly recommended. Adding metadata helps:
- Users understand what a file is about
- Systems organize and display files in search results
- Teams reuse and manage content more easily
Your team or ministry may have specific guidelines for which fields to complete. If you're not sure, check with your content team.
Best practices for metadata
To get the most benefit from metadata:
- Be accurate: Use terms that clearly describe the asset’s content, purpose, or audience
- Be consistent: Use the same formats and terms across similar assets
- Be complete: Fill in as many relevant fields as possible
Learn how to create quality metadata
Improve search results using metadata
You can use metadata and tags to help your assets appear in the right search tools.
For example:
If you tag an asset with Content type: Form, it will show up in the Forms search tool.
Where to edit asset metadata and tags
You can manage metadata and tags for an asset in two places:
- Metadata tab: standard fields like content type, description, subject, keywords, audience, and more
- Tags tab: custom tag collections created by your ministry or program area
These are found in the asset settings panel when you open a file in the Assets tab.
Bulk tagging assets
You can apply the same metadata or tags to multiple assets at once. This is useful when working with large sets of similar files.
Bulk tagging can overwrite existing metadata. Review your assets before using this feature.
- See the bulk tagging section for details
- To view an example of bulk tagging, learn how to bulk tag forms
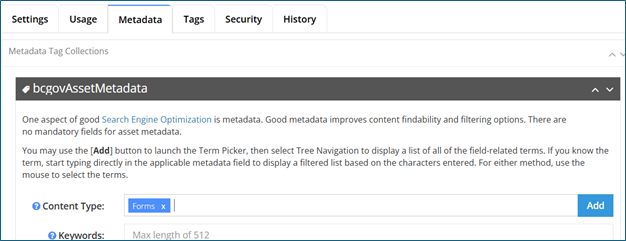
How to add metadata to an asset
You can add or edit metadata in the asset's Metadata tab. This includes fields like description, content type, keywords, and audience.
Click images to view full size
There are two ways to add terms to most metadata fields:
Option 1: Start typing in the field
-
Click inside a field
-
Start typing to filter available terms
-
Click on the term you want to apply

Option 2: Use the term picker
-
Click the Add button beside a field
-
Use the term picker to search or browse for the correct value
-
Click Select to apply the term

Some fields only allow one value. Others let you select more than one.
Descriptions of all metadata fields
There are 12 fields available in the Metadata tab. Some are free text fields, while others use predefined options from a controlled vocabulary (taxonomy).
In CMS Lite, you can hover over the ? icon beside each field for help.
| Field name | How to use it |
|---|---|
| Audience | Define the target audience (multiple values allowed) |
| Content type | Choose what type of content it is (default is "General Content") |
| Creator | Ministry, department, or branch responsible for the asset (defined list, only one term allowed) |
| Description | Brief summary of what the file is. The first few words should clearly describe it. This is often shown in search results.
|
| Keywords | Use relevant and concise phrases, separated by commas.
|
| Language | Identify the asset’s language. English is the default. You can add more than one language. |
| Publication date | Optional - Supports search filters and shows when the asset was published. |
| Security classification | Select a value based on the the Information Security Classification Framework (PDF) (defined list of options, example: 'Public') |
| Security label | Choose a label that matches the asset’s security level, aligning with the Information Security Classification Framework (PDF). (defined list of options, example: 'Low') |
| Subject | Further defines the classification from the subject category, such as ‘Adult education’ (Defined list, multiple values allowed) |
| Subject category | Broad classification category, such as ‘Education and Training’. (Defined list, multiple values allowed) |
| Synonyms | Add alternate search terms to help users find the asset even if those words don’t appear in the file content.
|
Using the Tags tab and tag collections
The Tags tab in CMS Lite lets you apply a tag collection to an asset. Tag collections group assets by topic, program, or service area.
Why use tag collections
Tag collections help:
- Improve filtered search results
- Group assets for publishing, sorting, or tracking
- Align metadata standards across programs and ministries
They're most often used for tagging documents, forms, or resources tied to a specific campaign or service area.
How tag collections work
Each collection includes one or more fields, which may use:
- Dropdowns with pre-set options
- Controlled vocabularies (term pickers)
- Free-text fields with character limits
Add a tag collection to an asset
To add a tag collection to an asset:
- Open the asset in CMS Lite
- Go to the Tags tab
- Click Add Tag Collection
Click images to view full size
- Search or browse for the right collection in the Tag Picker
- Click Select

- Fill in the fields in the collection, as needed
- Save and publish your changes
Fields marked with an asterisk (*) are required. You must complete all required fields to publish the asset.

You can only apply tag collections if your team uses them. Only authorized users can create or manage collections, following guidance from Corporate Online Services.
To request a new tag collection or update an existing one, contact gdx.servicedesk@gov.bc.ca.
How to tag forms for the Forms Search tool
To make your form appear in the Forms search tool on gov.bc.ca, you must set the asset’s content type to “Forms” in CMS Lite.
You can either tag each form individually, or tag multiple forms at once.
Which assets should be tagged as a form
Tag an asset as a form if someone is expected to fill it out or use it to provide information. This includes:
- Forms that users fill out and submit (PDFs, Word forms, templates)
- Worksheets or templates that users attach to another form (such as Excel files for financial details or supporting information)
- Checklists that help the user complete a submission (even the checklist won’t be submitted)
If the file asks for input or supports a form submission, it likely qualifies as a form.
Only tag sample forms in guidebooks or other large documents when the form isn’t available as a separate file.
How to tag an individual form
To tag a single form so it appears in the Forms Search tool:
- In CMS Lite, locate your form in the asset folder
- Click the Settings button to open your form
- Go to the Metadata tab
- In Content Type, click Add
- Type or select Forms, then click Select
- Save and publish your changes
Add unique, descriptive metadata
In search results, users won’t see the webpage the form came from. They may also see many unrelated forms from different programs. To help them understand what your form is, add clear, specific metadata:
- Title: Update the title to include the full document name and number (settings tab)
- Description: Explain what the form is for, who it’s for, and the situation it applies to. Be specific
- Keywords: Add keywords that match what users might type in search. Include form number, full title, common alternate names or phrases, and key subjects or services
- Creator: Add the ministry or program that owns or processes the form
Example of asset metadata
- Title: CF1303, Grant application for additional childcare spaces
- Description: Use this form to apply for funding to expand licensed childcare spaces through the Community Child Care Space Creation Program.
- Keywords: CF 1303, Grant application, childcare funding, space creation grant, child care spaces, request funds
- Creator: Ministry of Education; Childcare BC
How to bulk tag multiple forms
Bulk tagging lets you apply metadata to multiple assets at once. This is useful if you have many forms in the same folder.
Be careful with bulk tagging
Be careful when bulk tagging, as it can remove existing metadata. To avoid losing data, always double-check your assets before bulk tagging.
- It only changes the fields you edit. Any fields you leave blank will stay the same
- It overwrites anything already in the Content type field (such as 'Application' or 'Permit')
- Can remove important data if used incorrectly
For more details, learn more about bulk tagging in CMS Lite
Never bulk tag content pages. You could lose keywords or other important info. Edit those one at a time.
Steps to bulk tag a folder of forms
- Go to the asset folder in CMS Lite
- Set Results Per Page to 250 if there are many files

- Back at the top, click the checkbox in the header row to select all visible files

- Individually deselect any files that aren't forms
- Click the “Bulk Tag” button

- In the Metadata tab, add Forms to the Content Type field
- Scroll down to the bottom to check if there are more pages of files
If there are multiple pages, repeat steps 3 to 6 for each page
- Scroll down and click Save
- Publish your changes
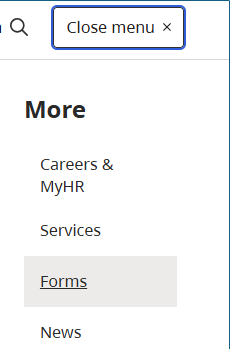
How to find the Forms Search tool
To find and use the Forms search tool:
- Go to gov.bc.ca
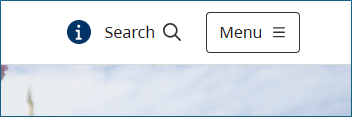
- Click the Menu in the top right next to the Search button
- Click Forms
- To see all tagged forms, type All in the search tool and click Search