Account management
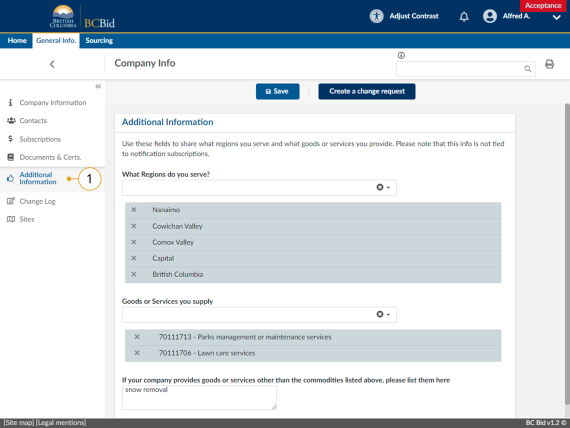
The person with the Supplier Admin role is responsible for keeping the company information up to date. Updates to the Company Information can be done through the Company Profile.
Company information
Click to view larger image
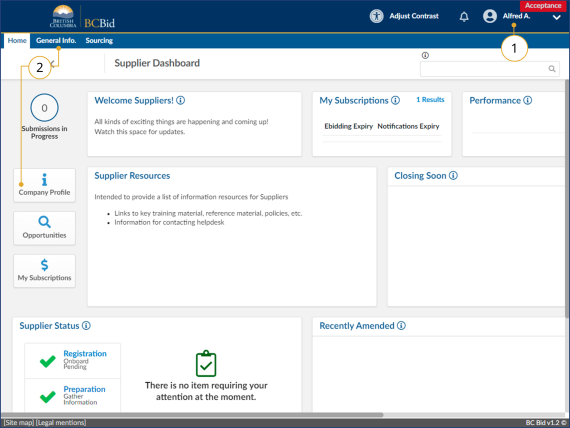
1. Log in to BC Bid as the account with the Supplier Admin privileges.
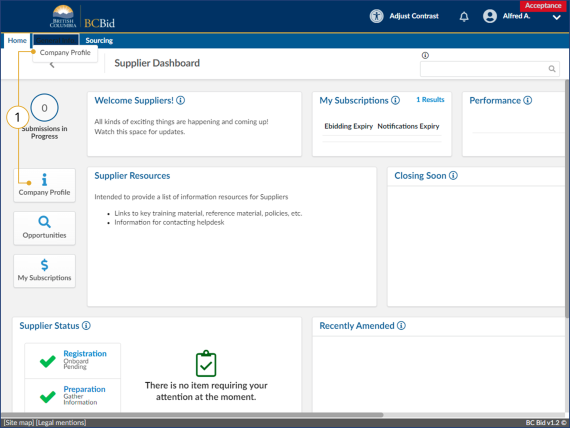
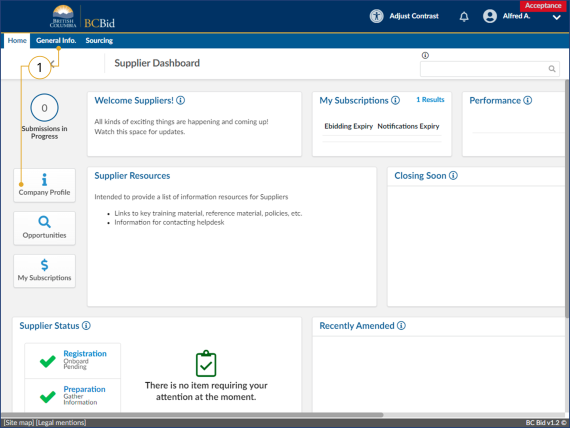
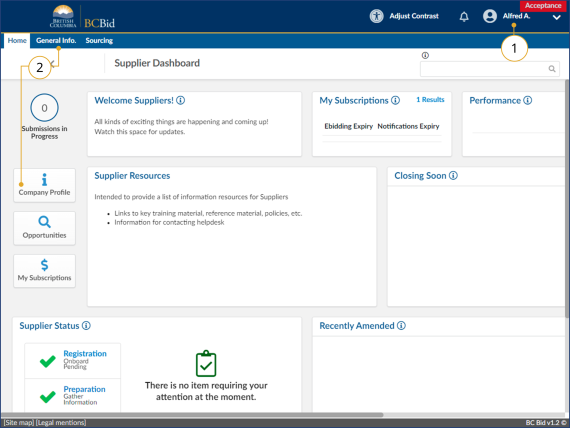
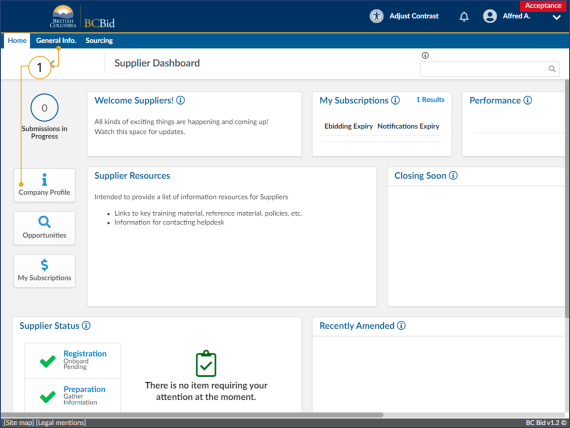
2. On the main menu, either click General Info and then select Company Profile, or click Company Profile from the left side of the Supplier Dashboard.
Click to view larger image
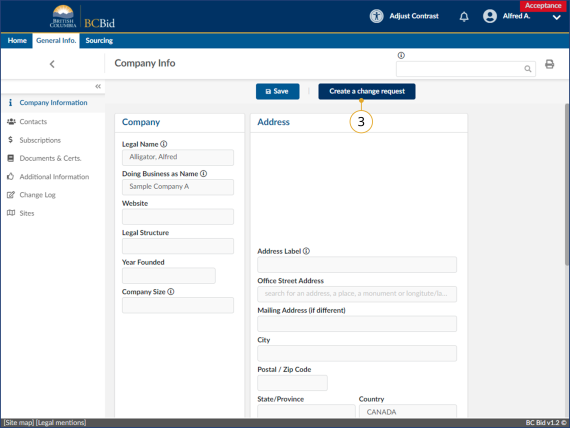
3. If an update to the Company Information is needed, click Create a change request.
Click to view larger image
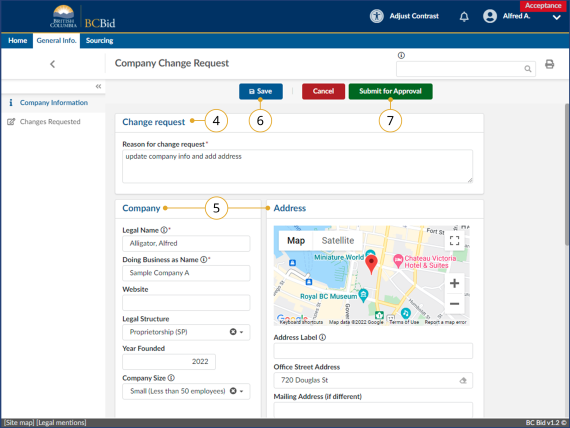
4. In the Reason for change request text box, enter the reason for the change.
5. Update the related company information in the boxes below.
6. Click Save.
7. Click Submit for Approval once complete.
8. The BC Bid Help Desk will review and approve any change requests.
Click to view larger image
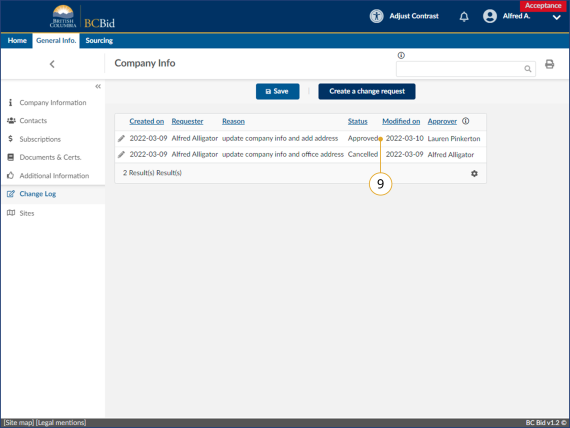
9. Once approved, the change log will update to a status of Approved.
If a Change Request is saved and not submitted, it can be retrieved from the Change Log. From the Change Log, it can be submitted or cancelled.
Contacts
Table of Contents
- Add additional users in BCeID and Register in BC Bid
- Approve additional users
- Assign the supplier admin role
- Edit user information
- Remove User
Add additional users in BCeID and Register in BC Bid
Adding additional users as a contact allow for multiple users within the same organization’s site to collaborate on submissions in BC Bid by using the Manage Team menu when responding to an opportunity. Each user will use their own BCeID to access BC Bid.
To create additional users, log in to the BceID system as the Business Profile Manager or Business Accounts Manager.
1. Create new BceID user account(s).
2. Assign a user ID(s) and create password(s).
3. When the new user(s) logs in to BC Bid, they will follow the steps for First Log in for Additional Users.
4. The Supplier Admin will Approve the Additional User in BC Bid.
If a company has multiple Supplier sites, all contacts belong to the main site and the Supplier Admin will add contacts to the other sites.
Approve additional users
Click to view larger image
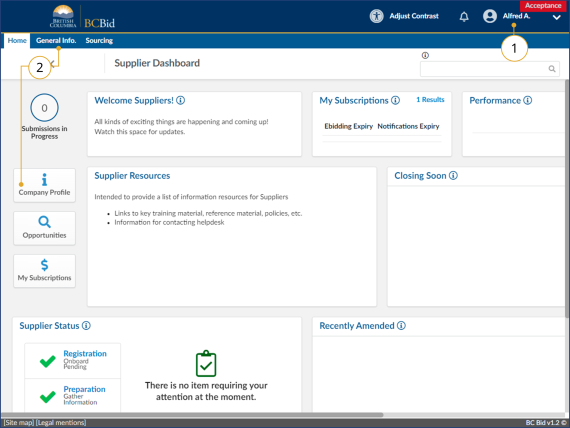
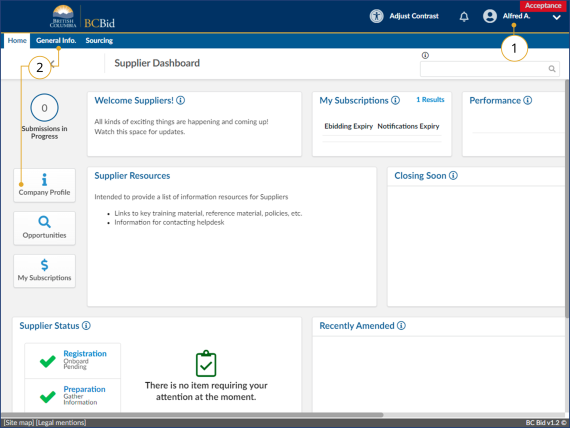
1. Log in to BC Bid as the account with the Supplier Admin role.
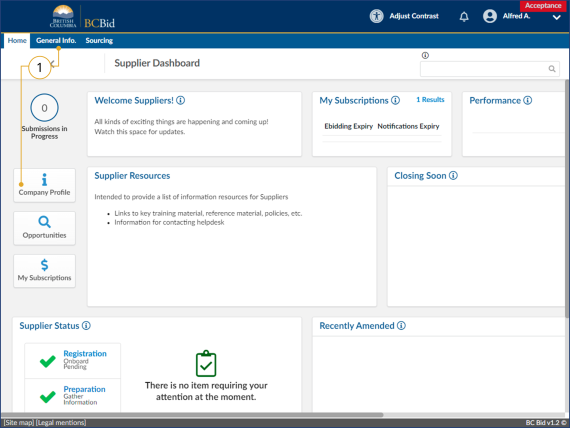
2. On the Supplier Dashboard, click Company Profile or on the main menu, click General Info, then Company Profile.
Click to view larger image
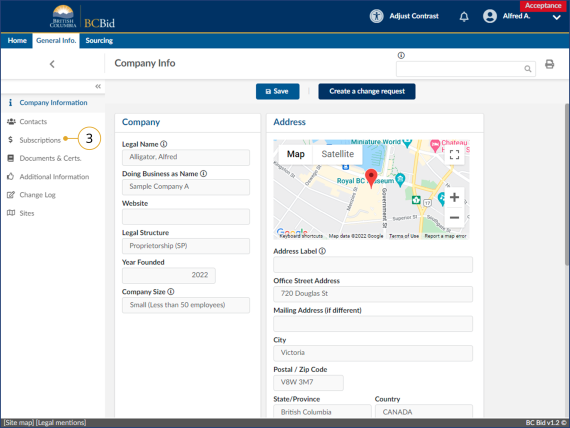
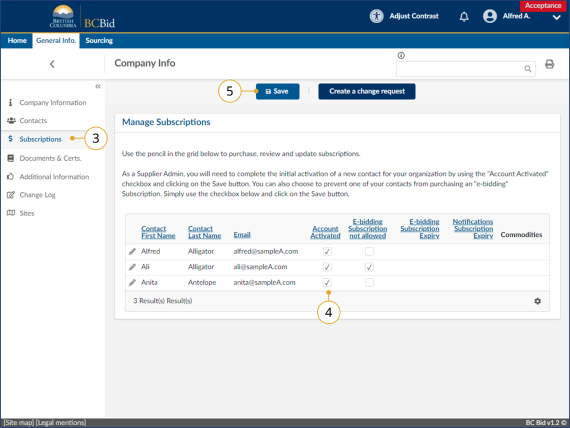
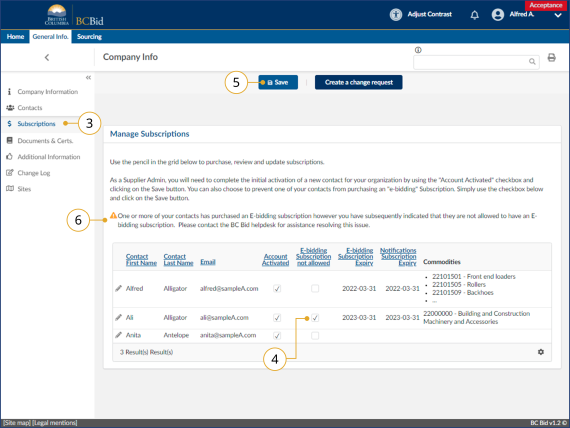
3 . In the left-hand menu, click Subscriptions.
Click to view larger image
4. In the Account Activated column, select the appropriate checkbox to activate the account.
5. Optional: To prevent a user from purchasing an e-Bidding subscription, in the e-Bidding subscription not allowed column, select the appropriate checkbox.
Note: e-Notification subscriptions may still be purchased by the user.
6. Click Save.
Assign the supplier admin role
The Supplier Admin manages administration, including creating/ managing supplier (BCeID and BC Bid accounts), activating new users and allowing e-Bidding privileges.
Click to view larger image
1. Log in to BC Bid as the account with the Supplier Admin privileges.
2. On the Supplier Dashboard, click Company Profile or on the main menu, select General Info, then Company Profile.
See Appendix 3 and Appendix 4 for information on Supplier admin and Additional User responsibilities.
Click to view larger image
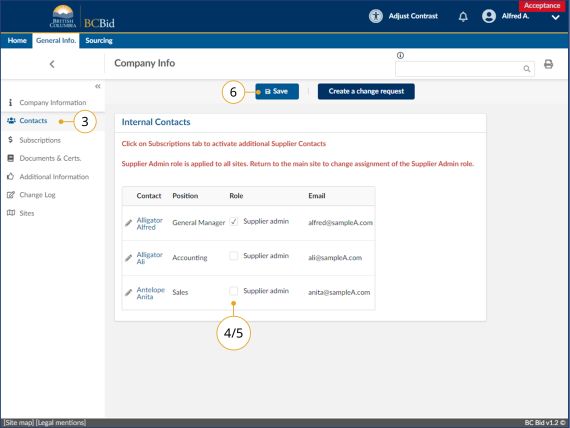
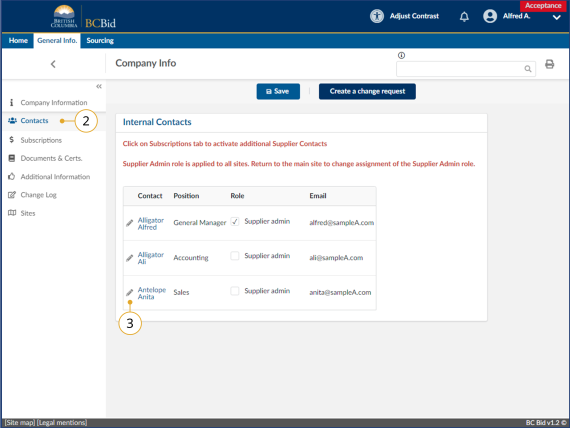
3. In the left-hand menu, click Contacts.
4. In the Role column, select Supplier admin checkbox for the contact to receive the role.
5. To remove the Supplier admin role from a contact, uncheck the checkbox.
6. Click Save.
There can only be one contact assigned the Supplier Admin role.
Edit user information
Click to view larger image
1. On the Supplier Dashboard, click Company Profile or on the main menu, select General Info, then Company Profile.
Users can edit their own information and the person with the Supplier Admin role can edit the information for all users.
Click to view larger image
2. In the left-hand menu, click Contacts.
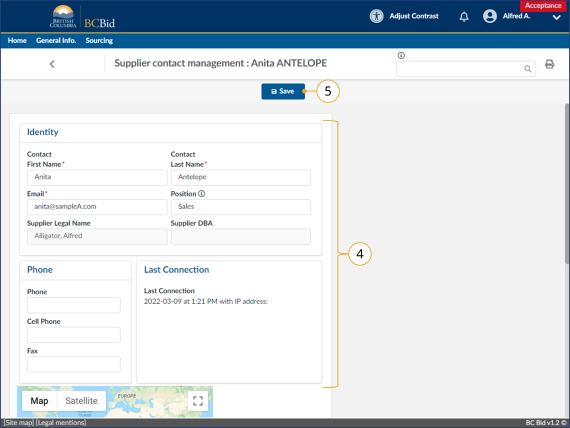
3. Click the pencil icon beside the contact name.
Click to view larger image
4. Edit any of the fields as required.
5. Click Save.
Remove User
Click to view larger image
1. Log in to BC Bid as the account with the Supplier Admin privileges.
2. On the Supplier Dashboard, click Company Profile or on the main menu, select General Info, then Company Profile.
Click to view larger image
3. In the left-hand menu, click Subscriptions.
4. Uncheck the Account Activated checkbox to remove the permissions for the contact.
5. Click Save.
Table of Contents
- Signing up - first time subscriptions
- Renewing a subscription
- Updating subscriptions to notifications
- Removing an e-Bidding subscription
Signing up - first time subscriptions
Click to view larger image
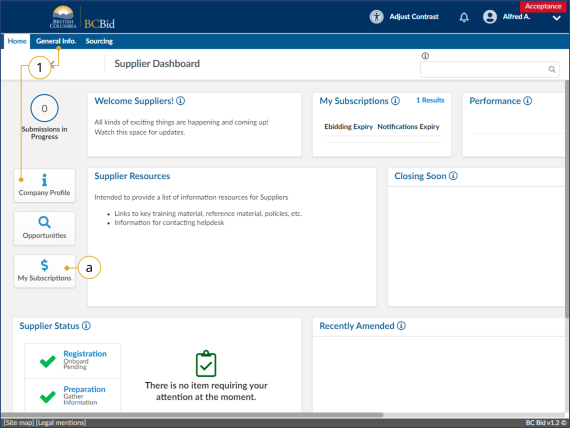
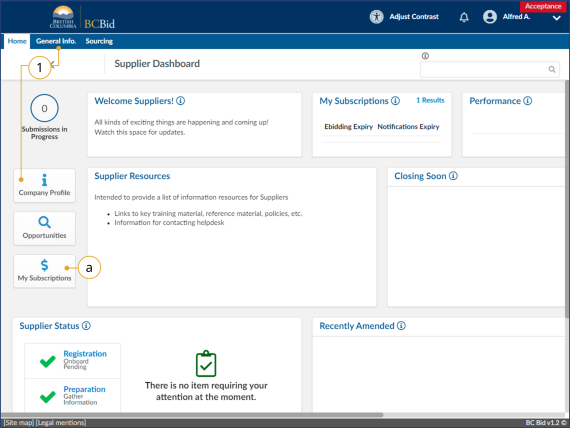
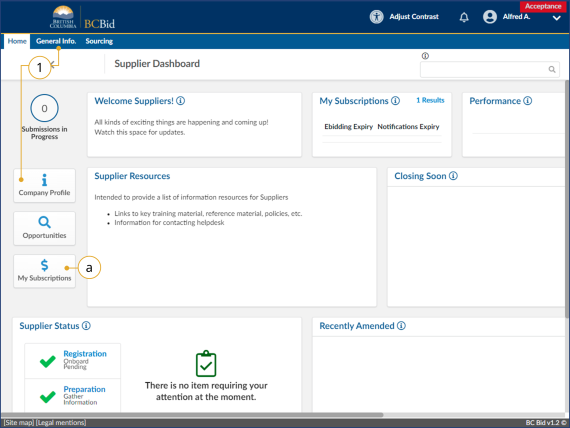
1. On the Main Menu, click General Info then select Company Profile or on the Supplier Dashboard click Company Profile.
a. Alternatively, click My Subscriptions to go directly to the Subscriptions for the current user. Continue with step 4.
Click to view larger image
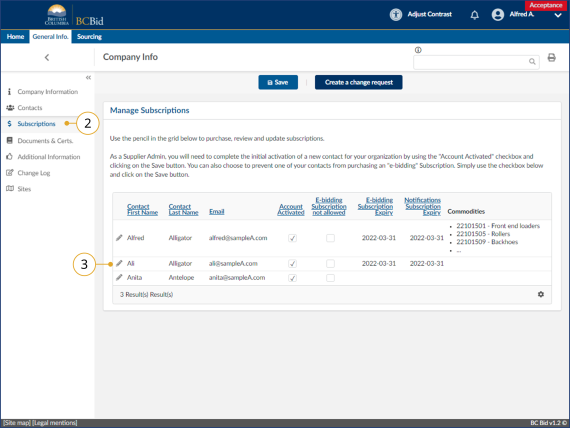
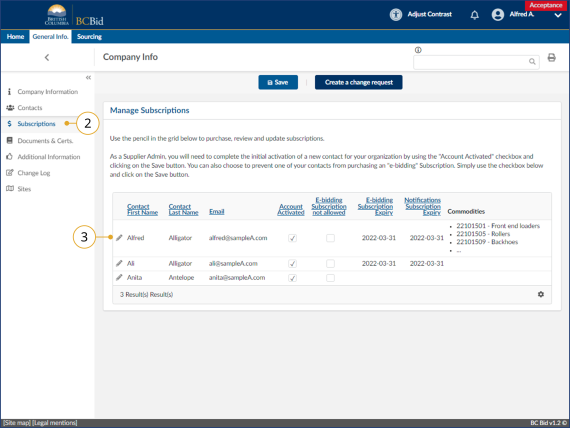
2. On the left-hand menu, click Subscriptions.
3. Click the pencil icon beside the user who will be subscribing.
Note: The Supplier Admin will see all contacts within the organization, users will only see their own name.
Click to view larger image
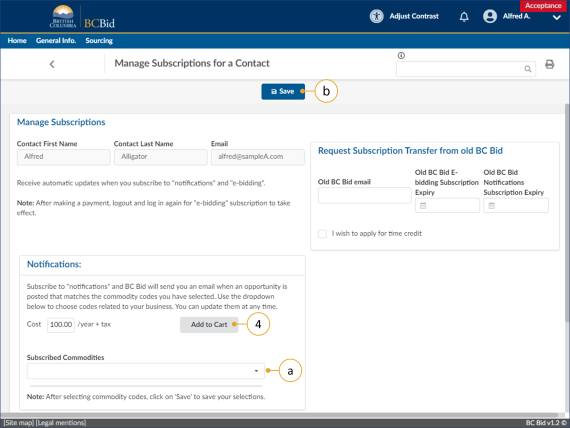
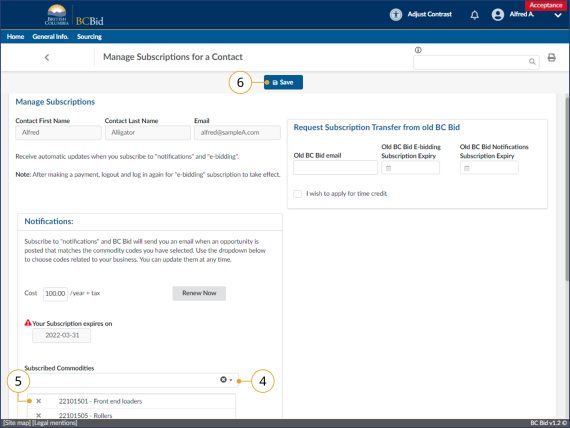
4. Click Add to Cart for each of the subscription(s) required.
a. When adding Notifications, use the Subscribed Commodities drop-down list to select the commodity code(s) to receive notifications for.
Additional commodities can be added later, see Editing a Subscription below.
Click to view larger image
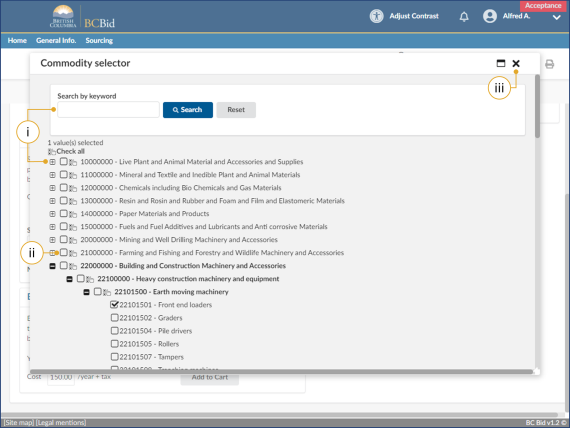
b. In the drop-down list, click See All for an expanded browse view of all commodity codes.
i. Use the search feature or navigate the commodity code tree using the + icon to find the desired code.
ii. Use the checkbox to select the desired commodity code(s).
iii. Click the X in the upper right corner to close the dialog window.
c. Click Save.
NOTE: As opportunities are posted based on the commodity codes you are subscribed to, one email notification will be sent per day with all relevant opportunities (if applicable) amalgamated into one email in a list.
Click to view larger image
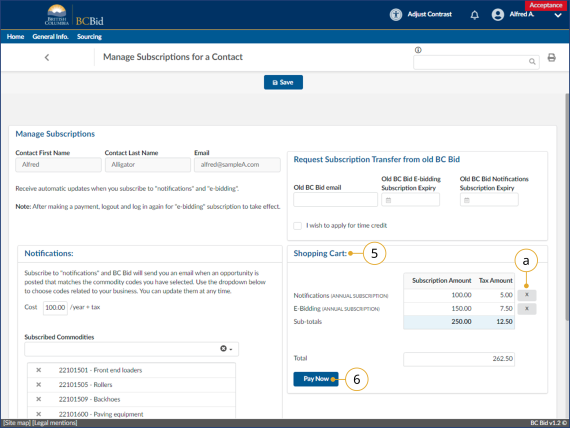
5. Once an item has been added to the cart, a shopping cart will appear on the right-hand side of the screen listing the subscription(s) selected.
a. To remove an item from the shopping cart, click the X beside the item to be removed.
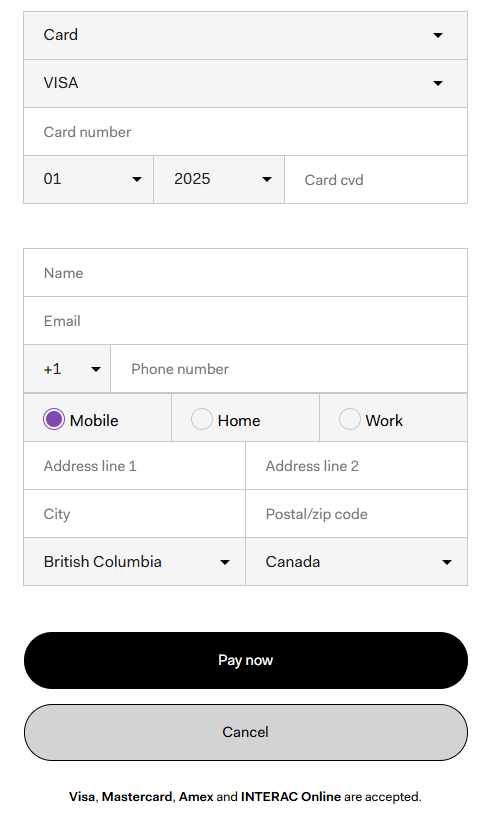
6. Click Pay Now to be directed to a secure payment site.
Click to view larger image
7. Enter payment information.
8. Click Pay Now.
Click to view larger image
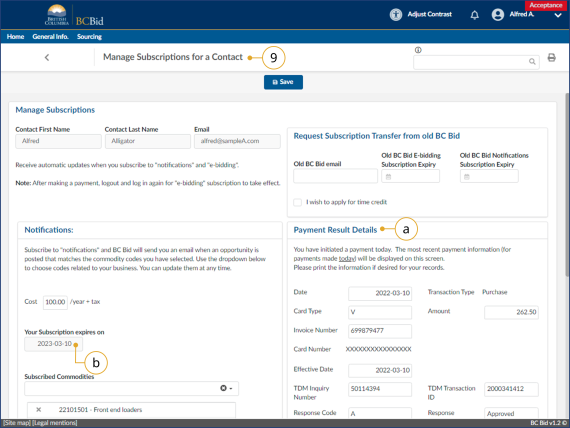
9. The Manage Subscriptions screen will appear when payment has been processed.
a. Payment confirmation will be displayed.
b. Subscription expiry date(s) will be displayed
Users will need to log out and log back in for e-Bidding privileges to be activated.
Click to view larger image
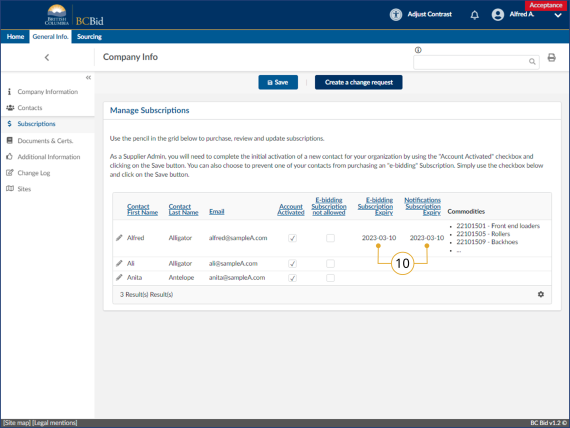
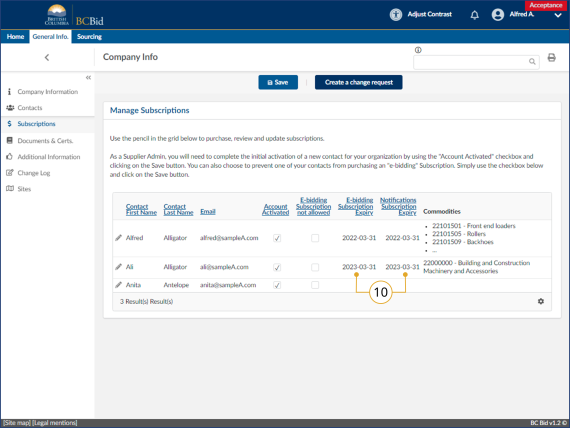
10. The Subscriptions page will be updated with the new e-Bidding expiry date.
Note: the expiry dates reflect the date that the subscription is no longer active.
Renewing a subscription
Subscriptions must be within 30 days of expiring before they can be renewed.
Click to view larger image
1. On the Main Menu, click General Info then click Company Profile or on the Supplier Dashboard click Company Profile.
a. Alternatively, click My Subscriptions to go directly to the Subscriptions for the current user, see step 4.
Click to view larger image
2. On the left-hand menu, click Subscriptions.
3. Use the pencil icon to select the user to renew the subscription
Click to view larger image
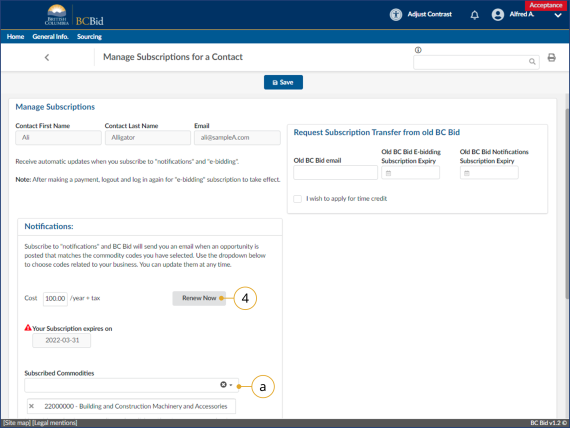
4. Click Renew Now for each of the subscriptions required.
a. When adding Notifications, select the commodity code(s) for the desired commodities.
Click to view larger image
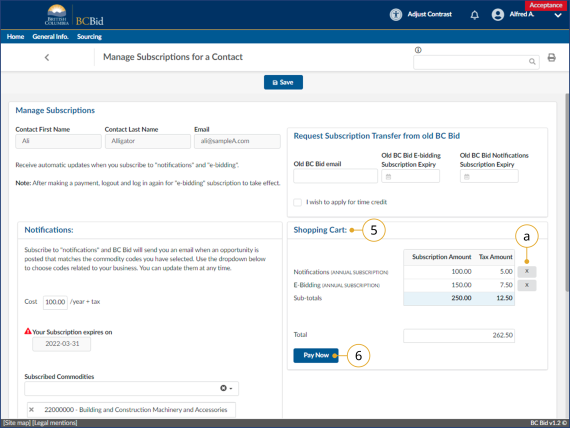
5. Once added to cart, a shopping cart will appear on the right-hand side of the screen.
a. To remove an item from the shopping cart, click the X beside the item to be removed.
6. Click Pay Now to be directed to a secure payment site.
Click to view larger image
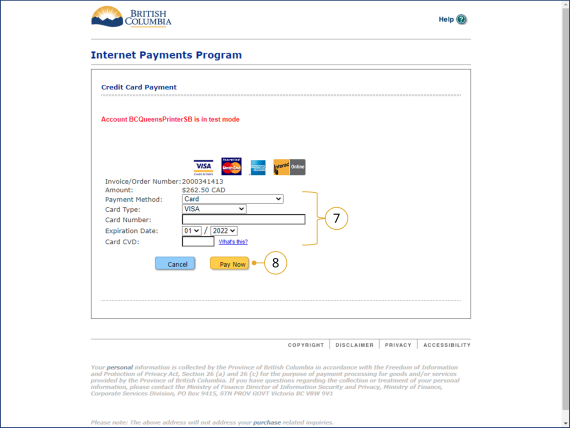
7. Enter credit card information.
8. Click Pay Now.
Click to view larger image
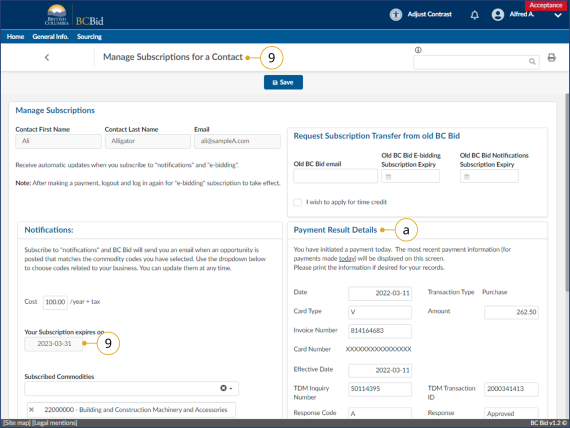
9. The Manage Subscriptions screen will appear with new subscription expiry date(s) listed.
a. The payment details will be listed in the Payment Result Details section of the screen.
Users will need to log out and log back in for e-Bidding privilidges to be activated.
Click to view larger image
10. The Subscriptions page will be updated with the new e-Bidding expiry date.
Note: the expiry dates reflect the date that the subscription is no longer active.
Updating subscriptions to notifications
To add a new Commodity Code to an existing Notification subscription:
Click to view larger image
1. On the Main Menu, click General Info then click Company Profile or on the Supplier Dashboard click Company Profile.
a. Alternatively, click My Subscriptions to go directly to the Subscriptions for the current user.
Click to view larger image
2. On the left-hand menu, click Subscriptions.
3. Use the pencil icon beside the user to edit the Commodity Code subscription.
Click to view larger image
4. Use the Subscribed Commodities drop-down list to search or browse the commodities to be added.
5. To remove a commodity, use the X beside the name of the commodity to be removed.
6. Click Save.
NOTE: As opportunities are posted based on the commodity codes you are subscribed to, one email notification will be sent per day with all relvant opportunities (if applicable) amalgamated into one email in a list.
Removing an e-Bidding subscription
Click to view larger image
1. Log in to BC Bid as the account with the Supplier Admin privileges.
2. On the Supplier Dashboard, click Company Profile or on the main menu, select General Info, then Company Profile.
Click to view larger image
3. Click on Subscriptions.
4. For the desired user, click the e-Bidding subscription not allowed checkbox.
5. Click Save.
6. If the user already has purchased an e-Bidding subscription, contact the BC Bid Help Desk to resolve.
7. Users who have their e-Bidding Subscriptions suspended by the Supplier admin will receive an email advising them of the change.
Click to view larger image
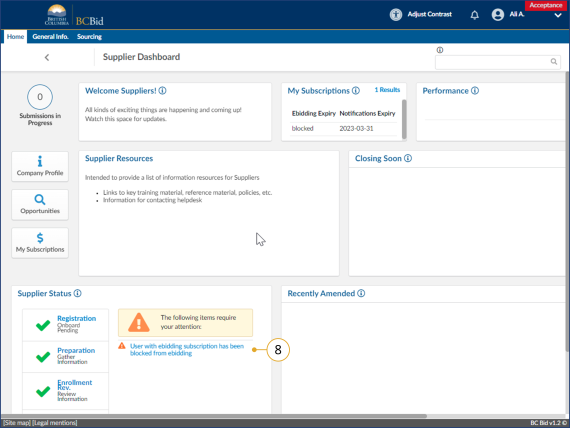
8. When the user logs in, they will see a notification in the Supplier Status box.
If a user has a current e-Bidding subscription, they will still get a notification to renew even if e-Bidding has since been restricted on their profile.
Documents and certifications
Table of Contents
- Overview
- Add a Document
Documents and certifications can be added to the supplier profile. This keeps important and frequently used documents easily accessible for both suppliers and buyers.
Overview
Click to view larger image
1. On the Supplier Dashboard, click Company Profile or on the main menu, select General Info, then Company Profile.
Click to view larger image
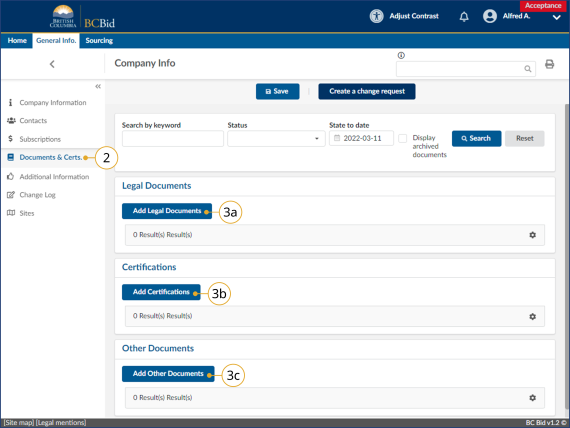
2. On the left-hand menu, click Documents & Certs.
3. Documents and Certifications are listed in three categories.
a. Legal Documents.
b. Certifications.
c. Other documents
Click to view larger image
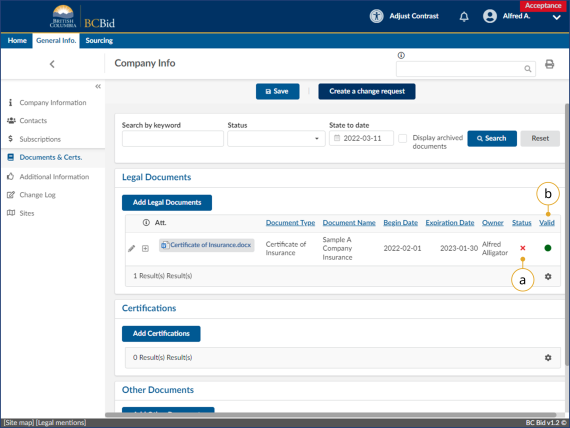
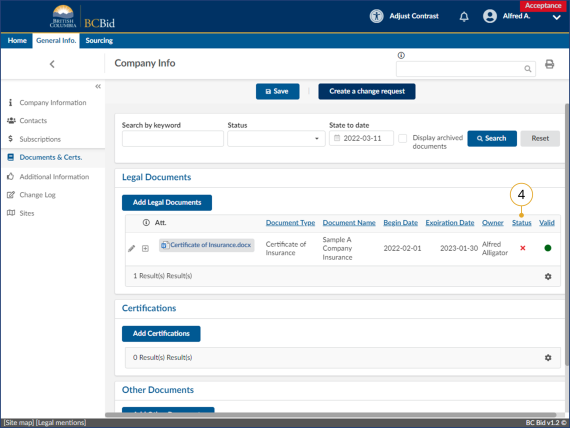
4. When viewing the documents, there are icons to indicate the status and if the document is valid.
a. Status – check mark for approved, x for pending approval
b. Valid – red circle for invalid (expired) and green circle for valid
Add a Document
Click to view larger image
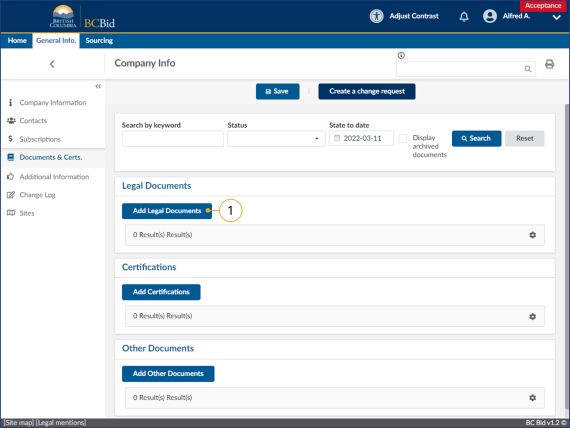
1. Click the applicable Add button under the category of the type of document being added.
Click to view larger image
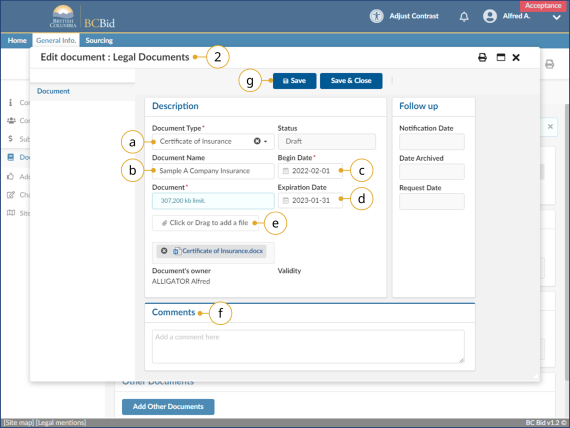
2. In the Edit document dialog window, complete the necessary information.
a. In the Document Type drop-down list, select the type of document being entered.
b. Optional: In the Document Name text box, enter a name for the document.
c. In the Begin Date, enter the start date related to this document.
d. Optional: Update the Expiry Date of the document. The system will update the expiry date to one year after the Begin Date.
e. In the Document field, use the Click or Drag to add a file to add the required document.
f. Optional: In the Comments text box add any related comments.
g. Click Save or Save & Close.
3. Repeat as necessary for the various document types.
Click to view larger image
4. Documents will initially appear with a red X in the Status column. All documents will require approval by the BC Bid Help Desk.
Email notification will be sent when the document is approved by the BC Bid Help Desk.
Additional information
Change log
The Change Log is a record of the change requests related to the BC Bid Account.
Click to view larger image
1. On the main menu, click General Info and then select Company Profile, or click Company Profile from the Supplier Dashboard.
Click to view larger image
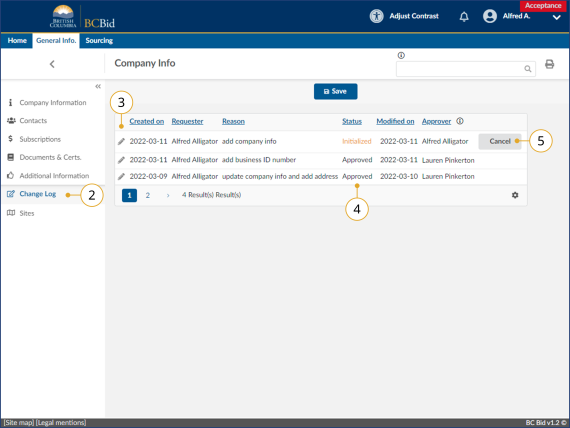
2. In the left-hand menu, click Change Log.
3. To view the details of a change activity, click the pencil icon.
4. If the change is still in the Initialized status, the record is editable.
5. To cancel a change request in initialized status, click Cancel.
a. Click OK to confirm the cancellation.
Sites
Table of Contents
- Create a new Site
- Completing a new Site Registration
- Adding users to an additional site
The Supplier Admin can create multiple supplier sites to respond to opportunities by multiple sites belonging to the same legal company. The sites menu is only visible when users are logged in as the main site. The person with Supplier Admin access belongs to all sites and oversees adding users from the main site to the additional sites.
Create a new Site
Click to view larger image
1. Log in to BC Bid as the account with the Supplier Admin privilege.
2. On the Supplier Dashboard, click Company Profile or on the main menu, click General Info, then Company Profile.
Click to view larger image
3. On the left-hand menu, click Sites.
4. Click on Create a new site.
Click to view larger image
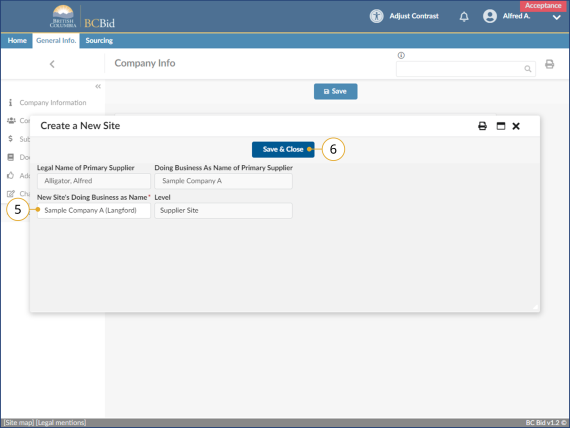
5. In the dialog window, in New Site’s Doing Business as Name text box, enter the name of the new site.
6. Click Save & Close.
7. Log out of BC Bid.
Completing a new Site Registration
Click to view larger image
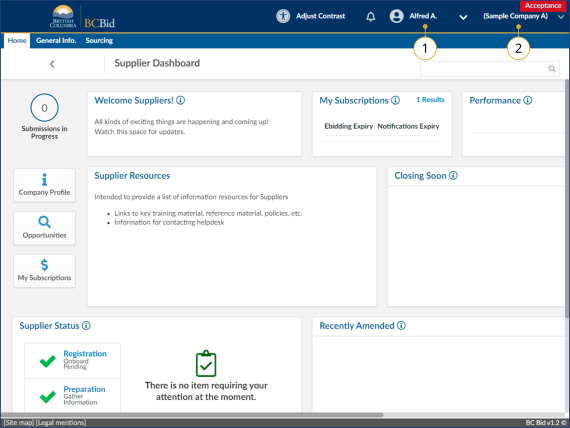
1. Log back in as the Supplier Admin.
2. In upper right corner, confirm name of main site is displayed.
Click to view larger image
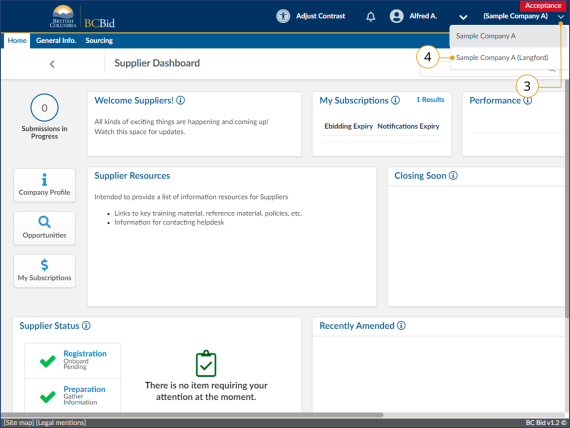
3. Click on the down arrow to display other sites.
4. Click on the name of the second (recently added site) site.
Click to view larger image
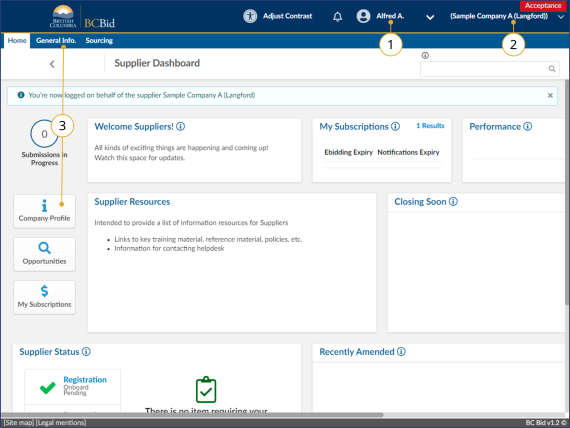
5. Confirm that the new company name is displayed in the upper right corner and a notification will appear at the top of the supplier dashboard.
6. Confirm the Supplier Status displays “Registration Onboard pending” and a “Main address is missing warning”.
7. Click on Company Profile.
Click to view larger image
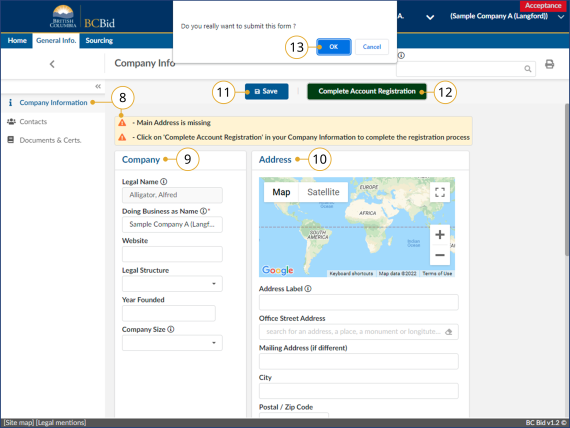
8. On the Company Information screen, a notification will display that the Main Address is missing.
9. Update the Company fields as needed.
10. Update the Address fields as needed.
11. Click Save.
12. Click Complete Account Registration.
13. Click OK to submit the form.
Click to view larger image
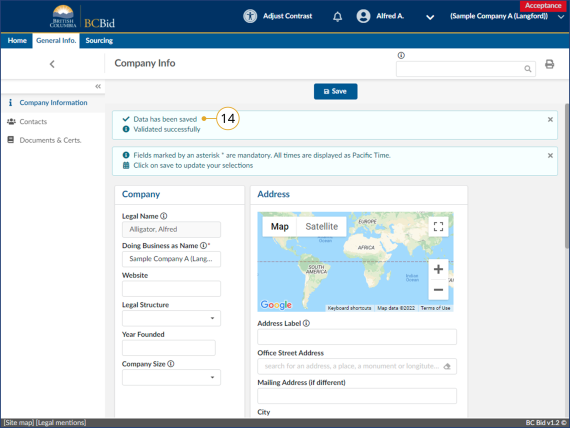
14. Confirm that the data has been saved.
15. The BC Bid Help Desk will review the information submitted and send an email when complete.
Until the Help Desk reviews the site’s registration, there will be a limited left-hand menu in the Company profile. Only Company Information, Contacts and Documents & Certs will be visible. This does not impact the ability to search or respond to opportunities.
Click to view larger image
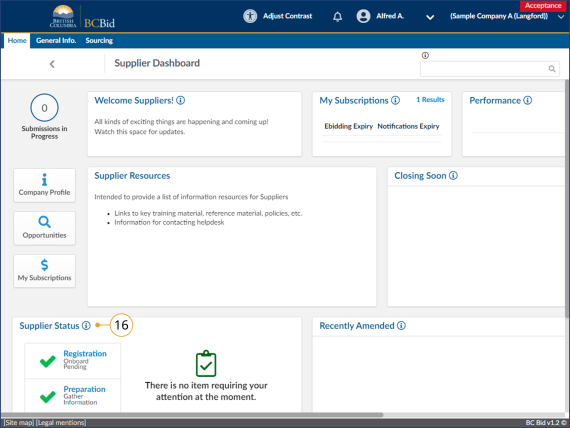
16. At next login, confirm validation checkboxes on the Supplier Status section of the Supplier Dashboard.
Adding users to an additional site
Click to view larger image
1. Log in as the Supplier Admin.
2. Use the drop-down to select the site.
3. On the Supplier Dashboard, click Company Profile or on the main menu, click General Info, then Company Profile.
Contacts must exist on the main company’s profile in order to be added to an additional site
Click to view larger image
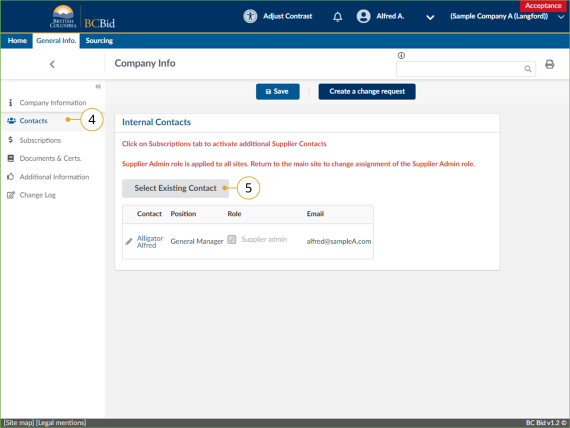
4. Click on the Contacts tab in the left-hand menu.
5. Click Select Existing Contact.
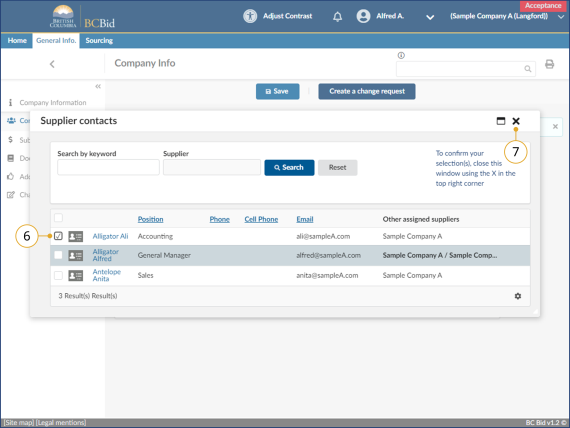
Click to view larger image
6. Click the checkbox beside the user name to add to the additional site.
7. Click the X to close the window.
Manage Submissions
The Manage Submissions page will list opportunities selected for submission (by Start Submission button) or where the supplier has been invited to a non-public opportunity. More information on Managing Submissions is included in the Supplier Guide – responding to opportunities.
Click to view larger image
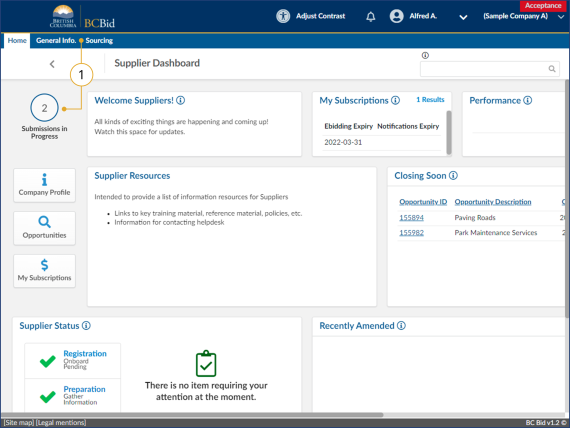
1. On the main menu, click Sourcing, then click Manage Submissions.
Click to view larger image
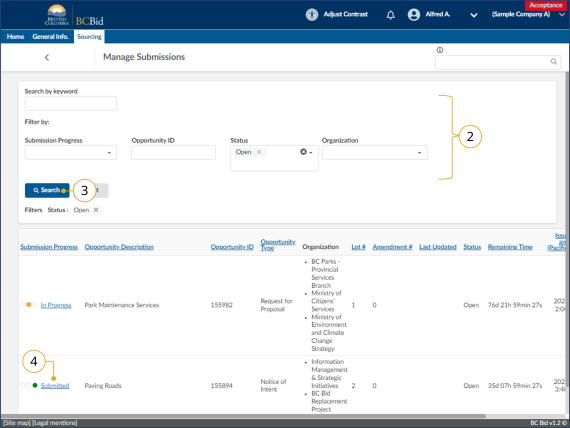
2. Use the Search by keyword field and additional filters as needed.
Note: the Status field defaults to searching for Open opportinities.
3.Click Search.
4. Click the submission progress to view the opportunity.
Click to view larger image
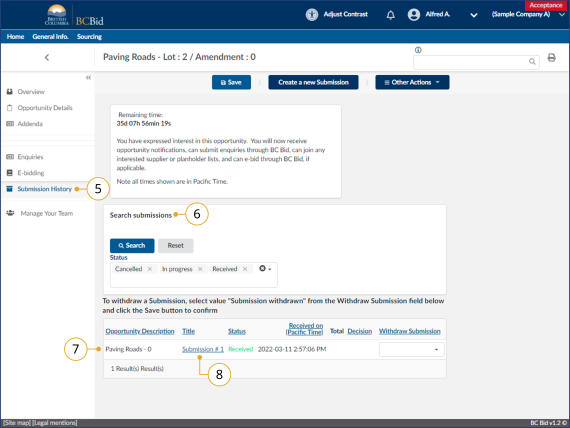
5. When viewing the opportunity, click Submission History.
6.Use the Search submissions field to search for submissions on this opportunity.
7.View the listing of submissions.
8. Click the Title of the submission to view the details of the submission.
Subscribe
Enter your email address to subscribe to updates of this page.

