Step 2 - Prepare RFx
Step 2 - Prepare RFx - How to Prepare RFx, Additional RFX Information, Documents, Approvals,
Instructions
Follow the instructions in the sections below.
Setup
This section is where all public or Supplier facing information in the opportunity is entered or uploaded. You will be working your way left to right through the tabs as they appear (e.g. Setup, Additional RFx Info; Documents; and Suppliers).
Click to enlarge image
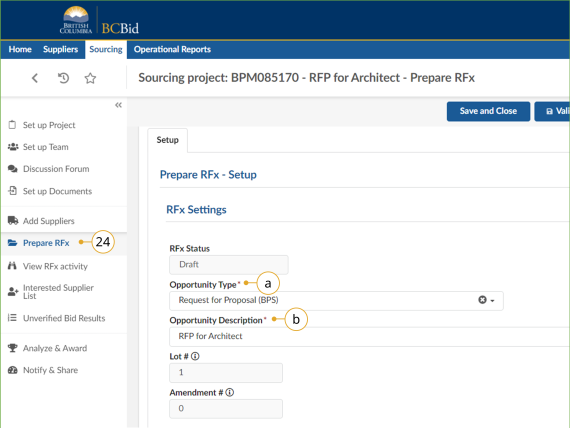
24. In the left-hand menu, click Prepare RFx, the Setup tab will open.
a. In the Opportunity Type drop-down list, select the appropriate template.
b. Review the Opportunity Description, and update if necessary.
Note: Once the Opportunity Type has been selected and the Validate & Save button clicked, the Opportunity Type cannot be changed.
Changing the Opportunity Description in the Setup tab doesn’t change the Opportunity Description in the Set up Project menu.
Click to enlarge image
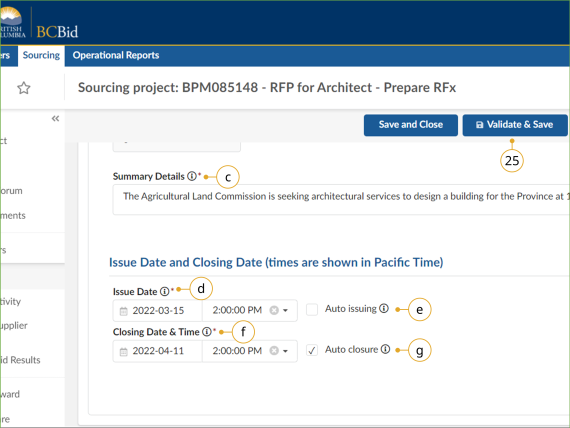
c. In the Summary Details text box, enter a summary of the opportunity.
d. Select an Issue Date and time.
e. Optional: Select the Auto issuing checkbox.
f. Select a Closing Date & Time.
g. Optional: Deselect the Auto closure checkbox.
25. Click Validate & Save and continue in the Setup tab.
Note: Click Save and Close to save any changes and exit the Sourcing Project.
![]() Auto issuing automatically posts the opportunity to BC Bid at the selected date and time (once all approvals are complete). Auto closure checkbox automatically closes the opportunity at the closing date and time. The auto-generated Opportunity ID can be edited until the opportunity is in draft status.
Auto issuing automatically posts the opportunity to BC Bid at the selected date and time (once all approvals are complete). Auto closure checkbox automatically closes the opportunity at the closing date and time. The auto-generated Opportunity ID can be edited until the opportunity is in draft status.
Click to enlarge image
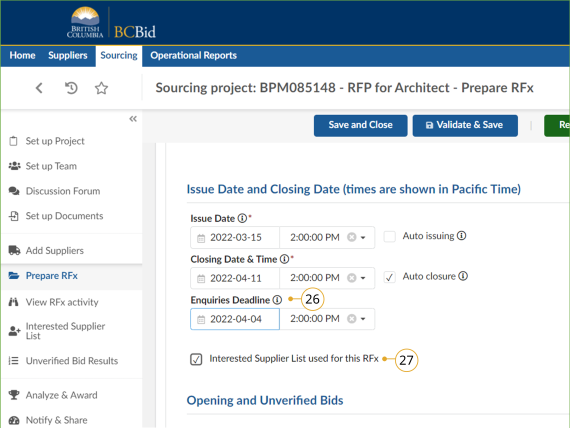
26. Optional: In the Enquiries Deadline field, select the preferred date and time deadline for submitting enquiries.
Note: if at a later time the closing date is extended, the enquiries deadline can be extended without an amendment.
27. Optional: Select the Interested Supplier List used for this RFx checkbox to include public-facing Interested Supplier List functionality into the opportunity.
Once issued, Suppliers will have the option to add themselves to the opportunity’s Interested Supplier List. The benefit is that small Suppliers can see and contact general Contractors who are developing Submissions or vice-versa.
![]() BPS entities will now use the Interested Supplier List instead of the Planholder List as used in old BC Bid.
BPS entities will now use the Interested Supplier List instead of the Planholder List as used in old BC Bid.
Click to enlarge image
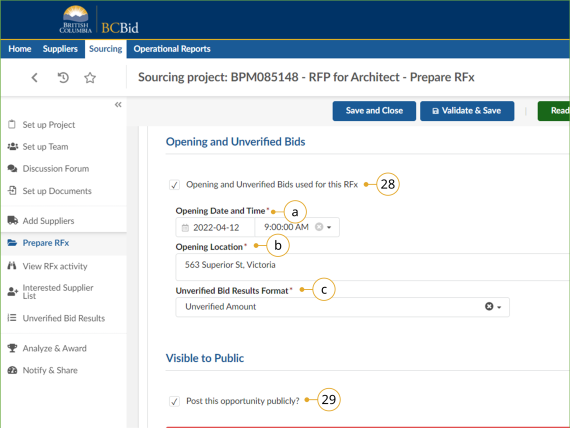
28. Optional: Select the Opening and Unverified Bids used for this RFx checkbox to allow Buyers to open the bids and publish the bid amount, Supplier name or rank before doing any compliance check.
Note: This option may not be applicable to all opportunity types or users.
a. Select the Opening Date and Time.
b. Enter the Opening Location.
c. Select an option from the Unverified Bid Results Format drop-down list.
29. Optional: In the Visible to Public section, deselect the Post this opportunity publicly checkbox. This option is available for invite-only opportunities only.
![]() Click View as Supplier button to preview the opportunity as a Supplier would see it. This button is visible in all tabs within Prepare RFx menu.
Click View as Supplier button to preview the opportunity as a Supplier would see it. This button is visible in all tabs within Prepare RFx menu.
Click to enlarge image
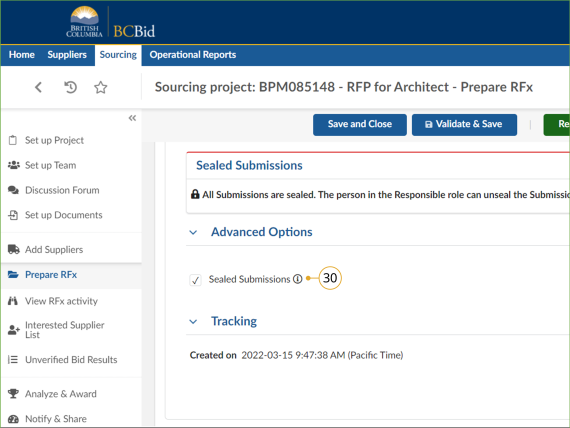
30. Optional: In the Advanced Options section, deselect the Sealed Submissions checkbox. Then scroll to the top.
Note: The Sealed Submissions checkbox is selected by default. This means opportunities must pass the Closing Date and Time before Submissions can be unsealed.
Deselecting this checkbox should be done for any opportunity where Submissions are opened continuously as they are received, such as for an RFI.
![]() Note: The Save button is different than Validate & Save. Save will save the sourcing project without checking the template for errors. Validate & Save will only save if all mandatory fields are filled out correctly.
Note: The Save button is different than Validate & Save. Save will save the sourcing project without checking the template for errors. Validate & Save will only save if all mandatory fields are filled out correctly.
Additional RFx Info
Click to enlarge image
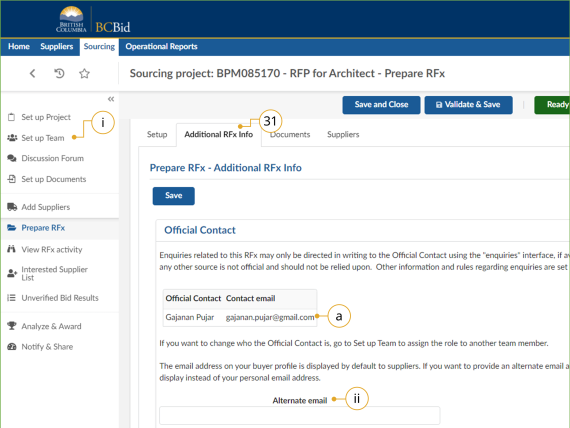
31. Click the Additional RFx Info tab.
a. Review the Official Contact.
i. To edit the Official Contact, click Set up Team and change the Official Contact.
ii. Optional: Enter an Alternate email; this will replace the default user email address of the Official Contact in the Supplier view. This is an information-only field for non-registered Suppliers to use when emailing questions.
Click to enlarge image
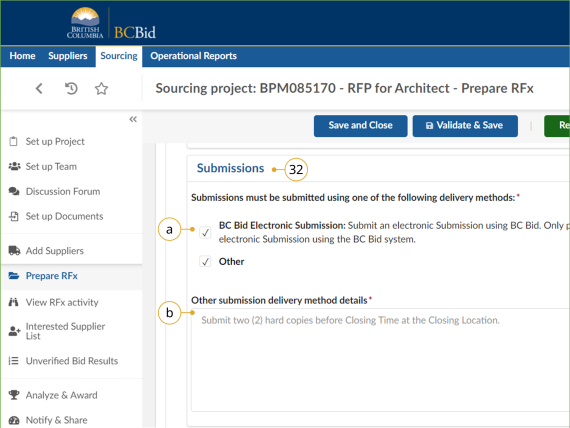
32. Select the Submissions delivery methods using the appropriate checkboxes.
a. To allow the Suppliers to submit a Submission electronically through BC Bid, select the BC Bid Electronic Submission checkbox.
Note: A Supplier can only submit an electronic Submission if they are registered and have subscribed to that service.
b. If the Other checkbox is selected, provide details in the Other submission delivery method details text box.
Note: If managing the opportunity on an external sourcing platform, you could add the link to the external sourcing platform in the Other submission delivery method details text box.
Click to enlarge image
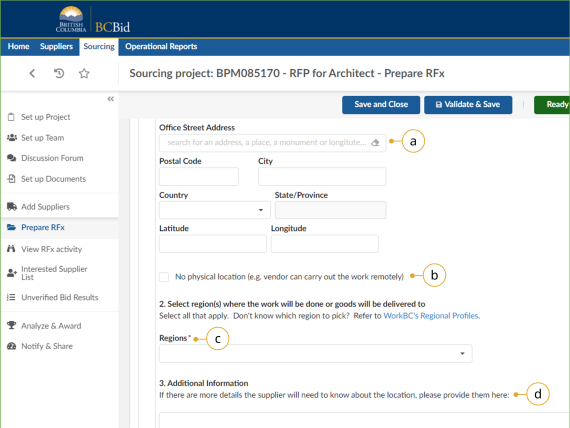
33. In the Delivery Location for Goods, Services, or Construction section, complete the following:
a. Optional: Enter the physical address where goods need to be delivered or Supplier will carry out work in the Office Street Address text box.
b. Optional: Select the No physical location checkbox if the work can be carried out remotely.
c. Using the Regions drop-down list select the region(s) where the work will be done, or goods will be delivered.
d. Optional: If there are more details the Supplier will need to know about the location, provide them in the Additional Information text box.
Documents
There are two ways to upload documents to your opportunity that will be made visible to Suppliers – uploading a document from outside the BC Bid application into Documents tab or transferring documents that have already been uploaded to Set up Documents menu.
Click to enlarge image
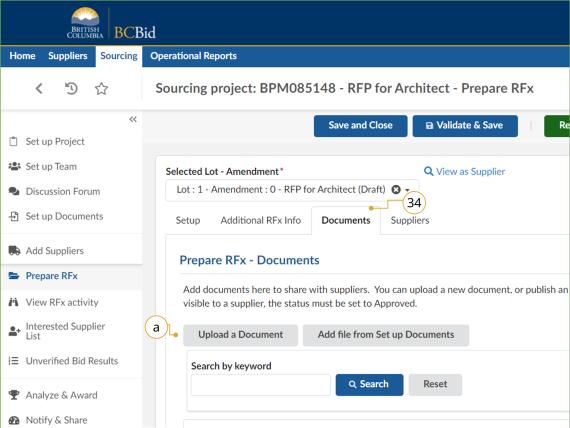
34. Click the Documents tab.
a. Click Upload a Document to add a new document. This will open Content editor dialog box.
To add an existing document, please go to Add file from Set up Documents in Step 34b below.
Note: Documents uploaded using Upload a Document button will automatically be added to Set up Documents in the left-hand menu.
Click to enlarge image
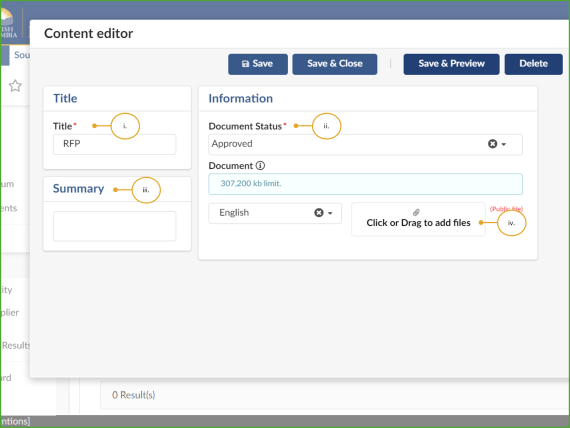
i. Enter the document Title.
ii. Use the Document Status drop-down list to select Approved to make the file visible to Suppliers.
iii. Optional: Enter a Summary (e.g., time last updated and by whom).
iv. To upload files, click the Click or Drag to add files button or drag and drop files on top of the button.
v. Click Save & Close.
![]() If the Document Status is Draft, the document will not be visible to Suppliers.
If the Document Status is Draft, the document will not be visible to Suppliers.
Click to enlarge image
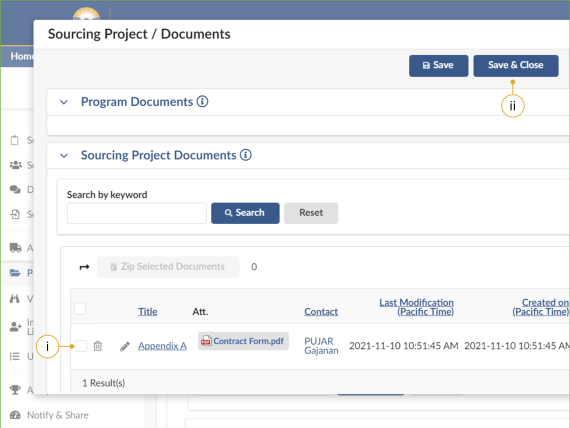
b. To add an existing document, click Add file from Set up Documents button in the Documents tab.
i. In the dialog box, select the documents you want to add.
ii. Click Save & Close.
Suppliers (Updated for 2025)
Click to enlarge image
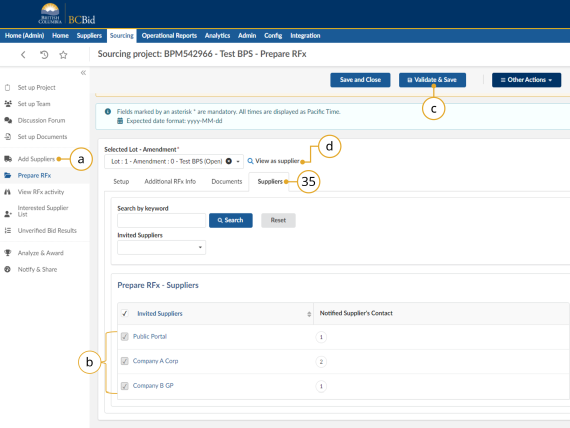
35. Optional: Click the Suppliers tab to review the list of invited Suppliers.
a. To add Suppliers to the list, click Add Suppliers in the left-hand menu.
b. If a Supplier should not be receiving an invitation, deselect that Supplier.
c. Click Validate & Save.
d. Optional: Click View as supplier button to preview the opportunity as a supplier would see it.
NOTE: You may hover over the number listed under the Notified Supplier’s Contact and it will show which supplier contacts were notified. See below.
NOTE: When adding suppliers, Shell Suppliers will be marked with [SHELL (Unregistered) Supplier] to the right of the supplier name. Please do not invite a [SHELL (Unregistered) Supplier] to an invite-only sourcing project as these accounts cannot be used to log in and view the details of the opportunity. If you wish to invite a supplier to an invite-only opportunity they are required to register for their own account prior to being invited.
If additional suppliers were added in step 35a, buyers must return to the Prepare RFx, Suppliers tab and click Validate & Save. Otherwise new suppliers will not be notified of the opportunity.
Public Portal will be selected for all opportunities (including invite-only) so addenda will be visible to all suppliers.
![]() Click View as Supplier button to preview the opportunity as a Supplier would see it.
Click View as Supplier button to preview the opportunity as a Supplier would see it.
Subscribe
Enter your email address to subscribe to updates of this page.

