
PRIME for PharmaNet software vendors and administrators
These guides show PharmaNet software vendors and community health practice administrators the PRIME application screens so that they can better support their clients and staff. If you are a PharmaNet user, please refer to PRIME for general information.

Independent users are physicians, nurse practitioners, licensed practical nurses (LPNs), registered nurses (RNs), and registered psychiatric nurses (RPNs), midwives, pharmacists, pharmacy technicians in specific care settings, dentists, naturopathic physicians, and optometrists.
If you recently obtained a new licence type from your college, you will be able to enrol or update in PRIME once the new licence is activated by your college and loaded into PharmaNet.
PRIME uploads your name from your BC Services Card. If your college provides a different name for the Ministry of Health, enter that name exactly (order, punctuation) in the alternate name field in PRIME. This prevents delays with enrolment. If you don't know which name to enter, contact your college.
To enrol in PRIME independent PharmaNet users will need:
- The BC Services Card app set up on a mobile device (phone or tablet). If you cannot get a BC Services Card, you can set up the app using other acceptable government ID. If you don’t have a suitable mobile device, but do have a BC Services Card, you can opt for the BC Token. Visit BC Services Card app set up for more information.
- The email address for the person in your workplace who sets up PharmaNet accounts (the "PharmaNet administrator")
- College name
- Licence type
- CPSID/PharmaNet ID/registration # or ID, and expiry/renewal date for your license
Most PRIME enrolments are approved immediately. Once your enrolment is approved:
- Enter the email address of the person in your workplace who sets up PharmaNet accounts.
- PRIME will share your approval notification with them. This allows them to set up your PharmaNet account. The notification contains details the recipient will need to set up your local PharmaNet user credentials, such as a link to your GPID that expires after 10 days. Only the link expires, not your approval to access PharmaNet. If the link expires before they set up your account, you will need to resend your approval notification.
1. PRIME landing page

Select Individual Access to start.
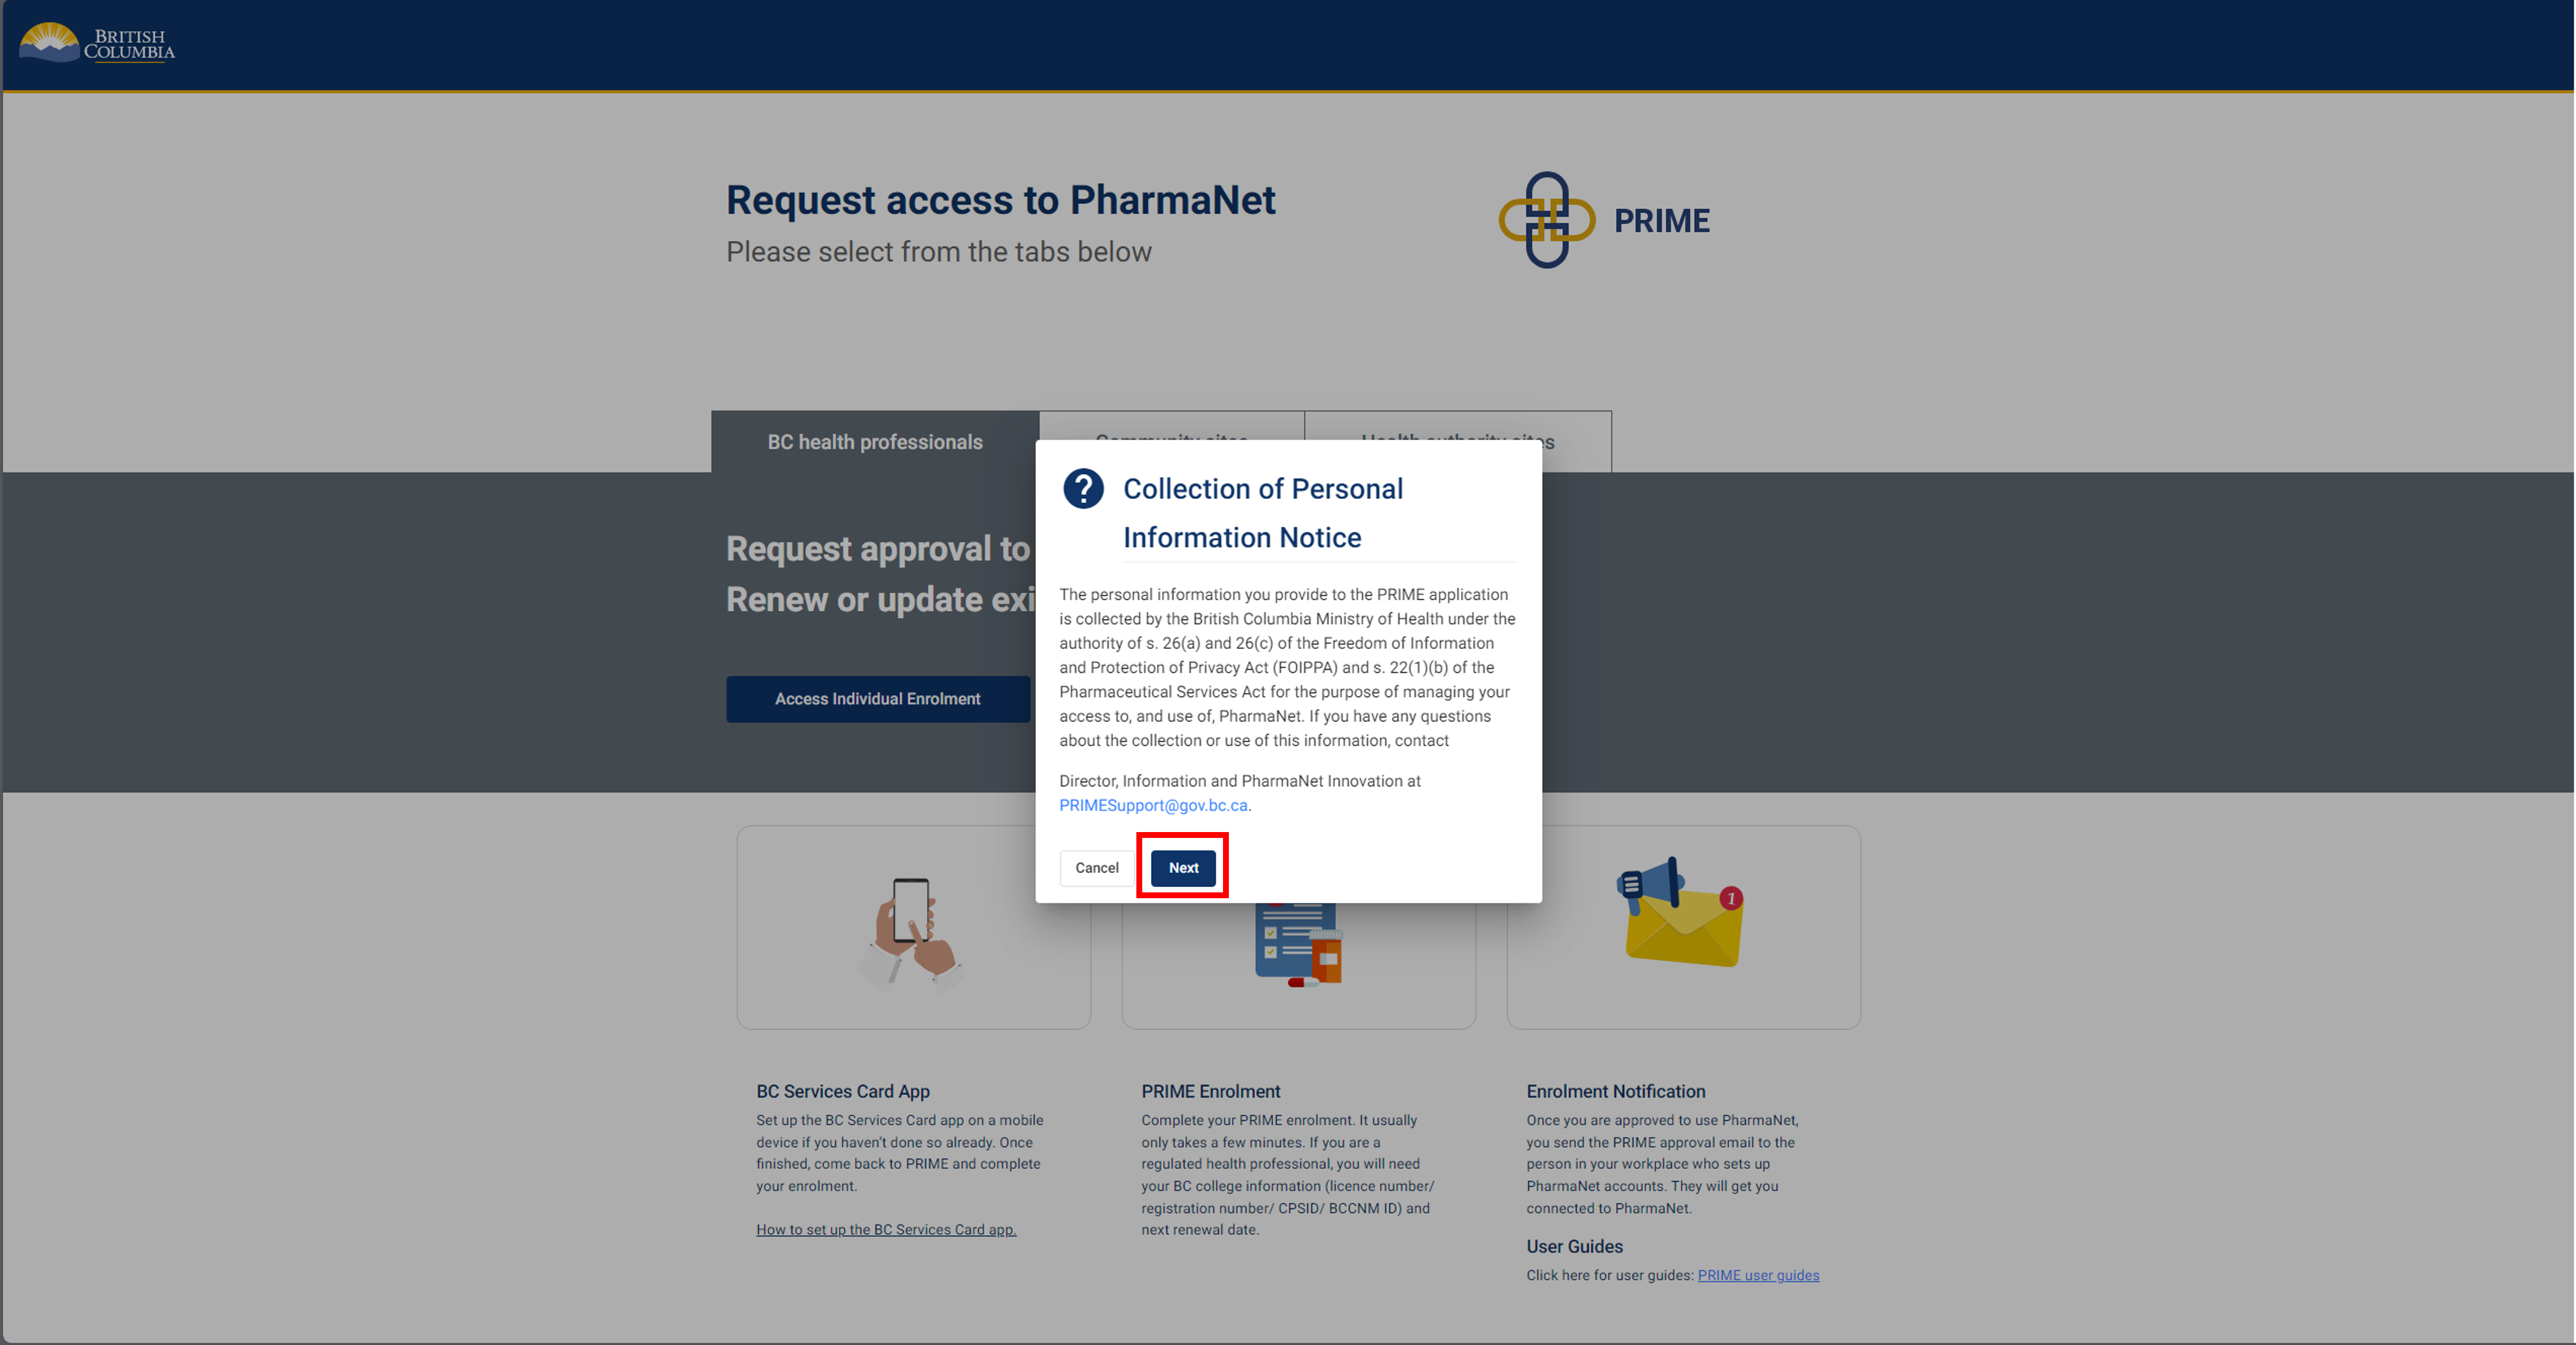
Click Next to acknowledge the Collection of Personal Information notice.
2. Login to PRIME with the BC Services Card app
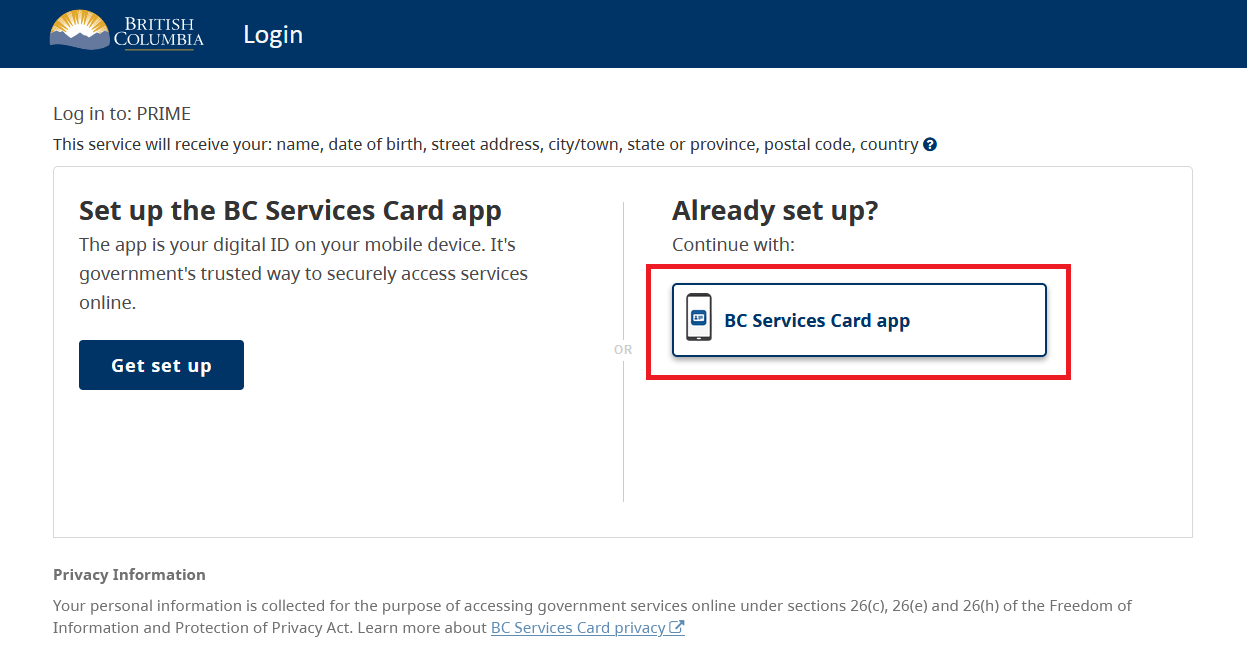
Select BC Services Card app.
For more information visit BC Services Card App.
3. BC Services Card app: enter pairing code in mobile device

Next steps:
1. Open the BC Services Card app on mobile device and select Enter Pairing Code.
2. Enter the code displayed on the BC Services Card login screen.
3. Click Continue.
4. BC Services Card app: choose to send notification to mobile device instead

Choose whether to send a notification to your mobile device, so that you can skip the pairing step next time you log in.
Click Continue.
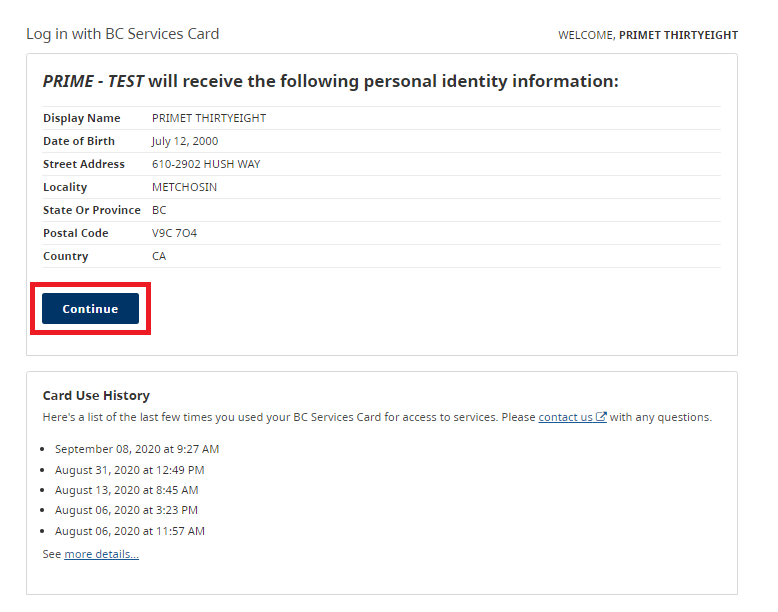
5. BC Services Card information shared with PRIME
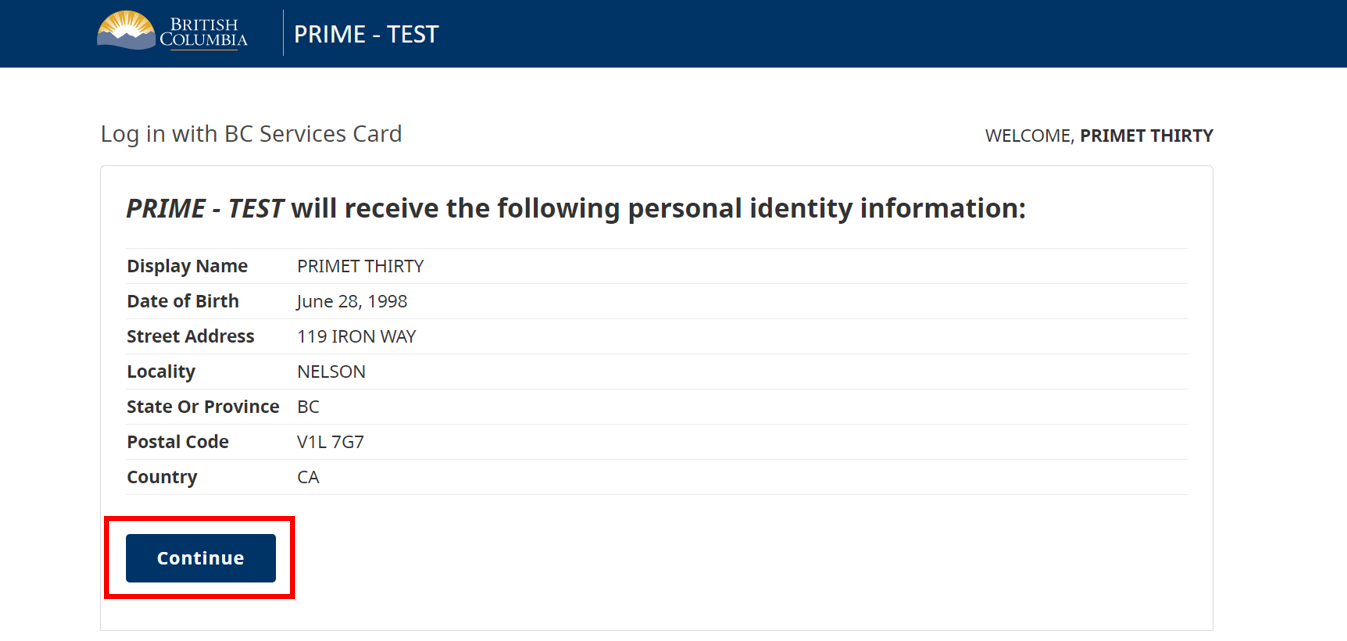
This screen displays the information that is shared between your BC Services Card app and the PRIME application.
Click Continue.
6. Enrollee information (1 of 2)
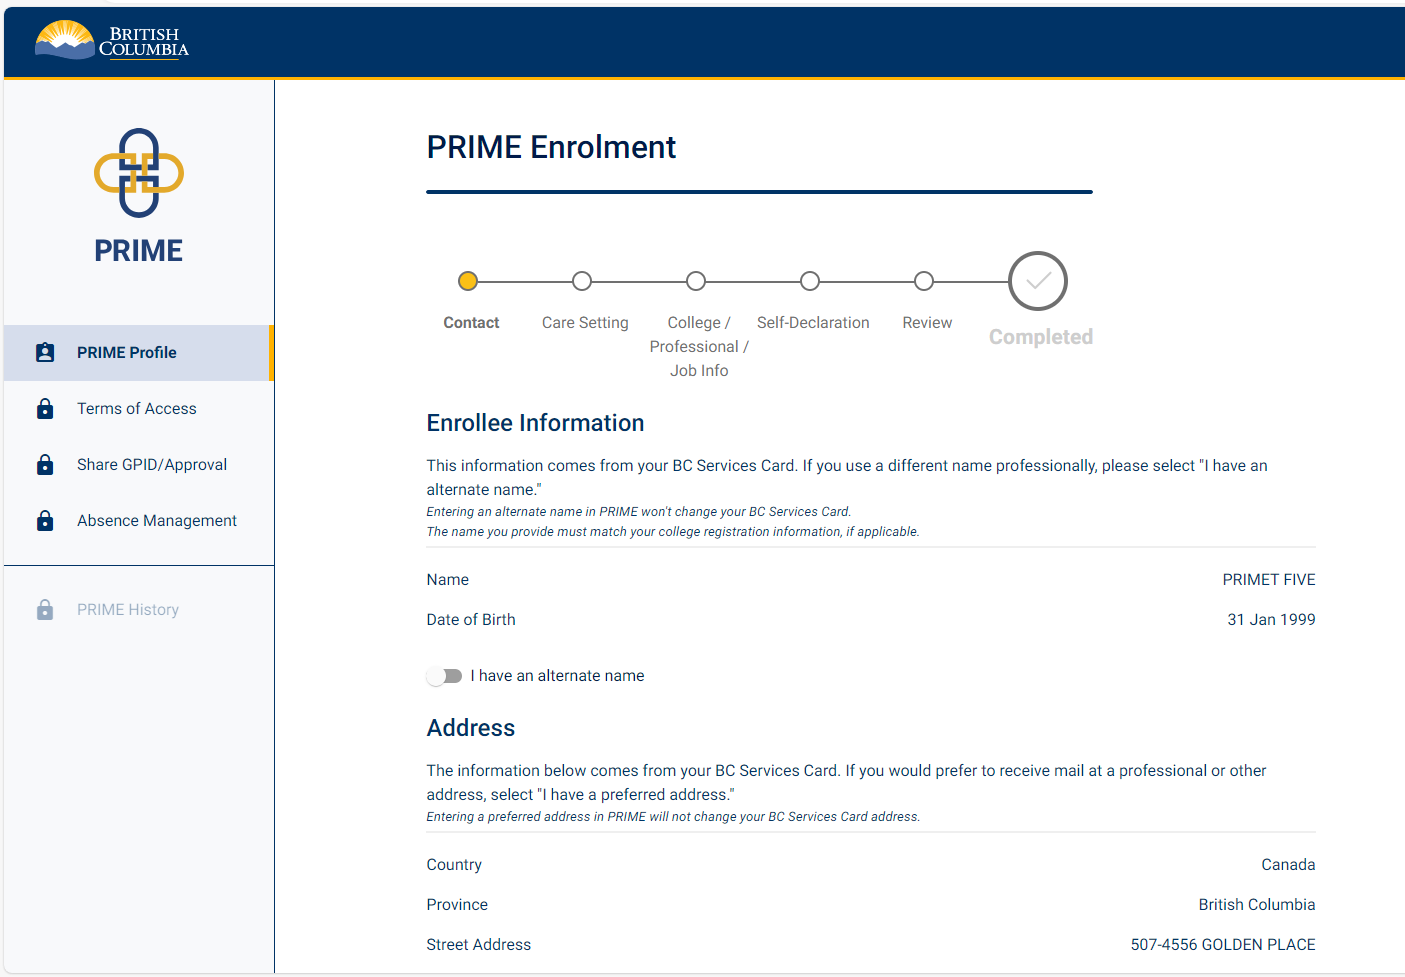
You are now inside the PRIME application.
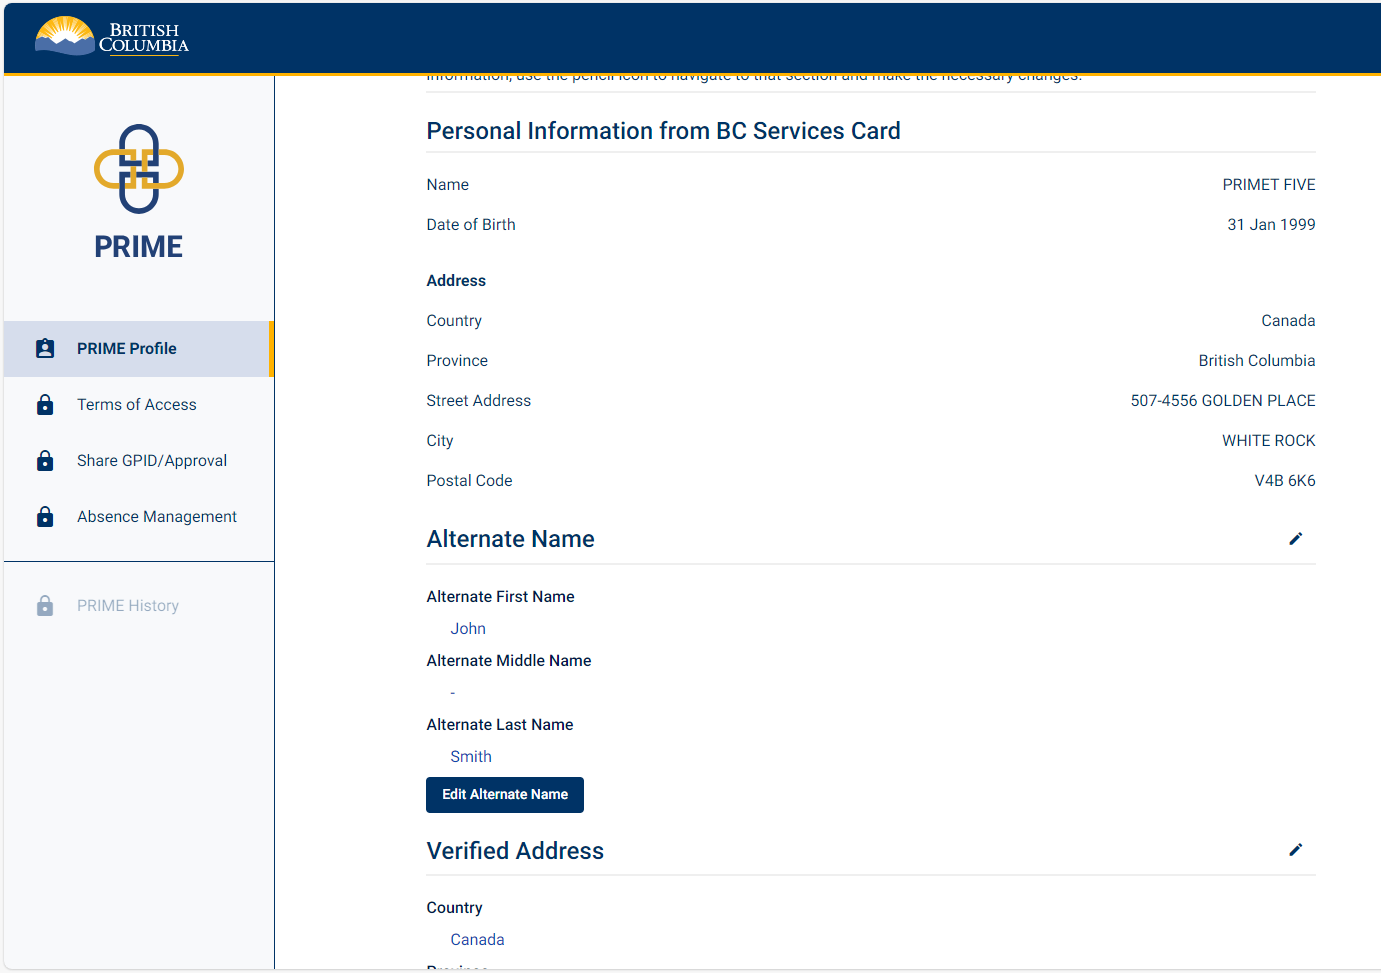
Your name, date of birth and address are auto-populated from your BC Services Card.
If your college licence shows a different name than the one on your BC Services Card, select I have an alternate name. If you select this option you must enter both a first and last name. Your first and last name must be exactly as your college shows them.
There is also an option to provide a physical or mailing address (address in B.C. where you can be contacted).
You must enter a physical or mailing address if:
- there is no address populated from your BC Services Card
- your BC Services Card address is not in B.C.
7. Enrollee information (2 of 2)
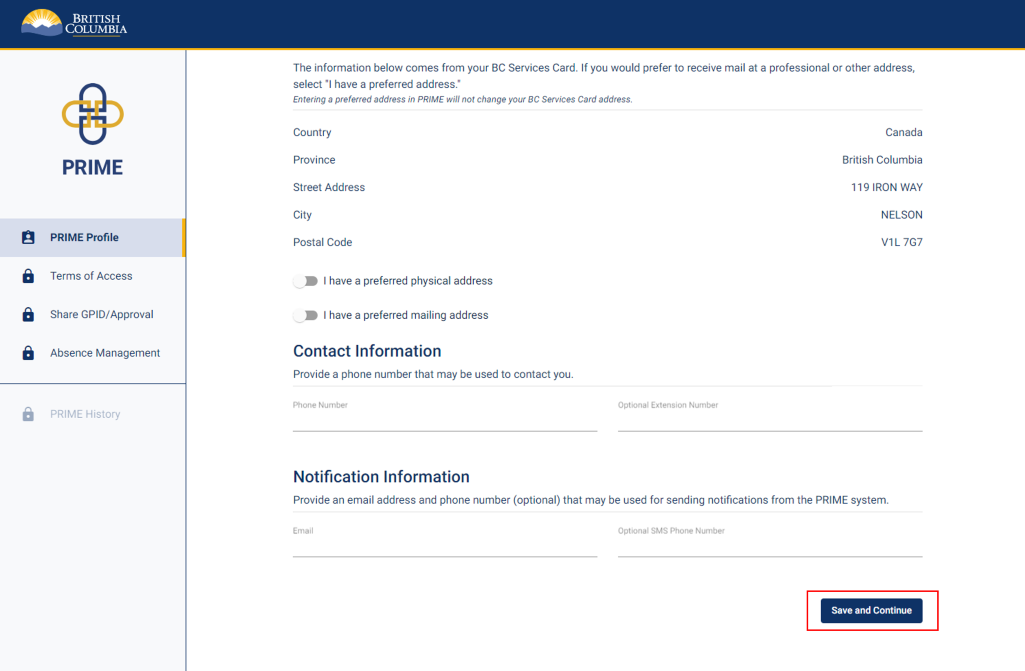
Enter a phone number that may be used to contact you, and a non-shared email address that you check regularly. There is an option to include a phone number for SMS notifications.
Click Save and Continue.
8. Care setting information
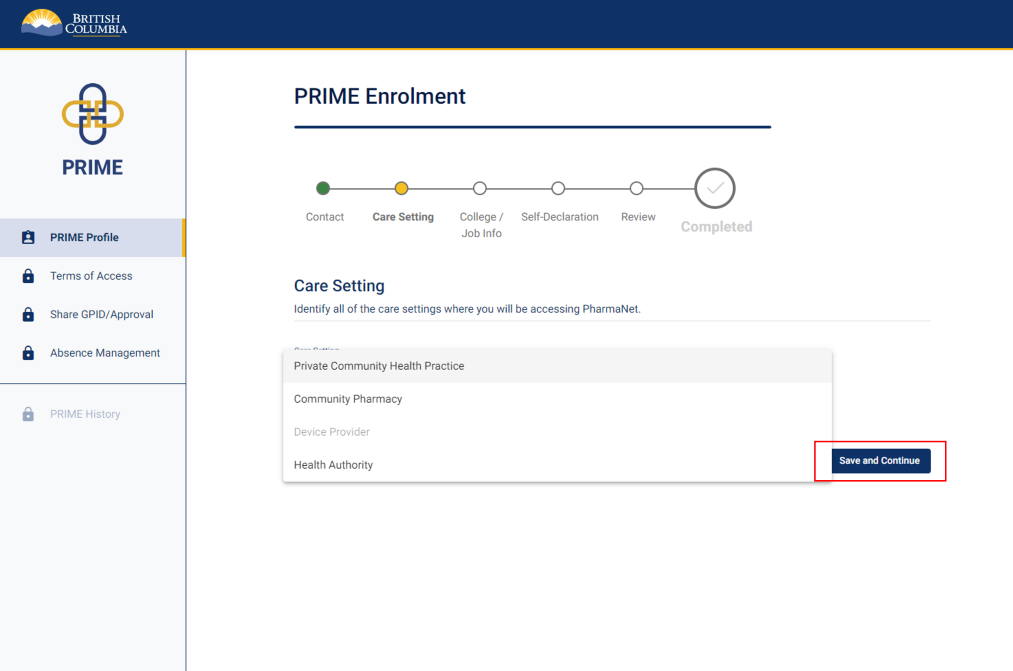
Select the care settings where you will be using PharmaNet.
If you work at more than one care setting select Add Additional Care Setting and then add the details.
Please only select care settings where you currently know you will be accessing PharmaNet. If the care settings you will be accessing PharmaNet at change, return to PRIME to update your care setting selection.
Click Save and Continue.
Note: Do not select Community Pharmacy unless you are physically working in a pharmacy.
9. College licence information (1 of 2)
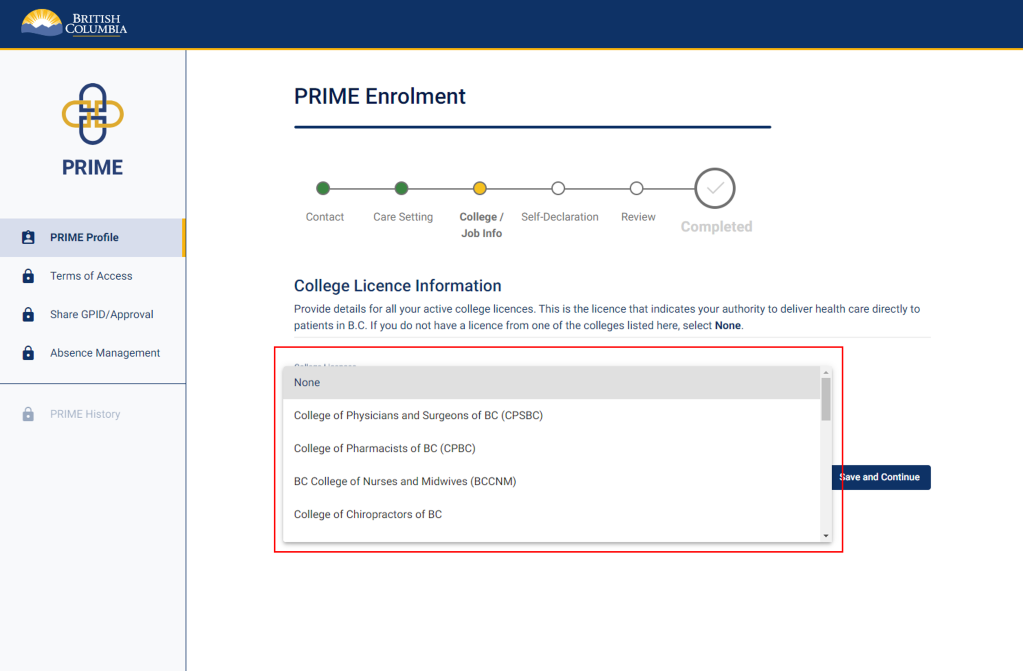
Select your college.
You may have to scroll down in the drop-down list to find your college.
10. College licence information (2 of 2)
College of Pharmacists of BC: Your licence (registration) number is on eServices. Click My Profile and choose Update profile (view) OR My Registration Card (download card).
Pharmacy students: Enter your student licence (not your eServices number). Your licence type is student.
College of Physicians and Surgeons of BC: Your 5-digit college ID (CPSID) is on your licence letter or your online CPSBC profile.
BC College of Nurses and Midwives: Your BCCNM licence number and PharmaNet ID are on your online BCCNM profile.
Prescribing BCCNM registrants: Your PharmaNet ID was issued when you were granted practising NP registration.
There are two possible formats of PharmaNet ID for NPs, prescribing RNs and prescribing RPNs:
- 5 numbers (formerly called prescriber ID)
- 5 alpha-numeric characters (PharmaNet ID)
Other nurse types all have a 5-character PharmaNet ID.
Non-prescribing BCCNM registrants: You will need your licence number and PharmaNet ID, issued by the college. Check your BCCNM account online.
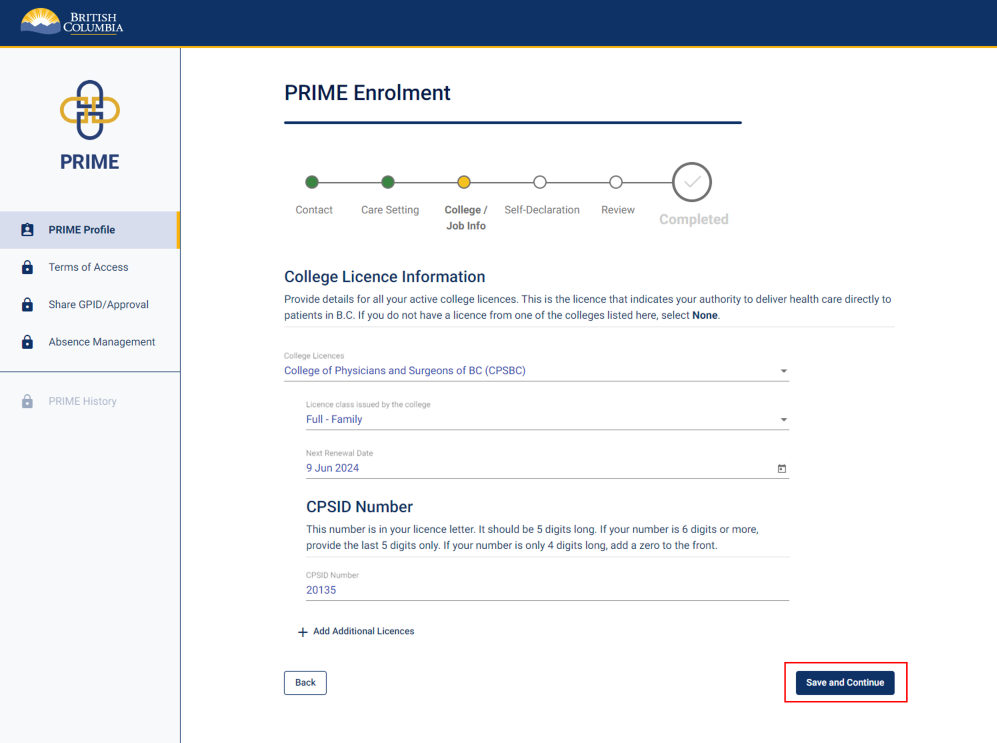
Select your licence category and class from the dropdown lists, then enter the next expiry/renewal date.
Click Save and Continue.
11. Request remote access
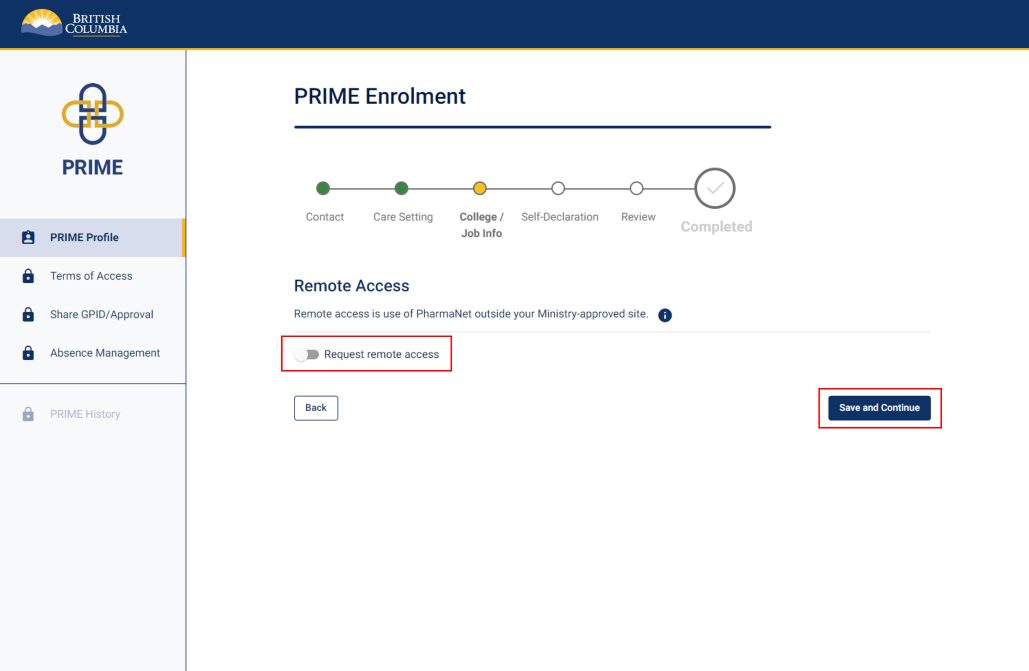
This screen will only appear for eligible practitioners. If you don’t see this option, you cannot request remote access.
Remote access is only available for practitioners working in private community health practice if it was included it in the site registration.
Remote access means you are physically located outside the premises of an approved PharmaNet site. You must always be physically located in B.C. when using PharmaNet, even if approved for remote access.
Click the checkbox to request remote access if you require it.
Click Save and Continue.
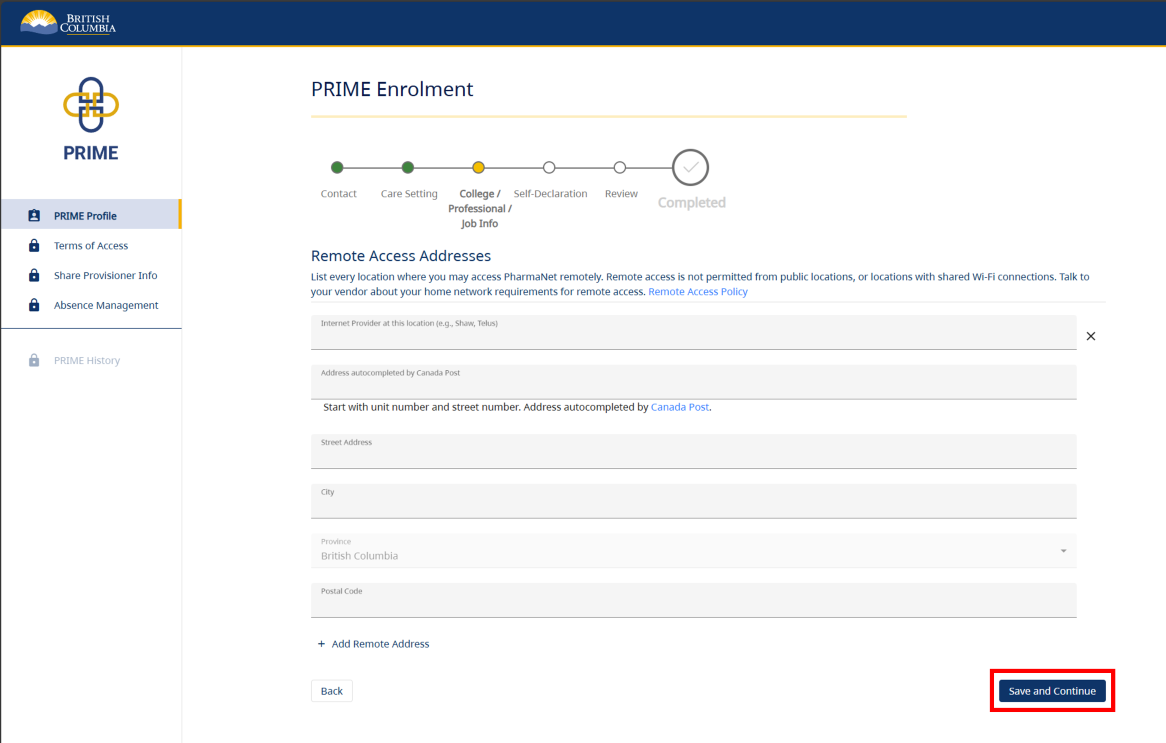
List every location where you may access PharmaNet remotely.
Click Save and Continue.
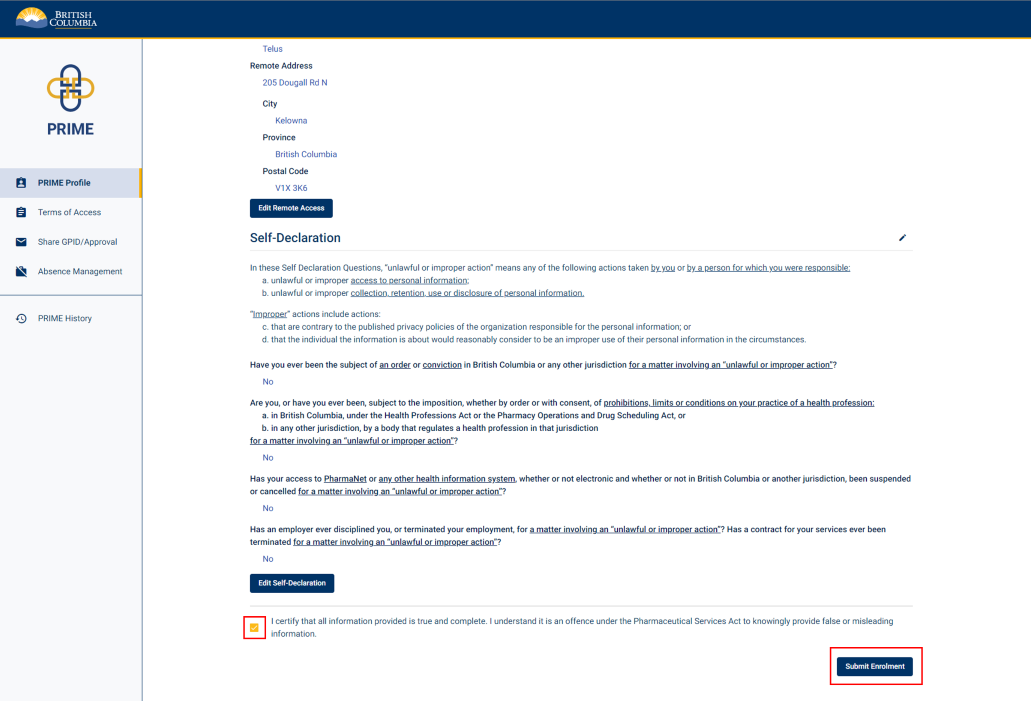
12. Self declaration
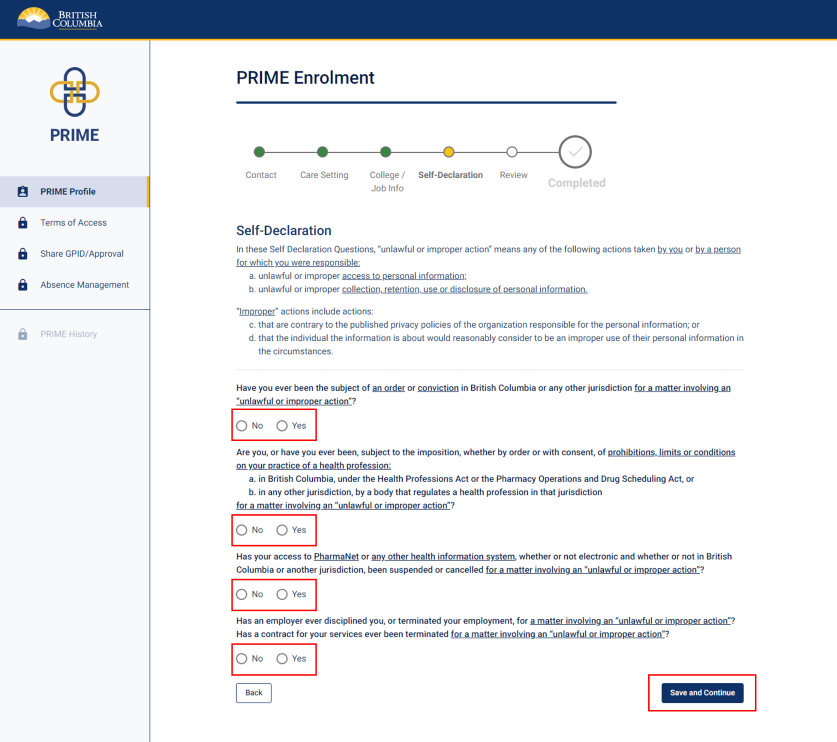
Answer the self-declaration questions by selecting either "No" or "Yes."
Please read the description of "unlawful or improper action" under Self-Declaration before answering the self-declaration questions.
If you select "Yes," a text box will appear and you will be asked to provide details.
Click Save and Continue.
13. Enrolment review (1 of 2)
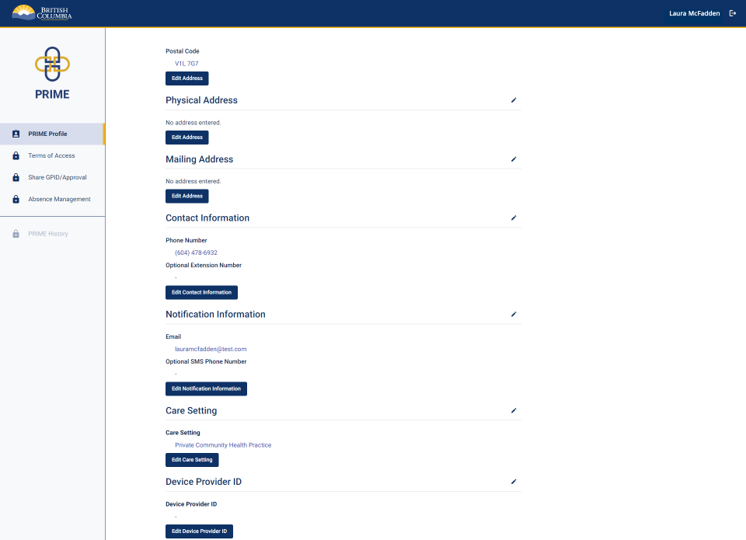
Review the information you entered for your PRIME profile.
Click the edit button or pencil icon to edit the information in any section.
Click continue or save to save changes.
14. Enrolment review (2 of 2)
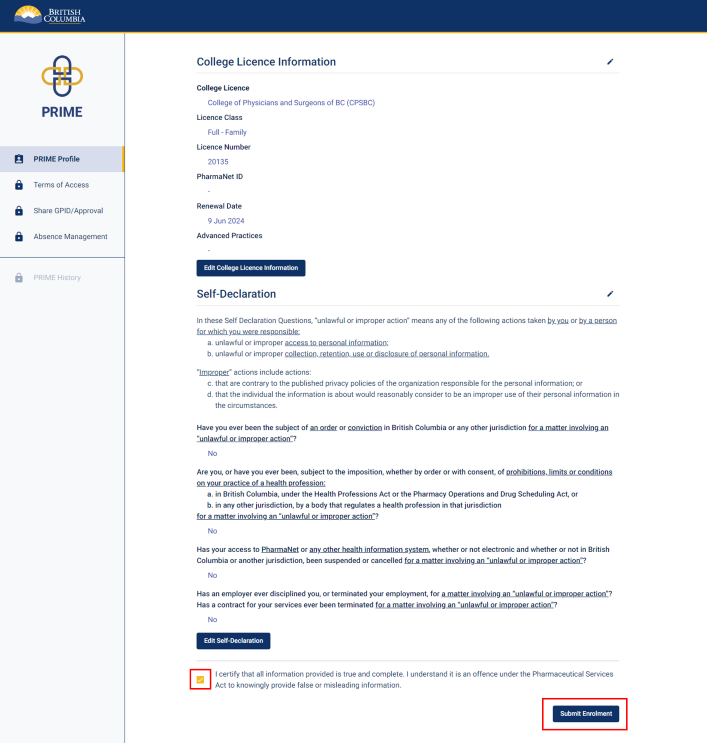
Click the checkbox to certify that all information is true and complete.
Click Submit Enrolment.
15. Submit enrolment
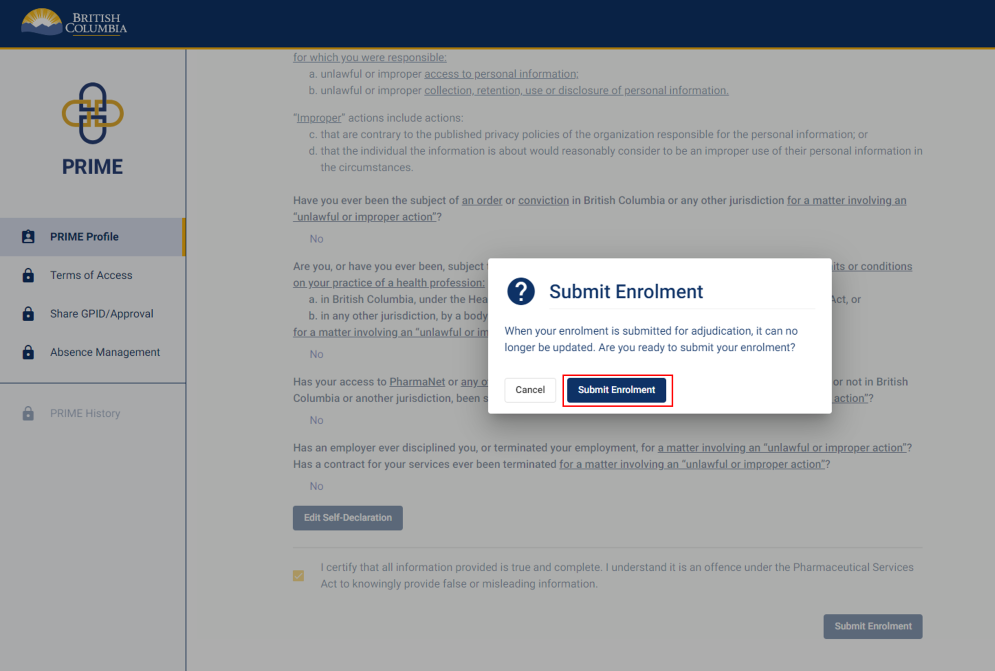
A pop-up window appears to confirm enrolment submission.
Click Submit Enrolment.
16. Enrolment submission approved (outcome 1)
You will see this screen if your request has been processed automatically. Your terms of access agreement will be specific to the type of access you have been granted and may differ from the example screenshot on the left.
Continue to step 18.
If you don't see this screen, proceed to step 17.
17. Enrolment submission under review (outcome 2)
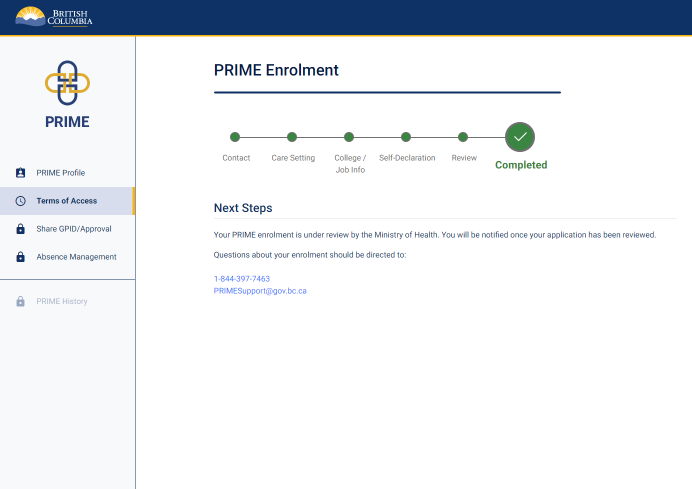
If you see this screen, your PRIME enrolment is now under review.
You can now log out of PRIME. Either PRIME Support will contact you for more information, or you will receive a notification from PRIME when it is time to log back in to complete the next steps, below.
Note: PRIME correspondence may show up in your junk folder. Check your junk folder and whitelist PRIME if needed to ensure you receive PRIME notifications.
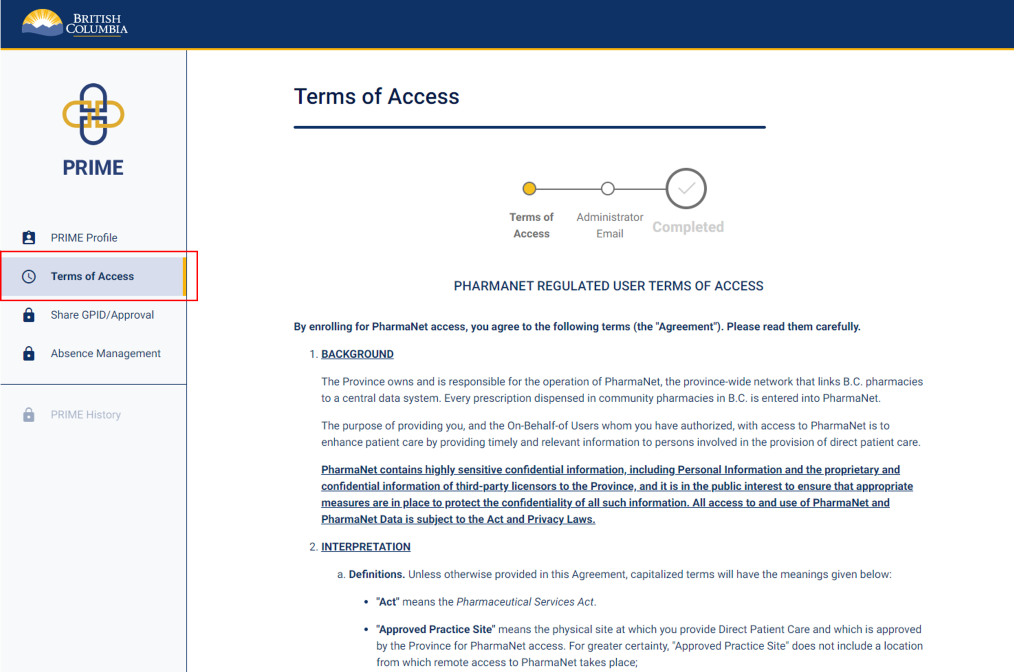
18. Terms of access (1 of 2)
Read the PharmaNet User Terms of Access (ToA). These will be specific to the type of access you have been granted and may differ from the example screenshot on the left.
If you have previously enrolled and submit updated information, the ToA may be different from the one you previously accepted.
19. Terms of access (2 of 2)
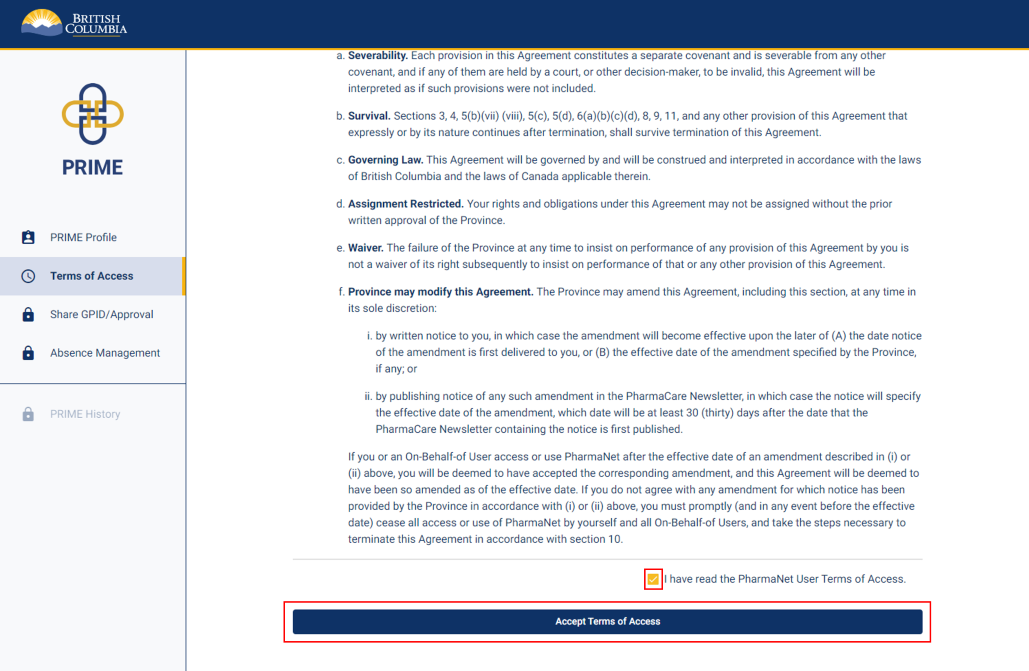
Check the box beside I have read the PharmaNet User Terms of Access.
Click Accept Terms of Access.
20. Terms of access confirmation
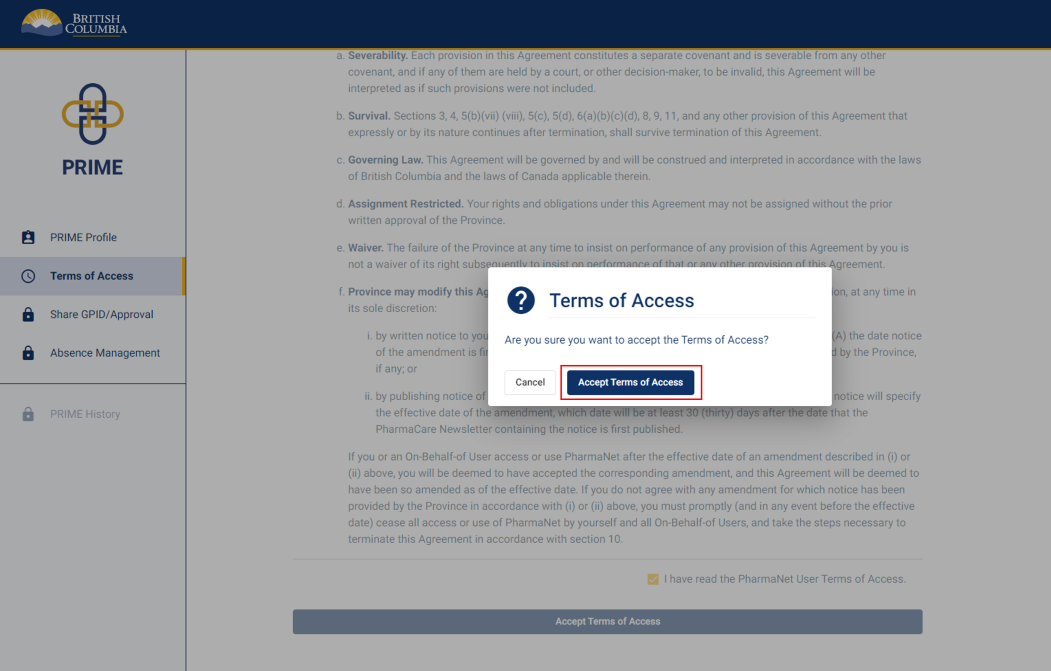
A pop-up window appears.
Confirm by clicking Accept Terms of Access.
21. Next steps to get PharmaNet
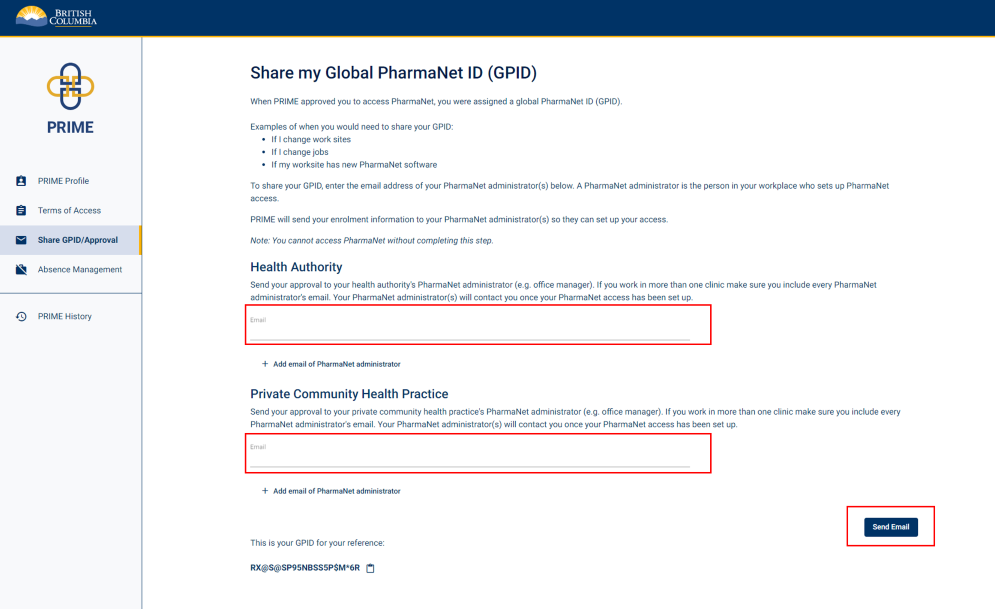
Enter the email address(es) for your PharmaNet administrator(s).
Your PharmaNet administrator is the person in your workplace who looks after setup of your PharmaNet user credentials. If you will be accessing PharmaNet from various worksites, enter the PharmaNet administrator's email for each one.
PRIME will let them know that you have been approved to access PharmaNet and they will get you connected.
Click Send Email.
22. Send approval notification email to PharmaNet Administrator
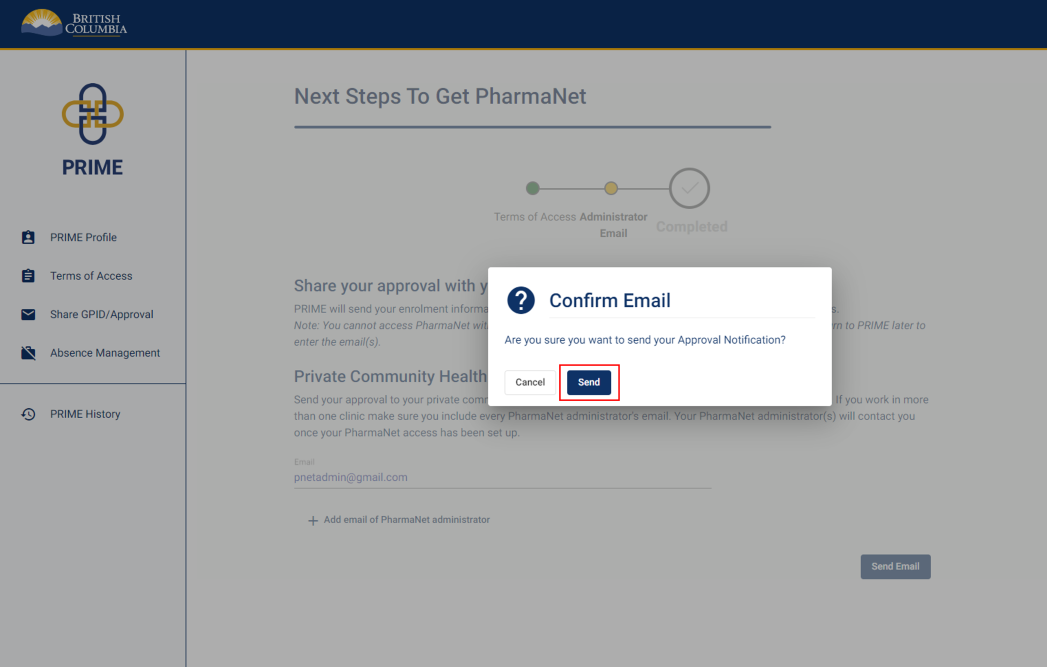
A pop-up window appears. Click Send.
23. Confirmation sent
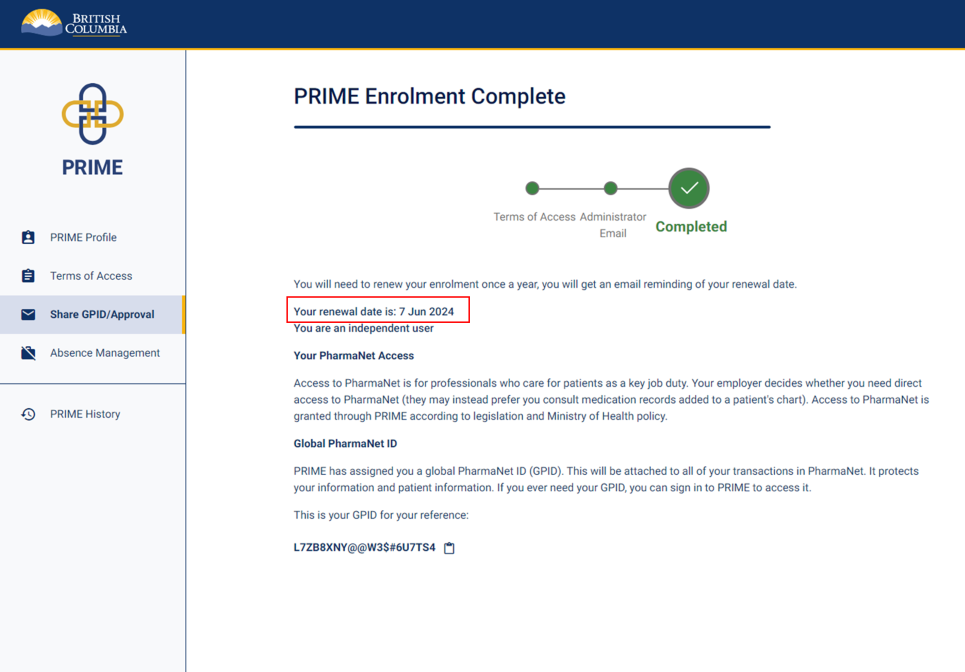
Your enrolment in PRIME is complete. Note your next renewal date. You must renew annually to retain your PharmaNet access.
The type of access you have been approved for is noted below your renewal date. In the example screenshot, the user has been approved as an independant user.
You will not receive a confirmation email. Do not contact PRIME Support to confirm approval or enrolment.
PRIME has assigned you a Global PharmaNet ID (GPID), which will be attached to all your transactions in PharmaNet. This keeps patient and health professional information secure.
24. Get support
Questions about PRIME should be directed to 1-844-397-7463 or to PRIMESupport@gov.bc.ca.
On-behalf-of users support independent users. They include medical office assistants (MOAs), pharmacy assistants, pharmacy students, certified dental assistants, unit clerks and others.
Even if you are only "pulling" a patient record for a practitioner and not viewing PharmaNet info, you need to enrol in PRIME.
To enrol in PRIME as on-behalf of users you will need:
- The BC Services Card app set up on a mobile device (phone or tablet). If you cannot get a BC Services Card, you can set up the app using other acceptable government ID. If you don’t have a suitable mobile device, but do have a BC Services Card, you can opt for the BC Token. Visit BC Services Card app set up for more information.
- The email address for the person in your workplace who sets up PharmaNet accounts (the "PharmaNet administrator")
- The name(s) and physical address(es) of workplace(s) where you use PharmaNet
Most PRIME enrolments are approved immediately. Once your enrolment is approved:
- Enter the email address of the person in your workplace who sets up PharmaNet accounts.
- PRIME will share your approval notification with them. This allows them to set up your PharmaNet account. The notification contains details the recipient will need to set up your local PharmaNet user credentials, such as a link to your GPID that expires after 10 days. Only the link expires, not your approval to access PharmaNet. If the link expires before they set up your account, you will need to resend your approval notification.
1. PRIME landing page
Select Individual Access to start.
Click Next to acknowledge the Collection of Personal Information notice.
2. Login to PRIME with the BC Services Card app
Select BC Services Card app.
For more information about options for logging in with a BC Services Card app, visit BC Services Card.
3. BC Services Card app: enter pairing code in mobile device
Next steps:
1. Open the BC Services Card app on mobile device and select Enter Pairing Code.
2. Enter the code displayed on the BC Services Card login screen.
3. Click Continue.
4. BC Services Card app: choose to send notification to mobile device instead
Choose whether to send a notification to your mobile device, so that you can skip the pairing step next time you log in.
Click Continue.
5. BC Services Card information shared with PRIME
This screen displays the information that is shared between your BC Services Card app and the PRIME application.
Click Continue.
6. Enrollee information (1 of 2)
You are now inside the PRIME application.
Your name, date of birth and address are auto-populated from your BC Services Card.
If your college licence shows a different name than the one on your BC Services Card, select I have an alternate name. If you select this option you must enter both a first and last name. Your first and last name must be exactly as your college shows them.
There is also an option to provide a physical or mailing address (address in B.C. where you can be contacted).
You must enter a physical or mailing address if:
- there is no address populated from your BC Services Card
- your BC Services Card address is not in B.C.
7. Enrollee information (2 of 2)
Enter a phone number that may be used to contact you, and a non-shared email address that you check regularly. There is an option to include a phone number for SMS notifications.
Click Save and Continue.
8. Care setting information
Select the care settings where you will be using PharmaNet.
If you work at more than one care setting, select Add Additional Care Setting and then add the details.
Please only select care settings where you currently know you will be accessing PharmaNet. If the care settings you will be accessing PharmaNet at change, return to PRIME to update your care setting selection.
Click Save and Continue.
Note: Do not select Community Pharmacy unless you are physically working in a pharmacy.
9. College licence information
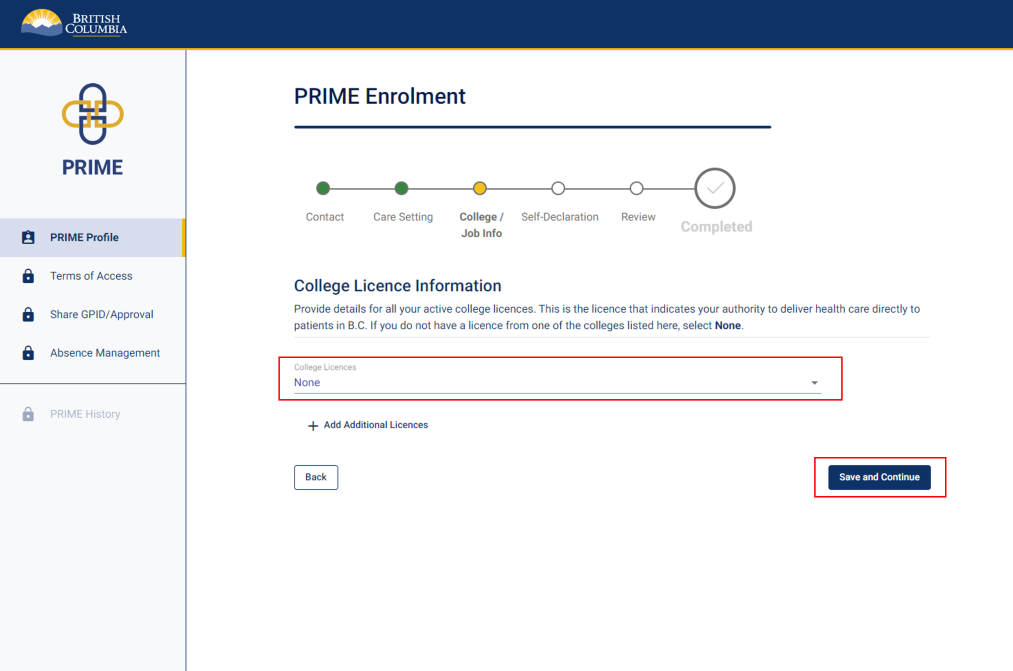
Select "None" in the College Licences field.
Click Save and Continue.
10. Workplace information for on-behalf-of users
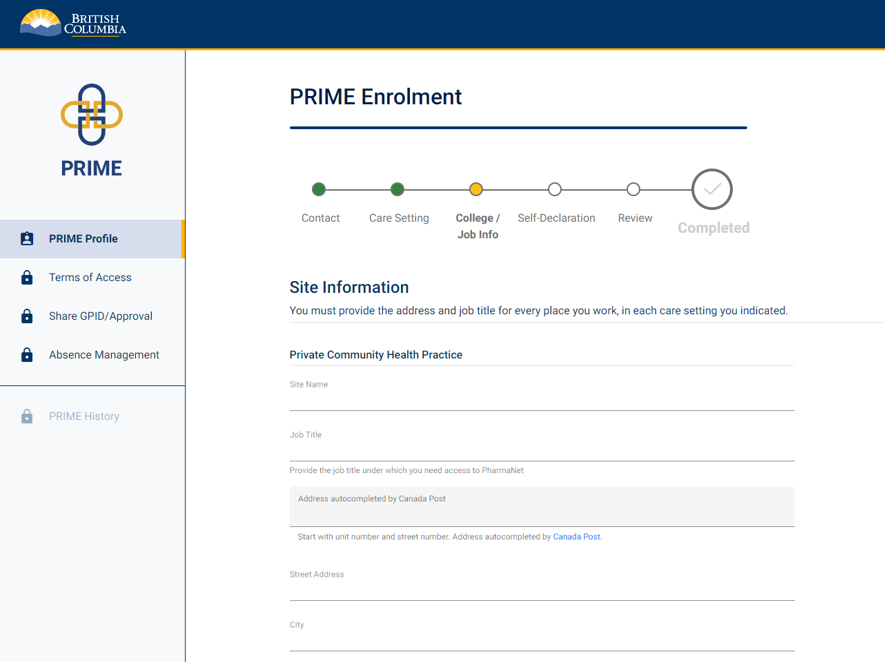
Enter the address for every place you work, in every care setting indicated (see step 8). Click on the job title field to select from a dropdown list of common job titles, or manually enter a job title.
If you are manually entering a job title, tab or click into the next field once your entry is complete. Do not use the enter key as this will replace your input with one of the dropdown options.
To add multiple locations, click Add Additional Site.
Click Save and Continue.
11. Self declaration
Answer the self-declaration questions by selecting either "No" or "Yes."
Please read the description of "unlawful or improper action" under Self-Declaration before answering the self-declaration questions.
If you select "Yes," a text box will appear and you will be asked to provide details.
Click Save and Continue.
12. Enrolment review (1 of 2)
Review the information you entered for your PRIME profile.
Click the edit button or pencil icon to edit the information in any section.
Click continue or save to save changes.
13. Enrolment review (2 of 2)
Click the checkbox to certify that all information is true and complete.
Click Submit Enrolment.
14. Submit enrolment
A pop-up window appears to confirm enrolment submission.
Click Submit Enrolment.
15. Enrolment submission approved (outcome 1)
You will see this screen if your request has been processed automatically. Your terms of access agreement will be specific to the type of access you have been granted and may differ from the example screenshot on the left.
Continue to step 18.
If you don't see this screen, proceed to step 17.
16. Enrolment submission under review (outcome 2)
If you see this screen, your PRIME enrolment is now under review.
You can now log out of PRIME. Either PRIME Support will contact you for more information, or you will receive a notification from PRIME when it is time to log back in to complete the next steps, below.
Note: PRIME correspondence may show up in your junk folder. Check your junk folder and whitelist PRIME if needed to ensure you receive PRIME notifications.
17. Terms of access (1 of 2)
Read the PharmaNet User Terms of Access (ToA). These will be specific to the type of access you have been granted and may differ from the example screenshot on the left.
If you have previously enrolled and submit updated information, the ToA may be different from the one you previously accepted.
18. Terms of access (2 of 2)
Check the box beside I have read the PharmaNet User Terms of Access.
Click Accept Terms of Access.
19. Terms of access confirmation
A pop-up window appears.
Confirm by clicking Accept Terms of Access.
20. Next steps to get PharmaNet
Enter the email address(es) for your PharmaNet administrator(s).
Your PharmaNet administrator is the person in your workplace who looks after setup of your PharmaNet user credentials. If you will be accessing PharmaNet from various worksites, enter the PharmaNet administrator's email for each one.
PRIME will let them know that you have been approved to access PharmaNet and they will get you connected.
Click Send Email.
21. Send approval notification email to PharmaNet Administrator
A pop-up window appears. Click Send.
22. Confirmation sent
Your enrolment in PRIME is complete. Note your next renewal date. You must renew annually to retain your PharmaNet access.
The type of access you have been approved for is noted below your renewal date. In the example screenshot, the user has been approved as an independant user.
You will not receive a confirmation email. Do not contact PRIME Support to confirm approval or enrolment.
PRIME has assigned you a Global PharmaNet ID (GPID), which will be attached to all your transactions in PharmaNet. This keeps patient and health professional information secure.
23. Get support
Questions about PRIME should be directed to 1-844-397-7463 or to PRIMESupport@gov.bc.ca.
For definition of a site and explanation of roles (signing authority, privacy officer, etc.), refer to the PRIME site registration quick guide (PDF, 175 KB).
1. Private community health practice site registration for PharmaNet access: landing page
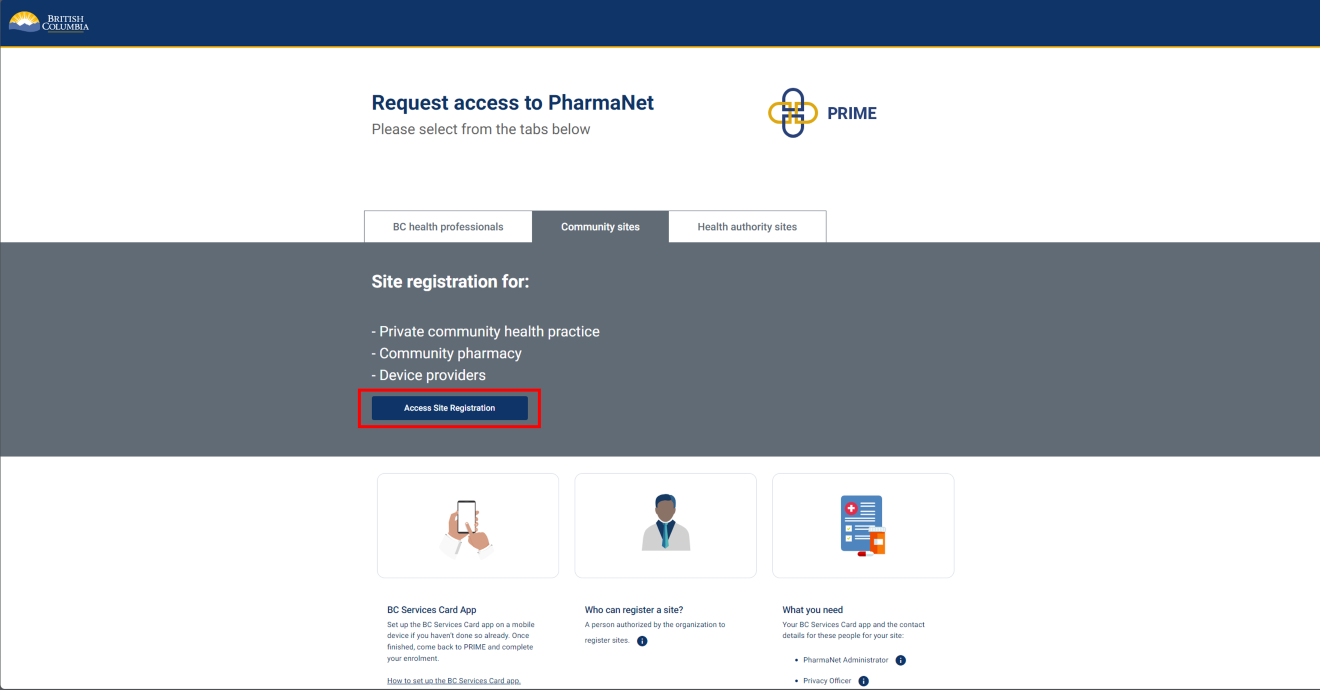
Select Site Registration to start.
The person registering the site ("signing authority" in PRIME) should have:
- BC Services Card app set up on a mobile device.
2. Collection of Personal Information Notice
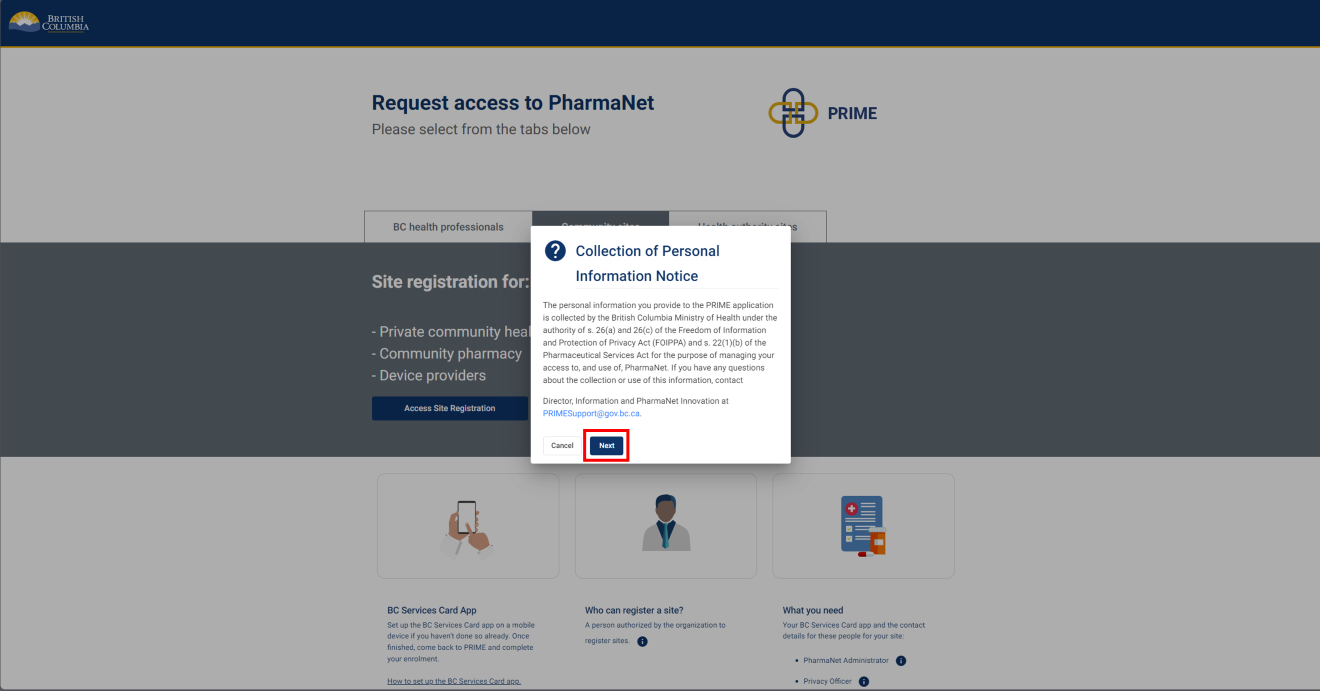
Click Next to acknowledge the Collection of Personal Information Notice.
3. Log in with the BC Services Card app

Select BC Services Card app.
For more information about logging in with a BC Services Card, visit: BC Services Card.
4. BC Services Card login: enter pairing code in mobile device
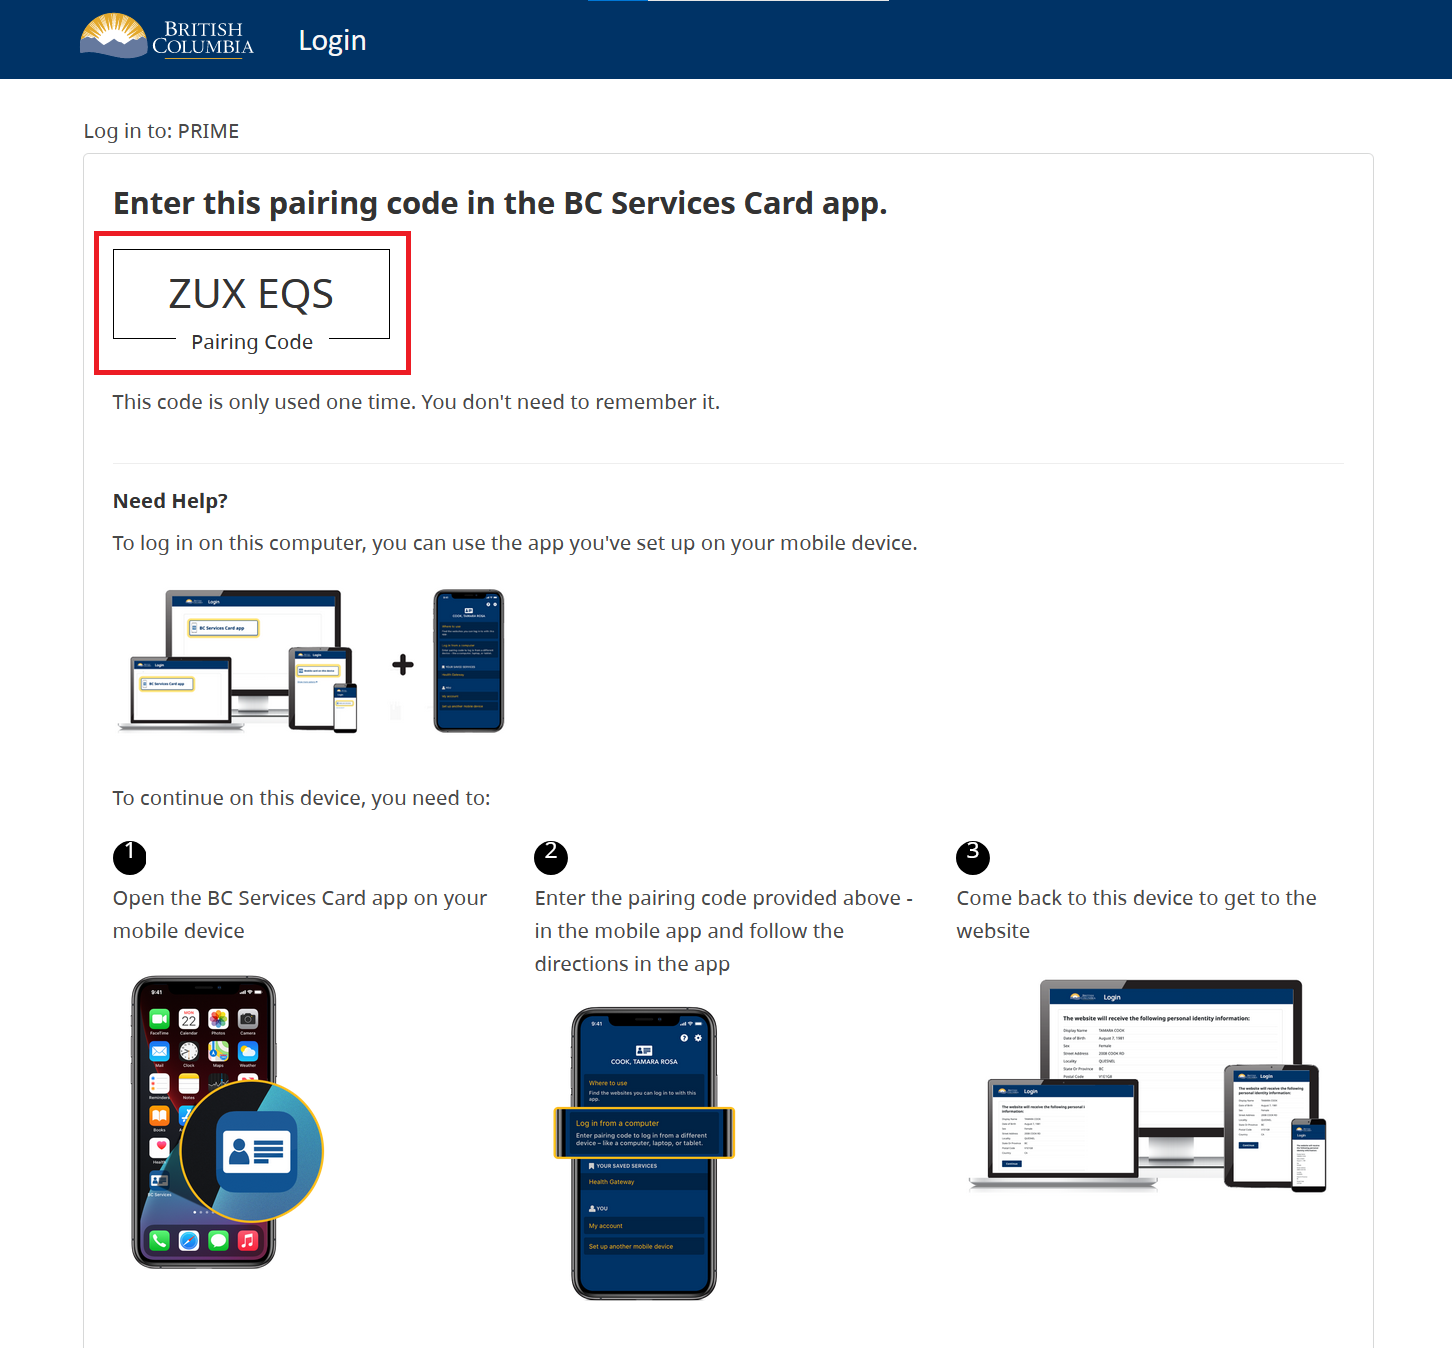
- Open the BC Services Card app on a mobile device
- Enter the code displayed on the BC Services Card login screen in the pairing code field.
- Select Continue.
PRIME will proceed to the next screen.
5. BC Services Card login: choose to send notification to mobile device instead
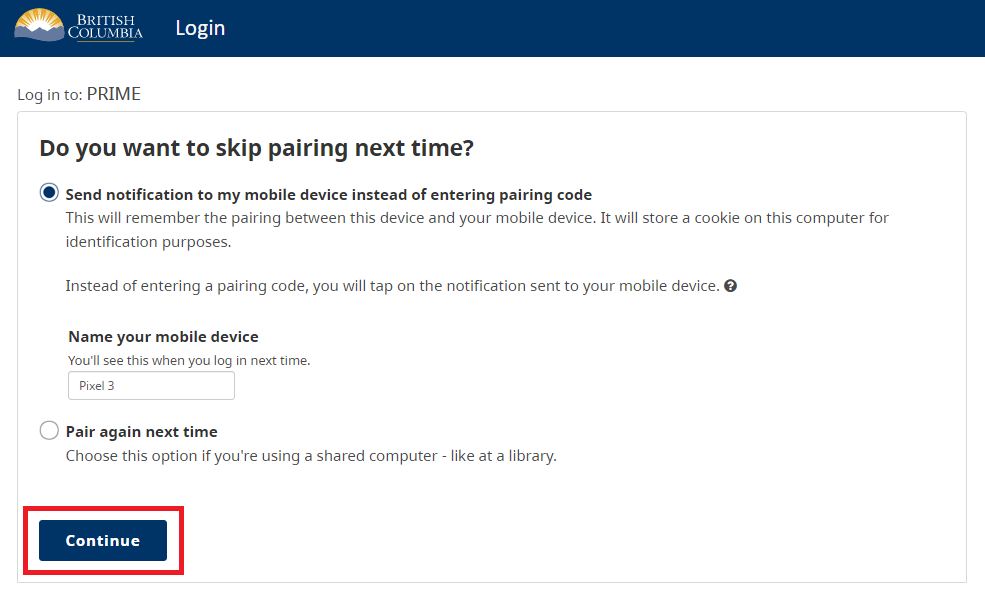
Choose whether to have a notification sent to a mobile device instead of entering a pairing code so you can skip the pairing step in subsequent logins.
Click Continue.
6. BC Services Card information shared with PRIME
This screen displays the information that is shared between the Signing Authority's BC Services Card app and PRIME.
Click Continue.
7. Organization information
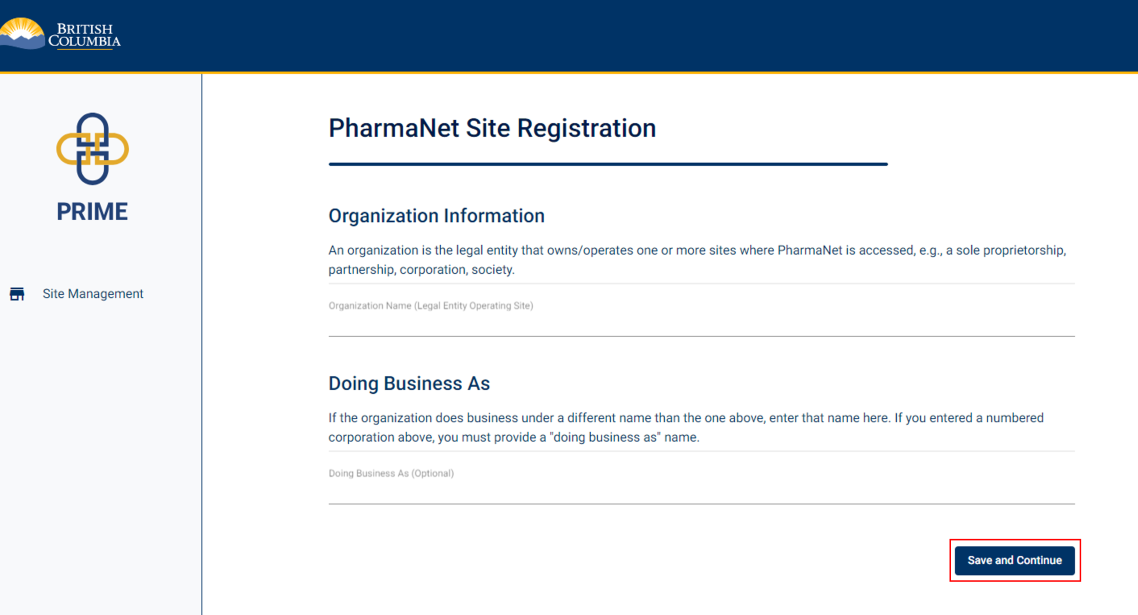
Enter the organization name.
If the organization does business under a different name than organization name, enter a Doing Business As name.
Click Save and Continue.
8. Care setting
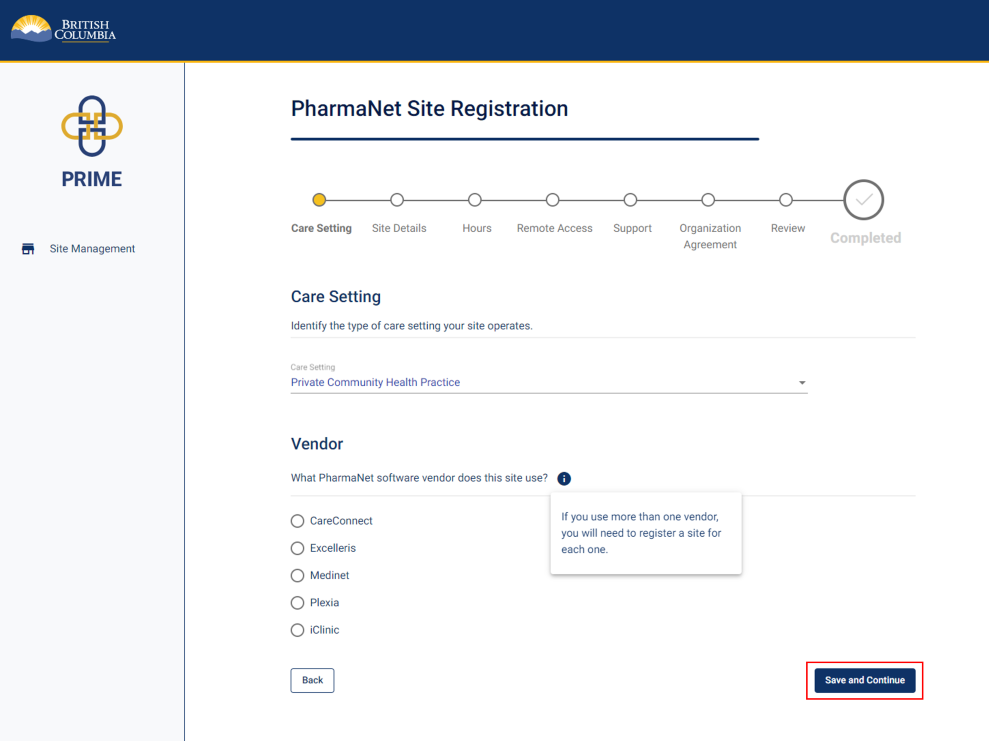
Select the type of care setting and the software vendor the site uses.
Visit Community health practice access to PharmaNet for software vendor contact info.
Click Save and Continue.
9. Site details (1 of 2)
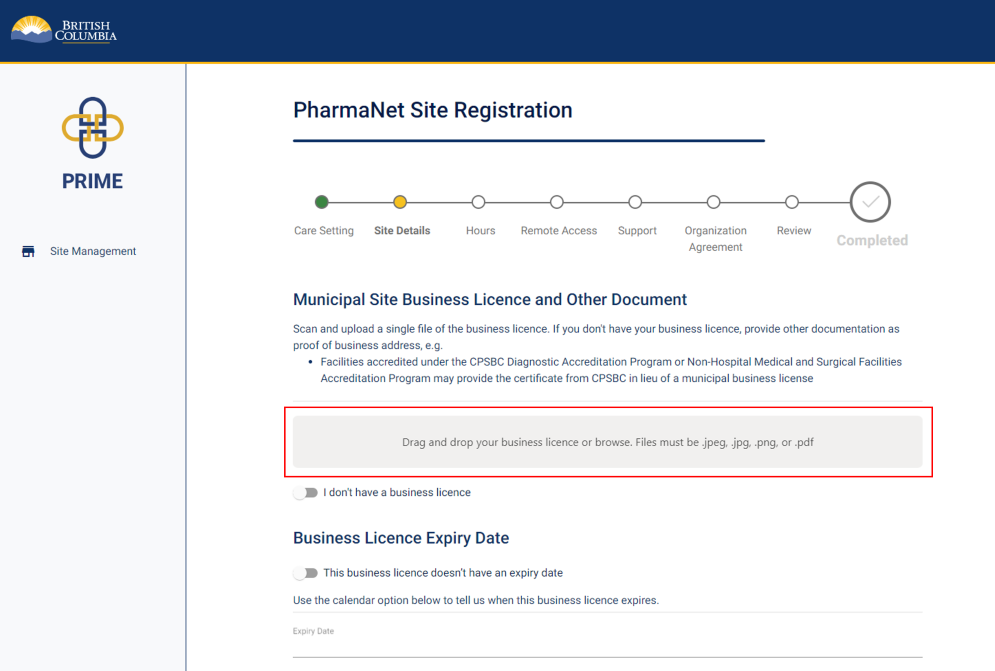
Scan and upload a copy of the site's municipal business licence.
Provide the business licence's expiry date.
If you do not have a business license yet, click the I don't have a business licence toggle, and enter a reason in the text box that appears below.
If you are located in a municipality or region that does not issue business licenses, please upload a screenshot of the municipality website indicating that a business license is not issued or contact PRIMESupport@gov.bc.ca to discuss.
10. Site details (2 of 2)
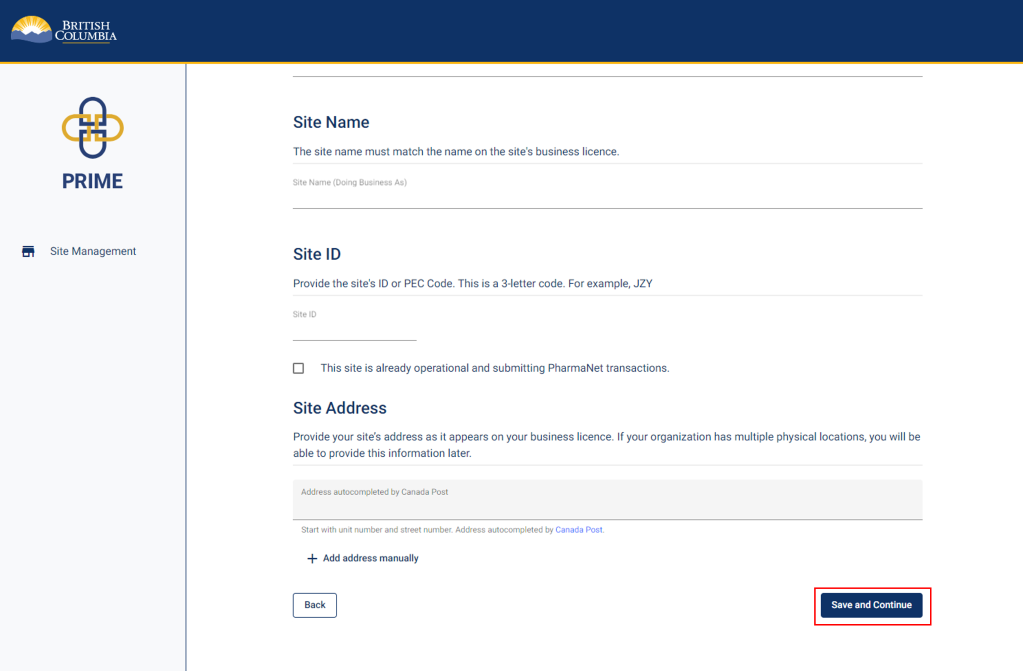
Enter the name under which the site does businesse. Please enter a site name even if it is the same as the name of the organization.
If the site does business under a different name than is on the licence, you must provide a "doing business as (DBA)" name. The organization's DBA name is on the organization information card
Provide the site ID or PEC code if you know it. If you are registering a new site using a different software vendor, do not enter your old site registration ID; a new PharmaNet site ID will be provided to your new vendor.
Enter the site's address as it appears on the business licence.
Click Save and Continue.
11. Hours of operation
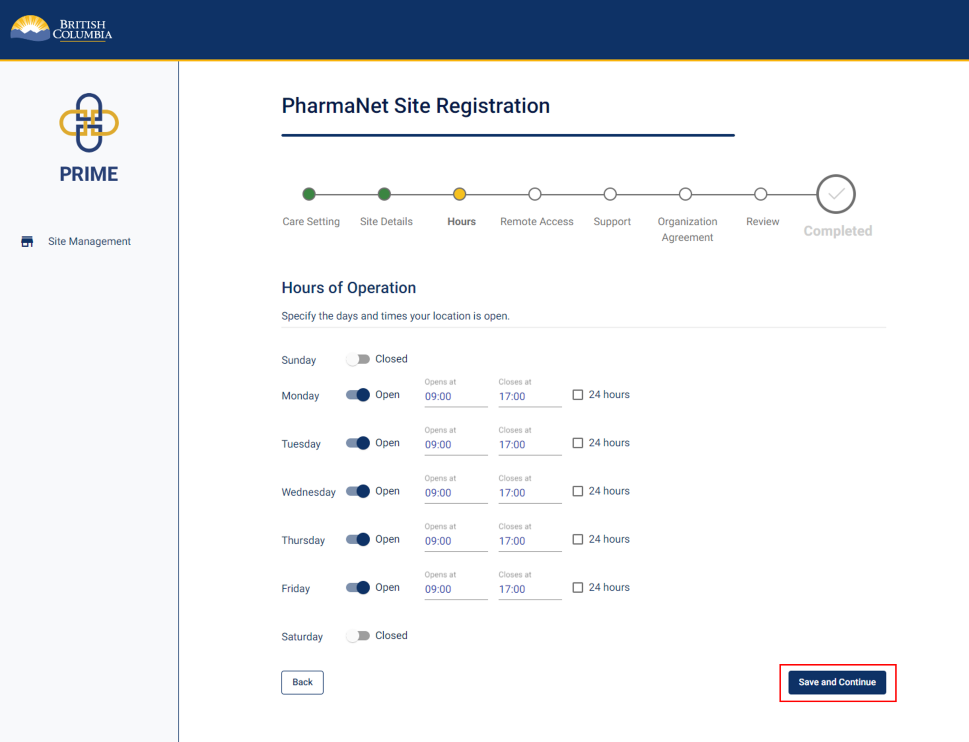
Specify the days and times the site is open for business.
Don’t select 24 hours unless your site is open to patients 24 hours/day.
Click Save and Continue.
12. Practitioners requiring remote PharmaNet access
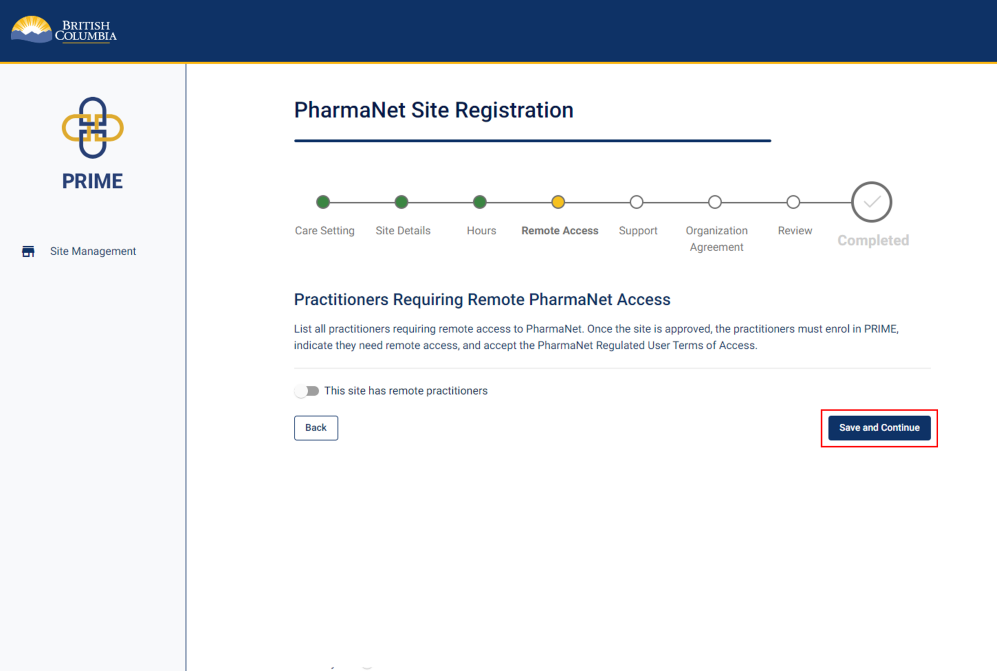
If applicable, list all practitioners requiring remote access to PharmaNet for the site.
Note: Remote access is only available to physicians and nurse practitioners.
If not applicable, click Save and Continue.
13. PharmaNet administrator information
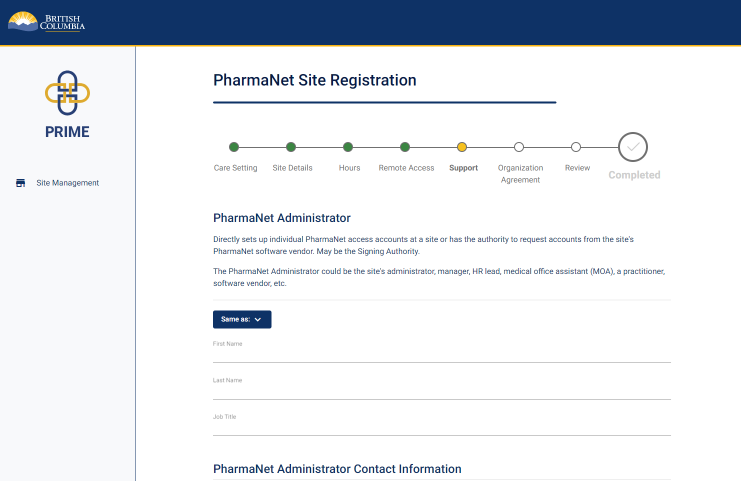
The next three steps will require you to enter information for three different functions. One person can perform all three of these functions.
If all three roles are performed by one person at your site, click the Same as button to auto-populate the information for each subsequent role.
If each role is performed by a different person, enter their information as requested on each screen.
Enter the PharmaNet administrator's name, job title, and contact information.
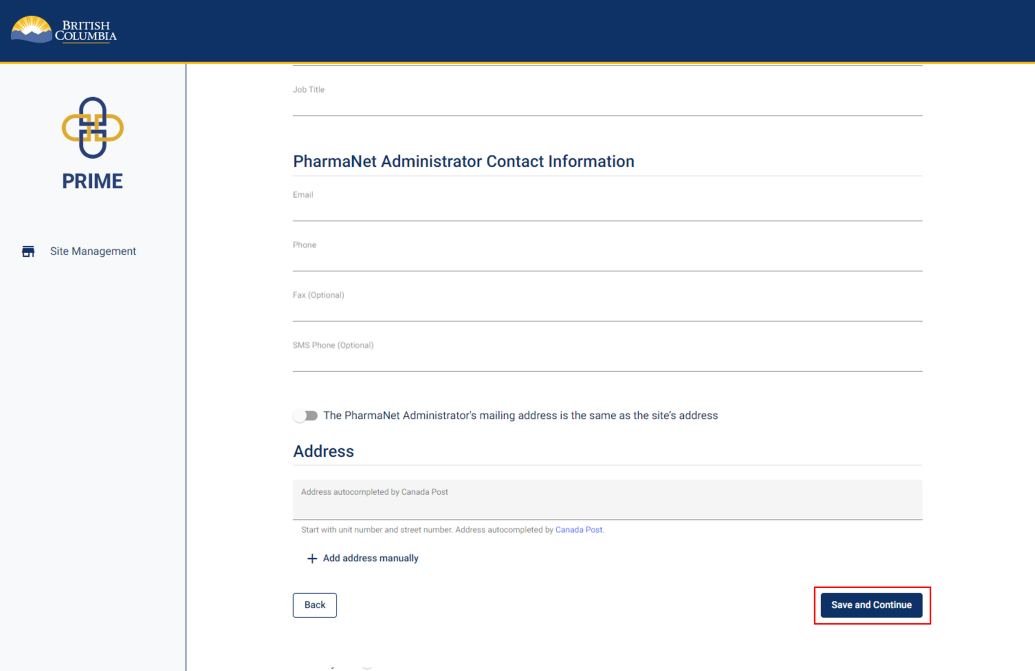
Click Save and Continue.
14. Privacy officer information
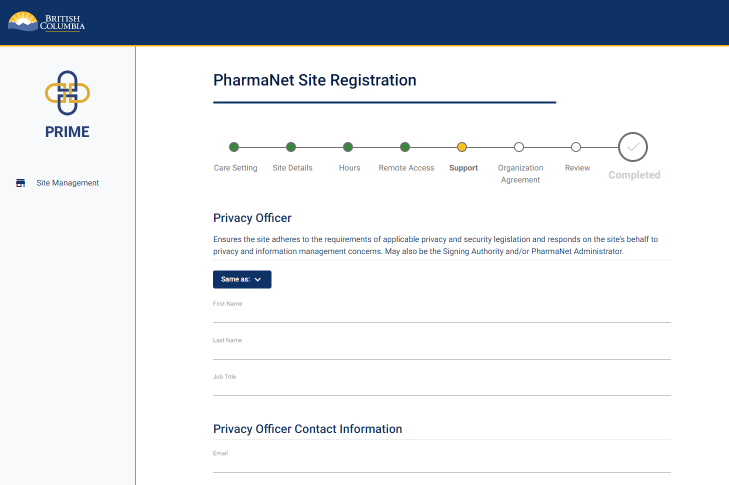
Enter the privacy officer's name, job title, and contact information.

Click Save and Continue.
15. Technical support contact information
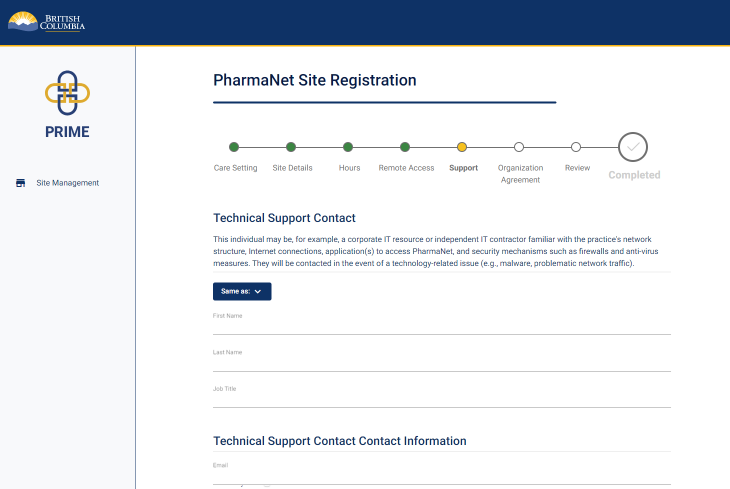
Enter the technical support's name, job title, and contact information.
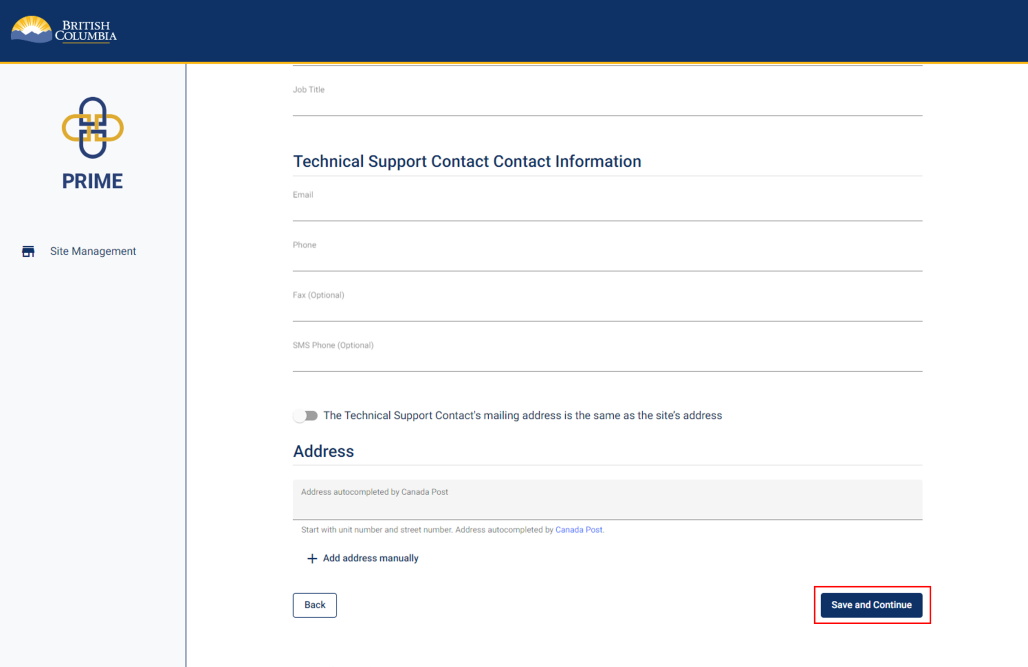
Click Save and Continue.
16. Review and accept Organization Agreement for PharmaNet Use (1 of 3)
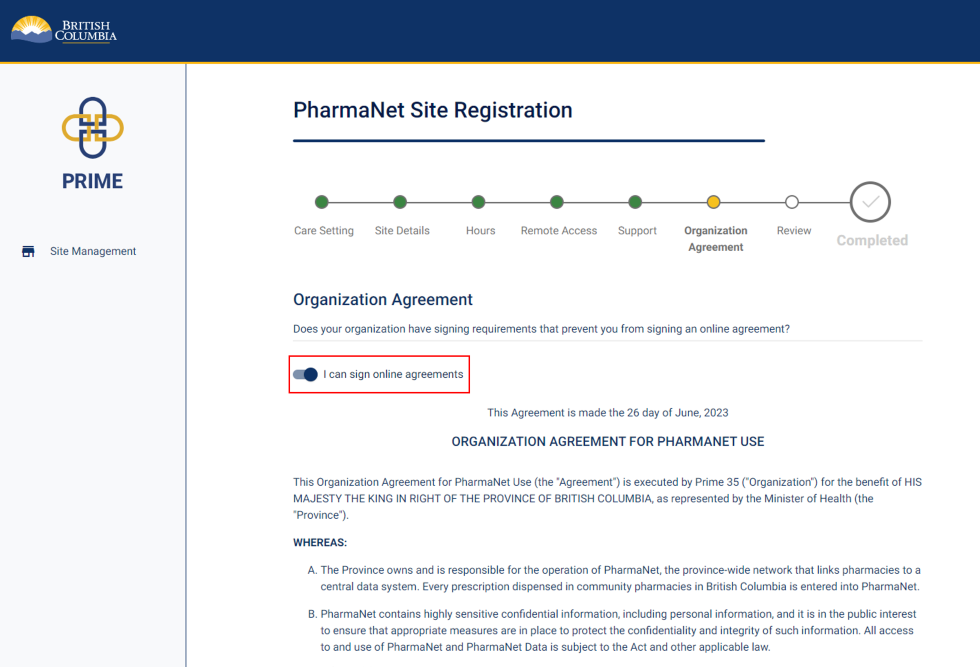
If you are legally authorized to accept on behalf of your organization, and your organization allows signing online agreements, click I can accept online agreements.
If you cannot accept online agreements, proceed to Step 18.
Scroll down to carefully read the Organization Agreement for PharmaNet Use, as it contains important details for the organization to be aware of.
17. Review and accept Organization Agreement for PharmaNet Use (2 of 3)
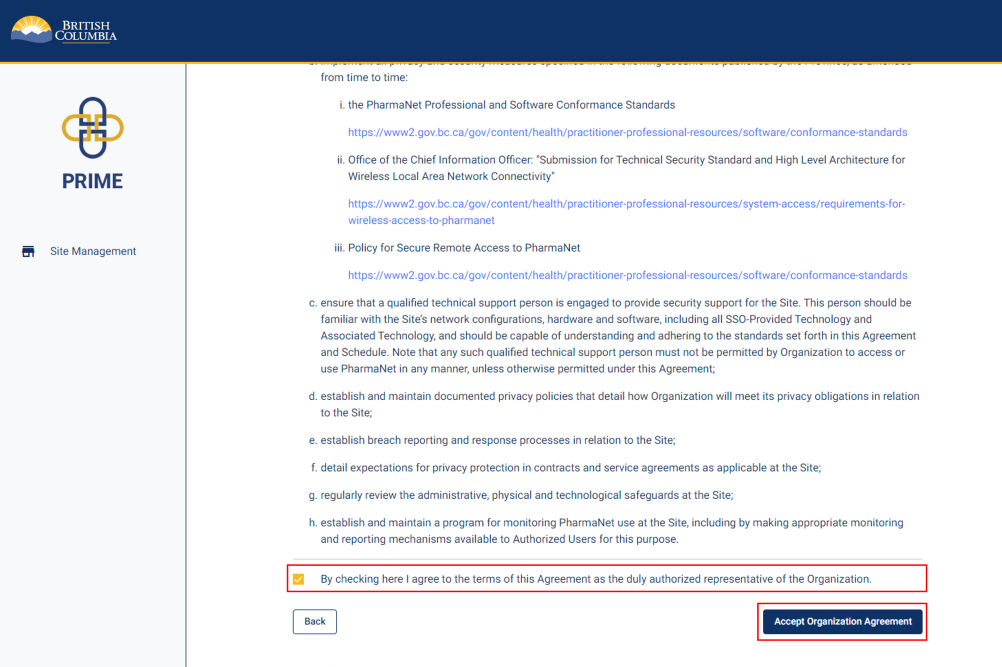
Click the checkbox to agree to the Organization Agreement for PharmaNet Use as the organization's authorized representative
Click Accept Organization Agreement.
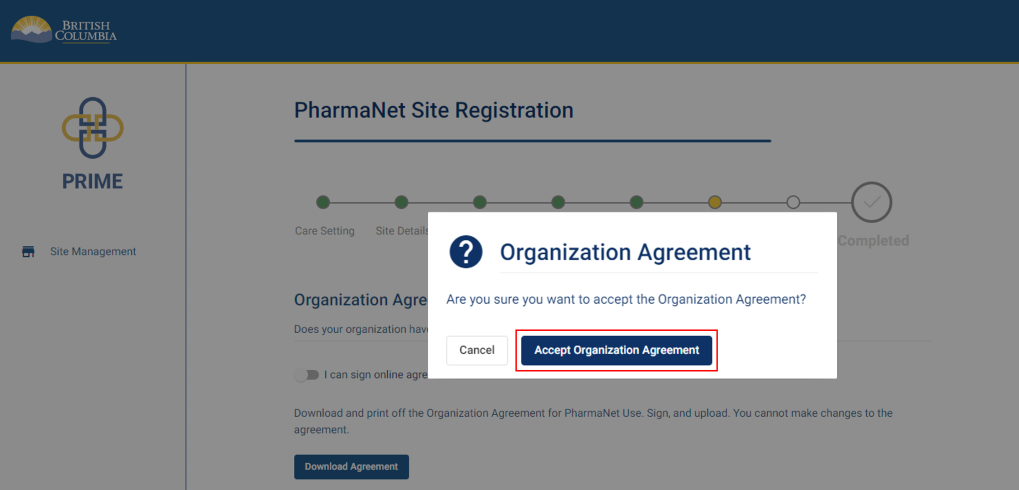
18. Review and accept Organization Agreement for PharmaNet Use (3 of 3)
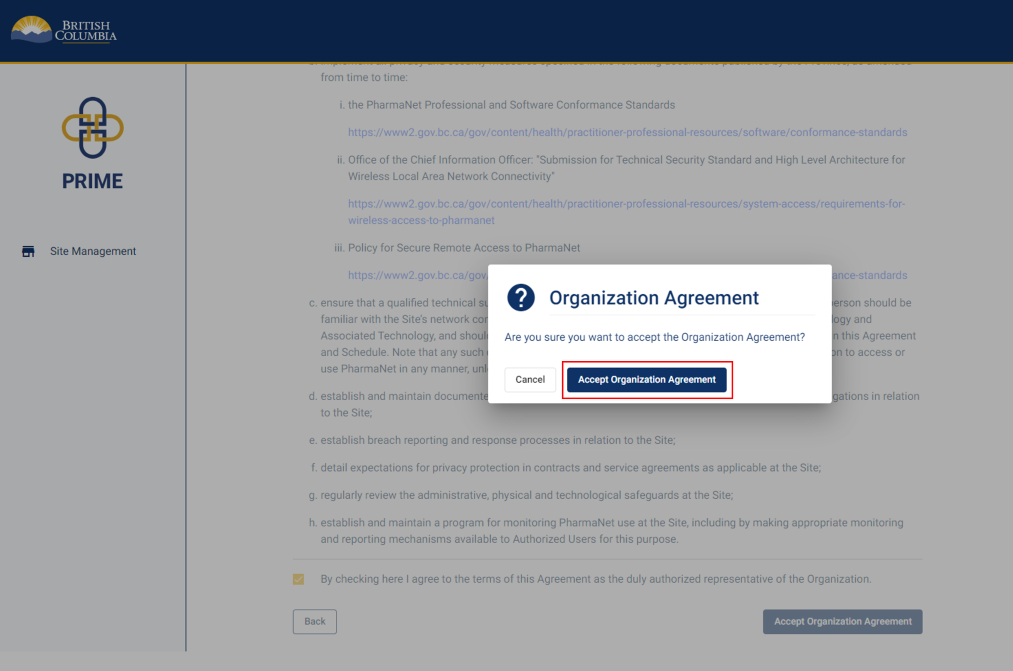
A pop-up window appears to confirm acceptance of the Organization Agreement.
Click Accept Organization Agreement.
19. Organization Agreement for PharmaNet Use (if you are not able to accept online agreements) (1 of 2)
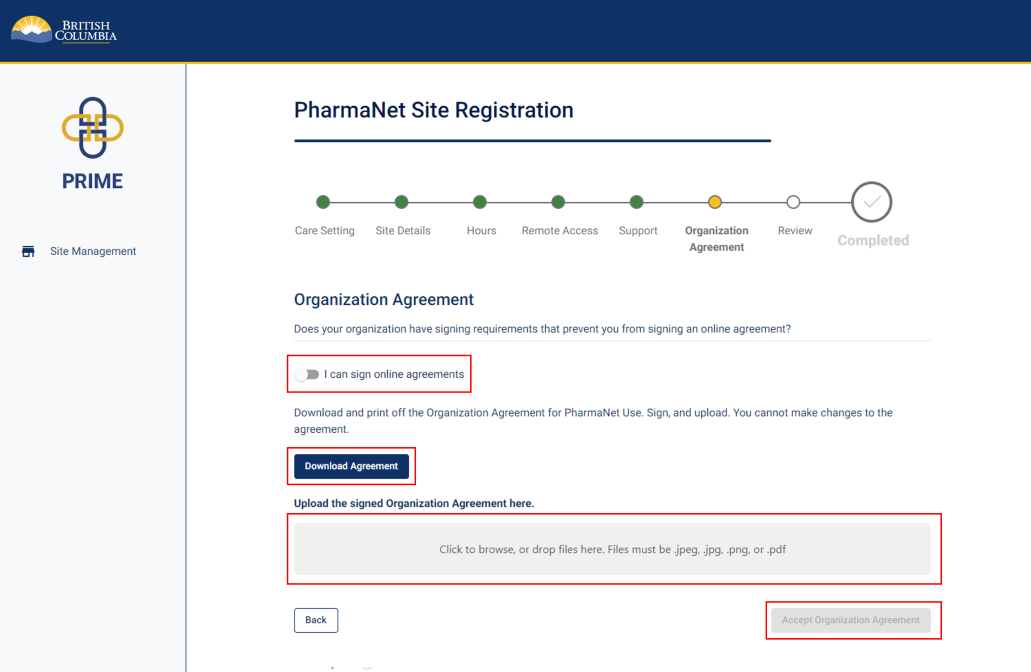
If the organization has signing requirements that prevent you from accepting an online agreement, download a copy of the organization agreement by clicking the Download Agreement button.
Print a copy of the agreement, sign it by hand, and upload it back to PRIME.
Click Accept Organization Agreement.
20. Organization Agreement for PharmaNet Use (if you are not able to accept online agreements) (2 of 2)
A pop-up window appears to confirm acceptance of the Organization Agreement.
Click Accept Organization Agreement.
21. Site registration review (1 of 3)
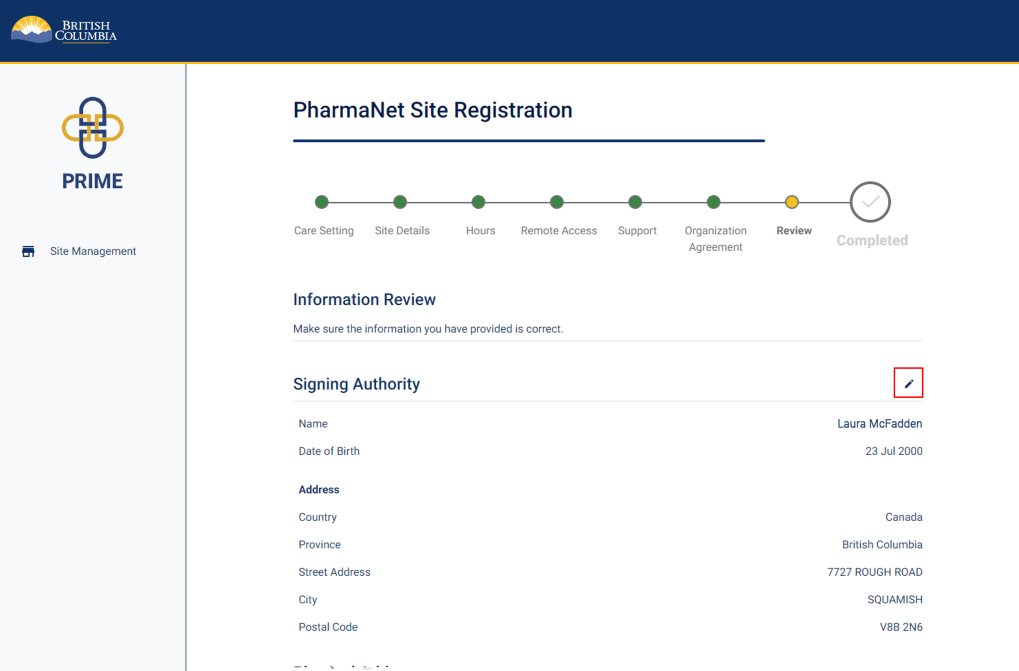
Review the information provided in the registration.
Click the edit button or pencil icon to edit the information in any section.
Click continue or save to save changes.
22. Site registration review (2 of 3)
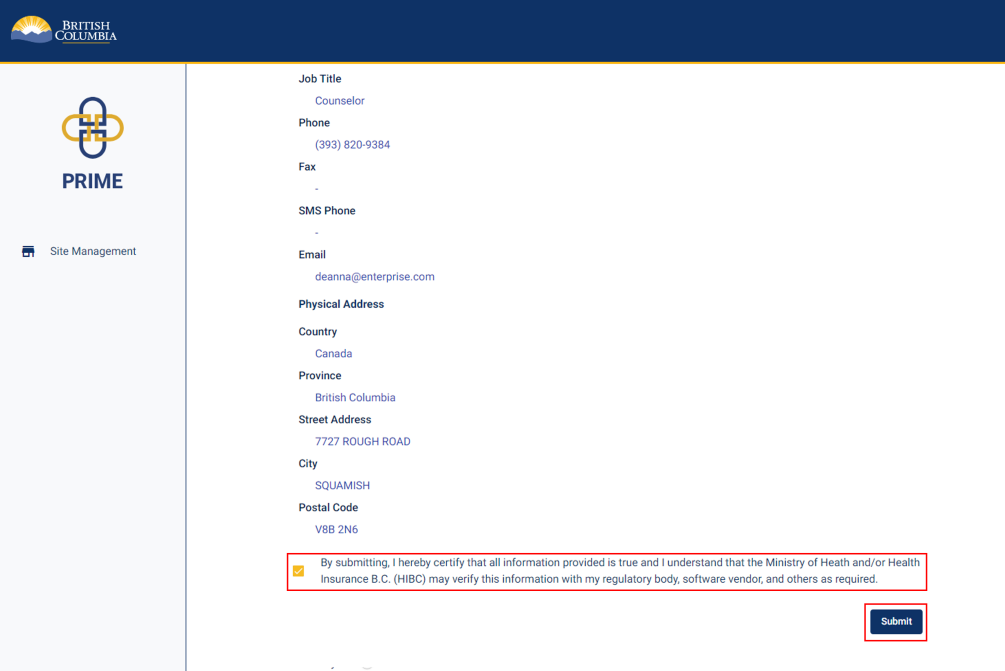
Check the box to certify that all information provided is true and complete.
Click Submit.
23. Site registration review (3 of 3)
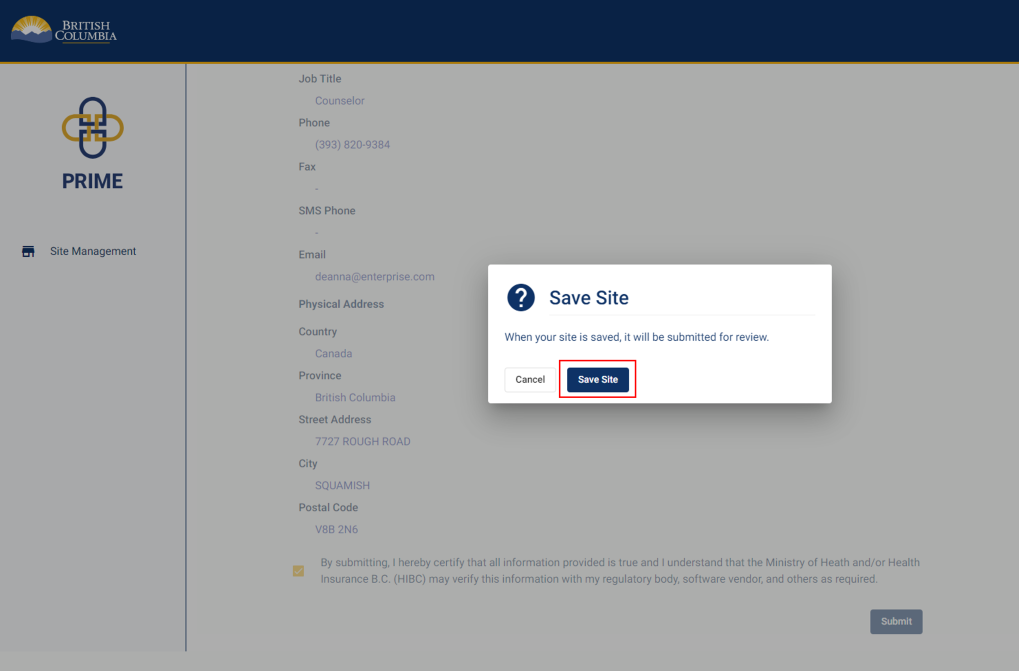
A pop-up window appears to confirm the registration submission.
Click Save Site.
24. Site registration submitted
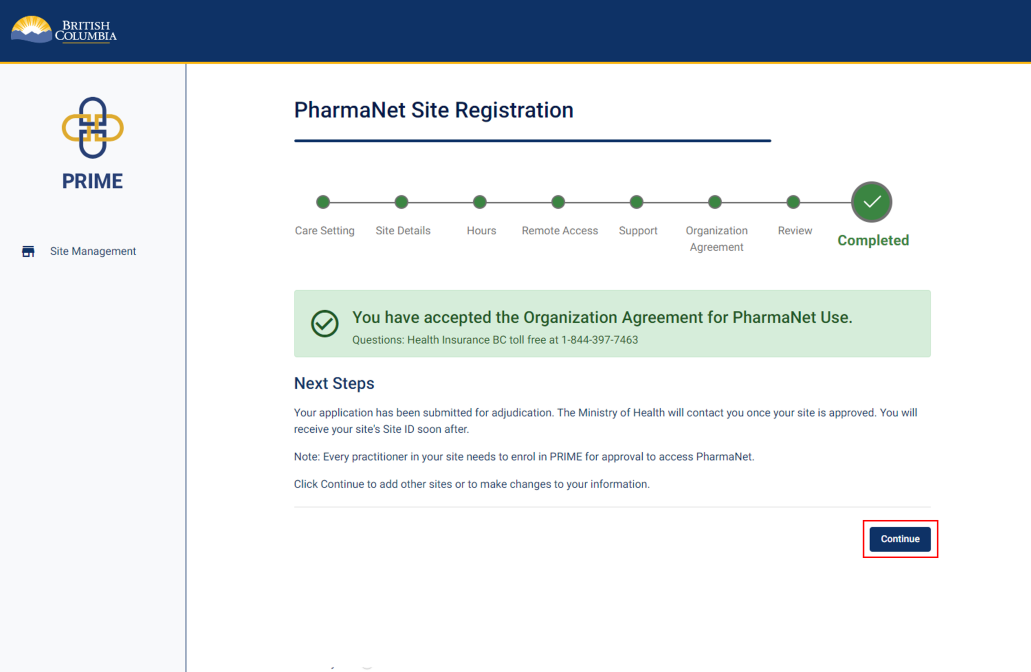
You will see confirmation of your acceptance of the Organization Agreement for PharmaNet Use.
This means the submission is under review by the Ministry, and the Signing Authority will be contacted in case of questions.
Click Continue.
25. Site management—waiting for approval
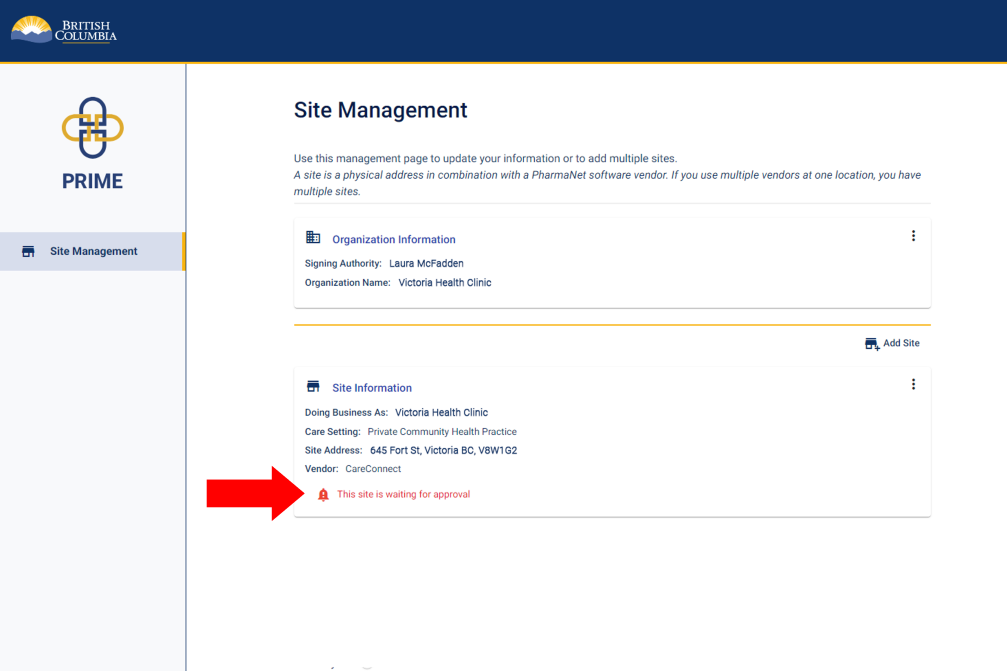
In the Site Management screen, you will see the site that has been added and a note that the site is waiting for approval.
You may now log out of PRIME.
26. PharmaNet software vendor is notified
The PharmaNet software vendor is notified when the site’s PRIME registration is approved and the clinic’s connection to PharmaNet is ready to be set up and activated. Once activated, all PharmaNet users at the site must enrol in PRIME and send their PRIME approval email to the site’s PharmaNet administrator (who is identified in the site registration). Please ensure that your PharmaNet users have the correct email address for the PharmaNet administrator to avoid delays. When the PharmaNet administrator receives a PRIME approval email, they should either:
- Add the requested clinic details and forward the email to the site’s PharmaNet vendor, who then contacts the enrollee when their access credentials are set up; or
- Use the details shown under the link embedded in the approval email to set up the user’s access in the site’s PharmaNet application (if this is arranged with the vendor)
Get support
Questions about PRIME should be directed to 1-844-397-7463 or to PRIMESupport@gov.bc.ca.
If your PharmaNet administrator asks you to resend your approval / GPID, follow the instructions below.
1. PRIME landing page
Click Access Individual Enrolment.
Click Next to acknowledge the Collection of Personal Information notice.
2. Login to PRIME with the BC Services Card app
Select BC Services Card app.
For more information about options for logging in with the BC Services Card app, visit BC Services Card.
3. BC Services Card app: enter pairing code in mobile device
Next steps:
1. Open the BC Services Card app on mobile device and select Enter Pairing Code.
2. Enter the code displayed on the BC Services Card login screen.
3. Click Continue.
4. BC Services Card app: choose to send notification to mobile device instead
Choose whether to send a notification to your mobile device, so that you can skip the pairing step next time you log in.
Click Continue.
5. Share provisioner info
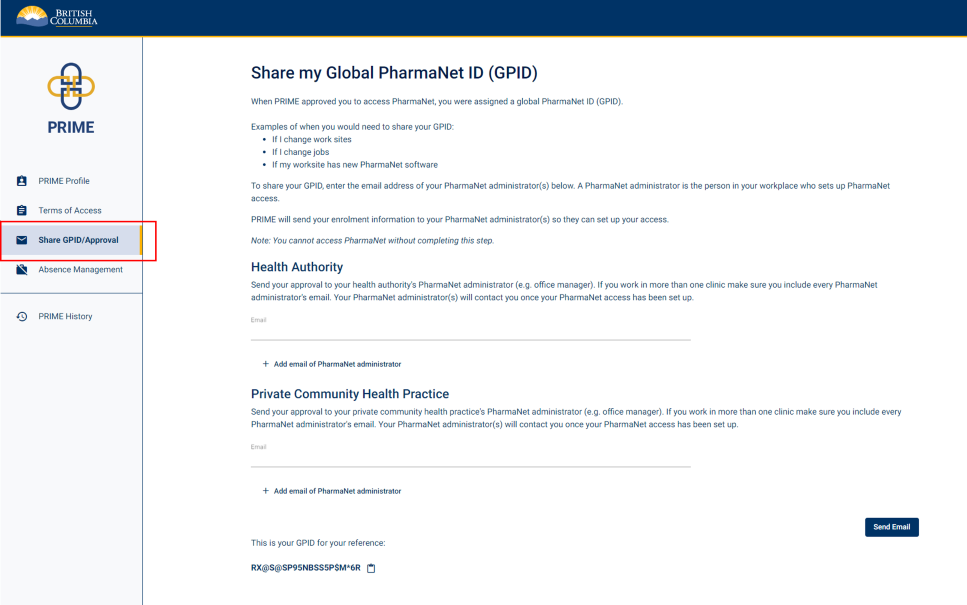
Select Share Provisioner Info from the sidebar.
6. Enter administrator email address and share GPID
Share your approval to access PharmaNet with your PharmaNet administrator.
The PharmaNet administrator is the person who works with the software vendor to set up your PharmaNet access.
Enter the email address of the PharmaNet administrator, then click Send Email.
7. Get support
Questions about PRIME should be directed to 1-844-397-7463 or to PRIMESupport@gov.bc.ca.
You need to renew your PRIME enrolment every year. You will receive email reminders 14, 7, 3, 2, 1 and 0 days prior to your renewal date.
You must also return to PRIME and update your profile if these things change:
- Workplace, care setting, or organization type where you access PharmaNet
- Type of access (e.g., dispensing at a pharmacy, clinical care in a non-dispensing setting)
- Your address, phone #, email, or legal or alternate name
- College licence type or renewal date
To renew or update your profile, go to PRIME and click Access Individual Enrolment. Update your information as needed, and sign the terms of access again.
1. PRIME landing page
Select Individual Access to start.
Click Next to acknowledge the Collection of Personal Information notice.
2. Login to PRIME with the BC Services Card app
Select BC Services Card app.
For more information visit BC Services Card.
3. BC Services Card app: enter pairing code in mobile device
Next steps:
1. Open the BC Services Card app on mobile device and select Enter Pairing Code.
2. Enter the code displayed on the BC Services Card login screen.
3. Click Continue.
4. BC Services Card app: choose to send notification to mobile device instead
Choose whether to send a notification to your mobile device, so that you can skip the pairing step next time you log in.
Click Continue.
5. Review enrolment information (1 of 2)
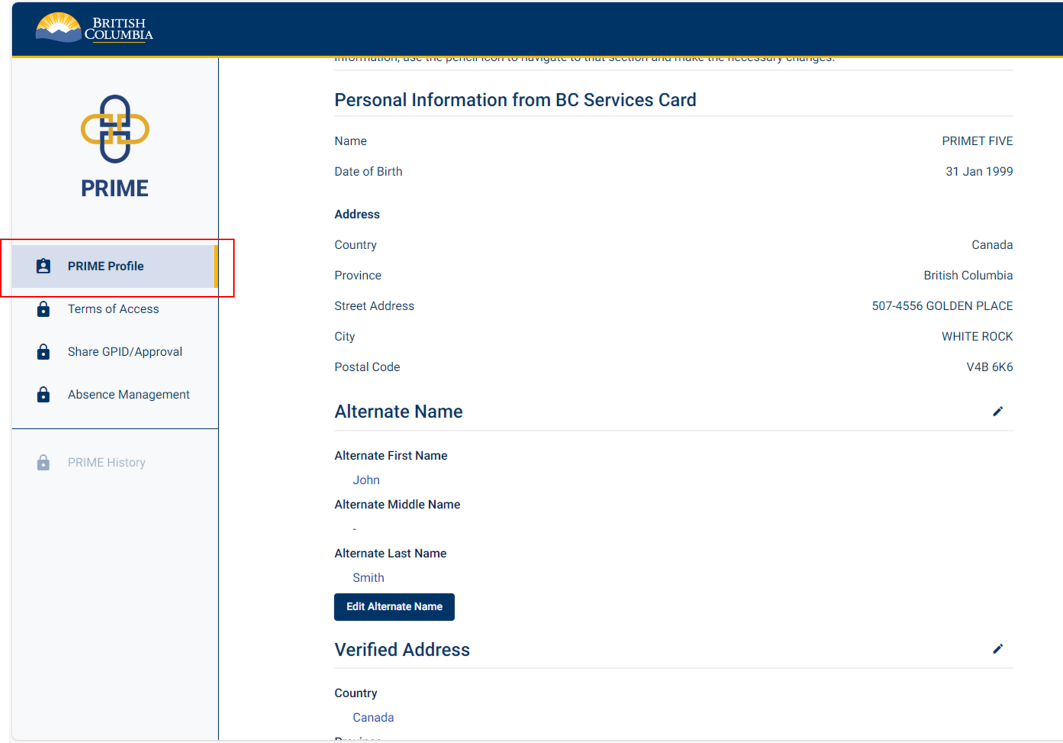
Review your PRIME enrolment information.
Click the edit button or pencil icon to edit the information in any section.
Click continue or save to save changes.
6. Review enrolment information (2 of 2)
Once you have reviewed your enrolment information, click the checkbox to certify that all information is true and complete.
Click Submit Enrolment.
7. Submit enrolment
A pop-up window appears to confirm enrolment submission.
Click Submit Enrolment.
8. Terms of access (1 of 2)
Read the PharmaNet User Terms of Access. These will be specific to the type of access you have been granted. They may be different from when you first enrolled, and may not match the example screenshot on the left.
9. Terms of access (2 of 2)
Check the box beside I have read the PharmaNet User Terms of Access.
Click Accept Terms of Access.
10. Terms of access confirmation
A pop-up window appears.
Confirm by clicking Accept Terms of Access.
11. Resend approval email
If your information has changed, please resend your approval to your PharmaNet administrator.
Enter the email address(es) for your PharmaNet administrator(s).
Your PharmaNet administrator is the person in your workplace who sets up your PharmaNet access. If you will be accessing PharmaNet from various worksites, enter the PharmaNet administrator's email for each one.
PRIME will let them know that you have been approved to access PharmaNet and they will get you connected.
Click Send Email.
12. Send approval notification email to PharmaNet Administrator
A pop-up window appears. Click Send.
13. Confirmation sent
Your enrolment in PRIME is complete. Note your next renewal date. You must renew annually to retain your PharmaNet access.
You will not receive a confirmation email. Do not contact PRIME Support to confirm approval or enrolment.
PRIME has assigned you a Global PharmaNet ID (GPID), which will be attached to all your transactions in PharmaNet. This keeps patient and health professional information secure.
14. Get support
Questions about PRIME should be directed to 1-844-397-7463 or to PRIMESupport@gov.bc.ca.
If you do not require PharmaNet for 90 days or more, you must record the start and end dates of your inactivity under the Absence Management tab in PRIME.
If you need to end your access to PharmaNet, this can be done in PRIME. Be sure to let your PharmaNet administrator know.
1. PRIME landing page
Select Individual Access to start.
Click Next to acknowledge the Collection of Personal Information notice.
2. Login to PRIME with the BC Services Card app
Select BC Services Card app.
For more information visit BC Services Card.
3. BC Services Card app: enter pairing code in mobile device
Next steps:
1. Open the BC Services Card app on mobile device and select Enter Pairing Code.
2. Enter the code displayed on the BC Services Card login screen.
3. Click Continue.
4. BC Services Card app: choose to send notification to mobile device instead
Choose whether to send a notification to your mobile device, so that you can skip the pairing step next time you log in.
Click Continue.
5. Select the Absence Management tab
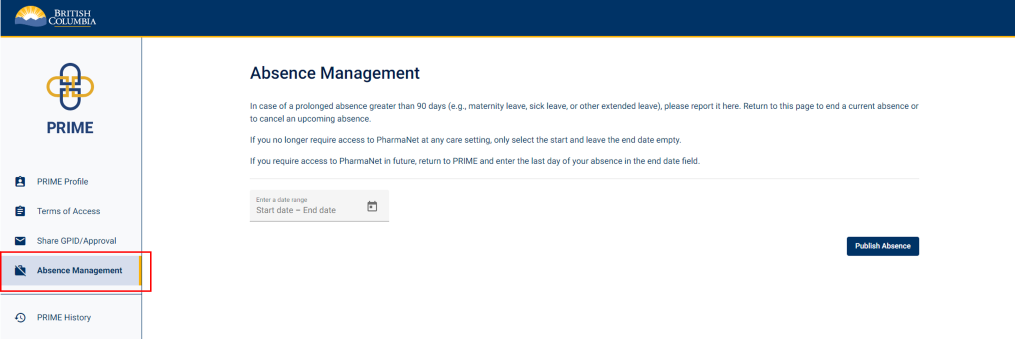
Select Absence Management from the left sidebar.
6. Enter absence dates (1 of 2)
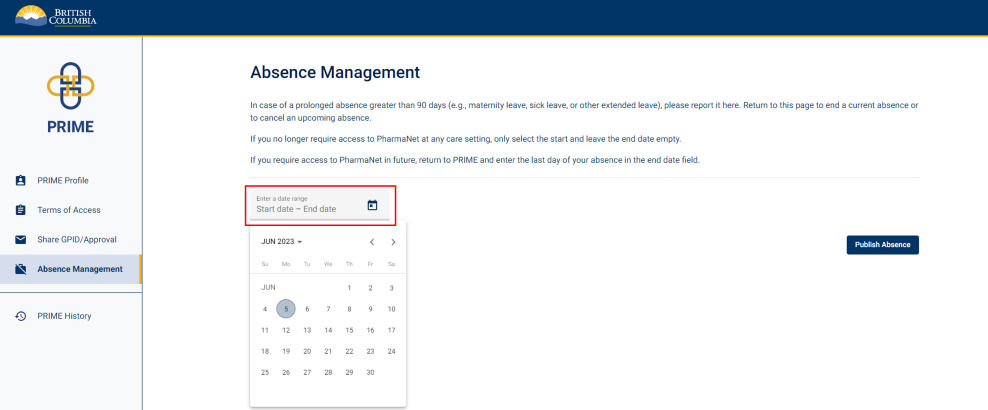
Click the calendar icon to open the pop-up calendar.
Select the start date of your absence.
7. Enter absence dates (2 of 2)
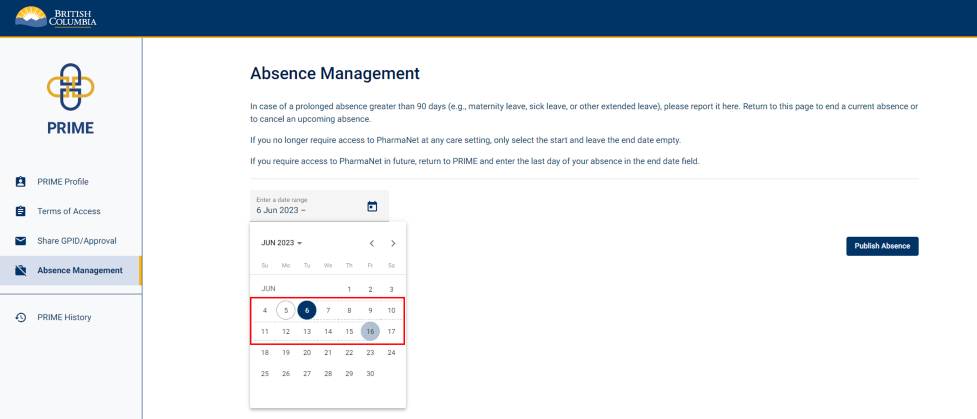
Select the end date of your absence.
If you no longer require access to PharmaNet or do not know when you will need access in the future, leave the end date blank.
8. Publish absence
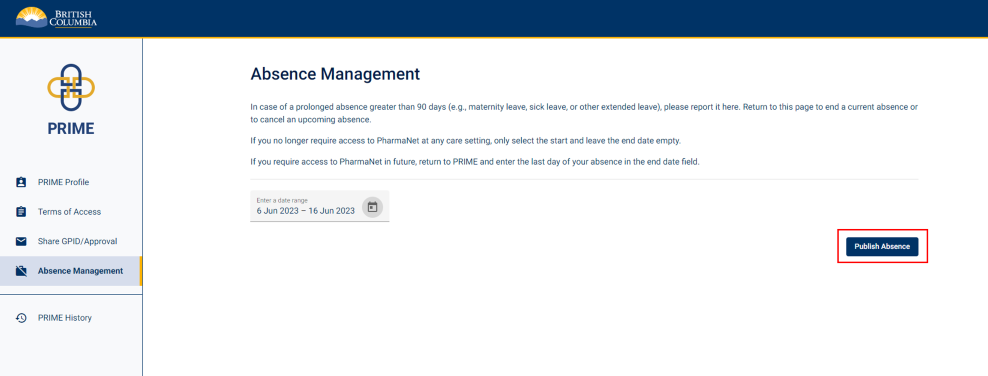
Click Publish Absence to submit your absence.
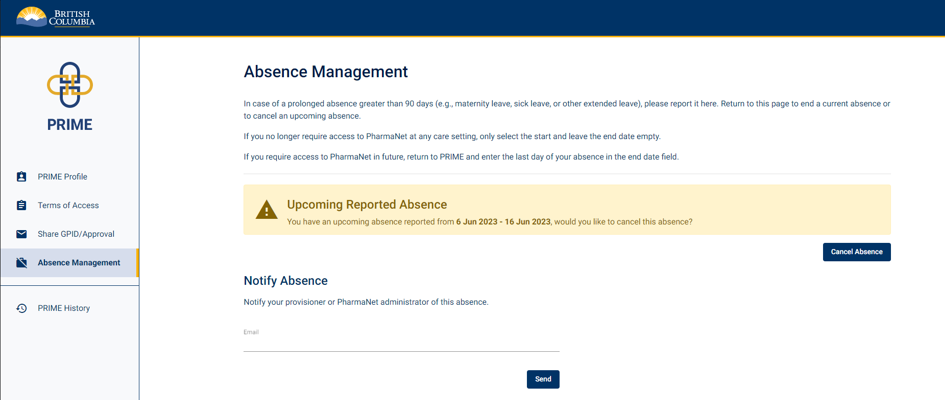
Your absence has now been published. A banner displaying your upcoming absence will appear on the screen.
If you entered an end date, you do not need to do anything when you return from your absence.
If you did not enter an end date, you must return to this page to enter one when you return from your absence.
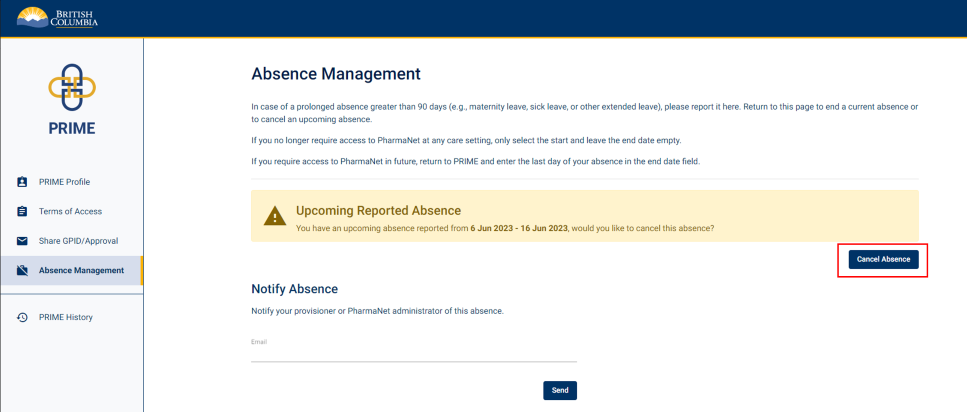
9. Edit or cancel absence
If your absence dates change, you need to enter an end date, or you will no longer be away, return to this screen.
To cancel your absence, click the Cancel Absence button and your absence will be removed from the system.
To edit your absence dates, click the Cancel Absence button, then follow the steps 6-8 to recreate it with the correct dates.
10. Get support
Questions about PRIME should be directed to 1-844-397-7463 or to PRIMESupport@gov.bc.ca.
For definition of a site and explanation of roles (signing authority, privacy officer, etc.), refer to the PRIME site registration quick guide (PDF, 175 KB).
1. Private community health practice site registration for PharmaNet access: landing page
Select Site Registration to start.
The person registering the site ("signing authority" in PRIME) should have:
- BC Services Card app set up on a mobile device.
2. Collection of Personal Information Notice
Click Next to acknowledge the Collection of Personal Information Notice.
3. Log in with the BC Services Card app
Select BC Services Card app.
For more information about logging in with a BC Services Card, visit: BC Services Card.
4. BC Services Card login: enter pairing code in mobile device
- Open the BC Services Card app on a mobile device
- Enter the code displayed on the BC Services Card login screen in the pairing code field.
- Select Continue.
PRIME will proceed to the next screen.
5. BC Services Card login: choose to send notification to mobile device instead
Choose whether to have a notification sent to a mobile device instead of entering a pairing code so you can skip the pairing step in subsequent logins.
Click Continue.
6. BC Services Card information shared with PRIME
This screen displays the information that is shared between the Signing Authority's BC Services Card and PRIME.
Click Continue.
7. Add new site
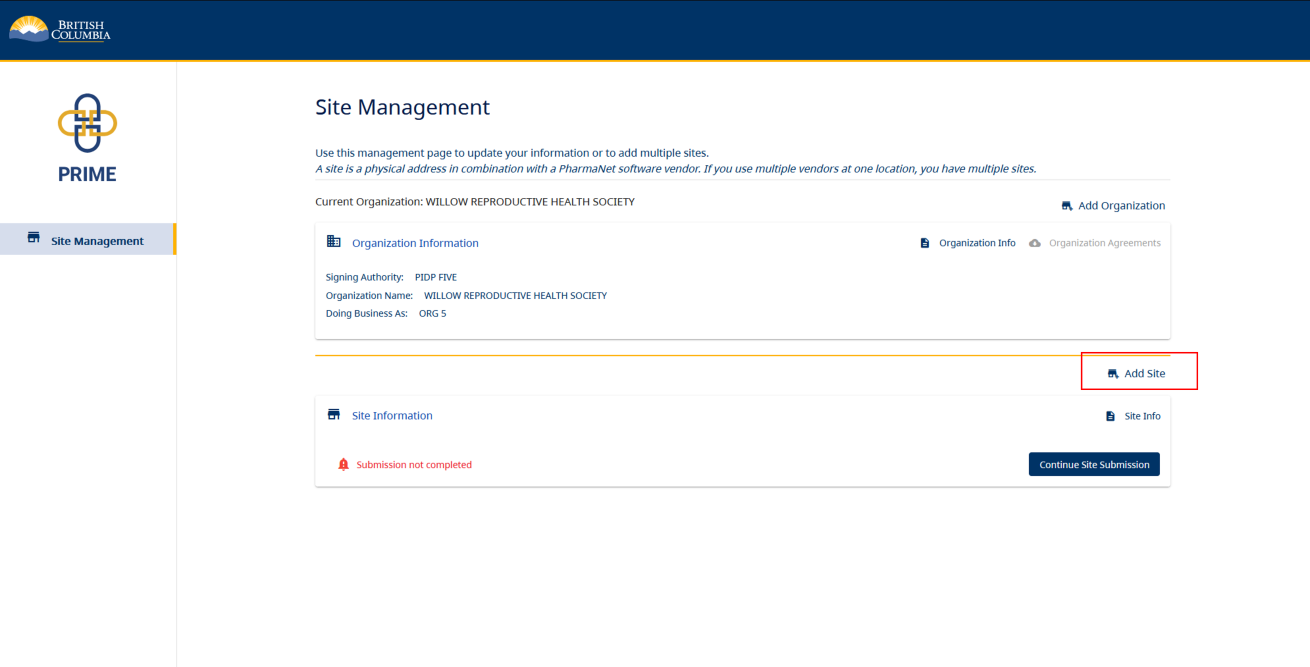
On the Site Management landing page, click Add Site.
8. Care setting
Select the type of care setting and the software vendor the site uses.
Visit Community health practice access to PharmaNet for software vendor contact info.
Click Save and Continue.
9. Site details (1 of 2)
Scan and upload a copy of the site's business licence.
Provide the business licence's expiry date.
If you do not have a business license yet, click the I don't have a business licence toggle, and enter a reason in the text box that appears below.
If you are located in a municipality or region that does not issue business licenses, please upload a screenshot of the municipality website indicating that a business license is not issued.
10. Site details (2 of 2)
Enter the site name. Please enter a site name even if it is the same as the name of the organization.
If the organization does business under a different name than is on the licence, you must provide a "doing business as" name.
Provide the site ID or PEC code if you know it. If you are registering a new site using a different software vendor, do not enter your old site registration ID; a new PharmaNet site ID will be provided to your new vendor.
Enter the site's address as it appears on the business licence. The rest of the address is auto-populated.
Click Save and Continue.
11. Hours of operation
Specify the days and times the site is open for business.
Don’t select 24 hours unless your site is open to patients 24 hours/day.
Click Save and Continue.
12. Practitioners requiring remote PharmaNet access
If applicable, list all practitioners requiring remote access to PharmaNet for the site.
Note: Remote access is only available to physicians and nurse practitioners.
If not applicable, click Save and Continue.
13. PharmaNet administrator information
The next three steps will require you to enter information for three different functions. One person can perform all three of these functions.
If all three roles are performed by one person at your site, click the Same as button to auto-populate the information for each subsequent role.
If each role is performed by a different person, enter their information as requested on each screen.
Enter the PharmaNet administrator's name, job title, and contact information.
Click Save and Continue.
14. Privacy officer information
Enter the privacy officer's name, job title, and contact information.
Click Save and Continue.
15. Technical support contact information
Enter the technical support's name, job title, and contact information.
Click Save and Continue.
16. Review and accept Organization Agreement for PharmaNet Use (1 of 3)
If you are legally authorized to accept on behalf of your organization, and your organization allows signing online agreements, click I can accept online agreements.
If you cannot accept online agreements, proceed to Step 18.
Scroll down to read the Organization Agreement for PharmaNet Use.
17. Review and accept Organization Agreement for PharmaNet Use (2 of 3)
Click the checkbox to agree to the Organization Agreement for PharmaNet Use as the organization's authorized representative
Click Accept Organization Agreement.
18. Review and accept Organization Agreement for PharmaNet Use (3 of 3)
A pop-up window appears to confirm acceptance of the Organization Agreement.
Click Accept Organization Agreement.
19. Organization Agreement for PharmaNet Use (if you are not able to accept online agreements) (1 of 2)
If the organization has signing requirements that prevent you from signing an online agreement, download a copy of the organization agreement by clicking the Download Agreement button.
Print a copy of the agreement, sign it by hand, and upload it back to PRIME.
Click Accept Organization Agreement.
20. Organization Agreement for PharmaNet Use (if you are not able to accept online agreements) (2 of 2)
A pop-up window appears to confirm acceptance of the Organization Agreement.
Click Accept Organization Agreement.
21. Site registration review (1 of 3)
Review the information provided in the registration.
Click the pencil icon to edit any section.
22. Site registration review (2 of 3)
Check the box to certify that all information provided is true and complete.
Click Submit.
23. Site registration review (3 of 3)
A pop-up window appears to confirm the registration submission.
Click Save Site.
24. Site registration submitted
You will see confirmation of your acceptance of the Organization Agreement for PharmaNet Use.
This means the submission is under review by the Ministry, and the Signing Authority will be contacted once the application has been reviewed.
Click Continue.
25. Site management—waiting for approval
In the Site Management screen, you will see the site that has been added and a note that the site is waiting for approval.
You may now log out of PRIME.
26. PharmaNet software vendor is notified
The PharmaNet software vendor is notified when the site’s PRIME registration is approved and the clinic’s connection to PharmaNet is ready to be set up and activated. Once activated, all PharmaNet users at the site must enrol in PRIME and send their PRIME approval email to the site’s PharmaNet administrator (who is identified in the site registration). Please ensure that your PharmaNet users have the correct email address for the PharmaNet administrator to avoid delays. When the PharmaNet administrator receives a PRIME approval email, they should either:
- Add the requested clinic details and forward the email to the site’s PharmaNet vendor, who then contacts the enrollee when their access credentials are set up; or
- Use the details shown under the link embedded in the approval email to set up the user’s access in the site’s PharmaNet application (if this is arranged with the vendor)
Get support
Questions about PRIME should be directed to 1-844-397-7463 or to PRIMESupport@gov.bc.ca.
Short-term emergency access to PharmaNet
There will be cases where a health professional urgently needs access to PharmaNet and is not enrolled in PRIME. If you receive a request for emergency access to PharmaNet, first confirm that there are no PRIME-enrolled PharmaNet users at the location or all are unavailable. If either is the case, contact Health Insurance BC (HIBC) at 1-844-397-7463.